Online enrollment
Via the Member Portal, new and/or existing members can enroll in activities in the association. This can be new members signing up, or existing members enrolling in an event or team training session.
Membership for new members
If you want to open up enrollment for new members, do the following:
Choose “Activities -> Create new activity”.
In the “Type” field, choose “Membership”.
In the “Price type” field, choose for example “Fixed amount” and enter the amount.
In the “Activity name” field, enter for example “Enrollment” or “Annual membership”, or whatever the membership should be called.
The department field is not so important — it is mostly used to structure activities into different groups.
Click “Create activity” at the bottom right.
A range of different options is now shown. Not all of them are covered here — only those related to payment. If you have card payment or MobilePay integrated payment set up, for example, you can tick the relevant options at the bottom of the page in the box named “Invoicing / Billing”, so the member must pay as part of enrollment. At the bottom right of the page you can update any changes you have made.
At the top of the page there is an enrollment link, and you can place this enrollment link on your own website (unless you use our website module), so members can enroll via a link from your own website.
If you have several different types of memberships, simply repeat the above. It is often useful to start by creating the first membership, and then use the “Copy activity” function, where you typically only change the name and price of the membership.
Note
If you want to set up court booking or room booking, you must use Booking.
Members can also edit their own master data and more. This is done via Member Portal.
An enrollment can be combined with payment (for example Dankort), so the member pays for the enrollment immediately and cannot enroll without paying.
Enrollment can for example be used for the following:
- Enrollment of new members
New members who purchase for example an annual or semi-annual membership in the association.
- Enrollment in events
Existing members who enroll in for example a general assembly or an end-of-season party.
- Subscribe and unsubscribe for team training
Existing members who for example enroll in weekly teams where advance enrollment is required. This can for example be indoor bike, yoga, or similar, where there is a limited number of places.
- Sale of for example club kit, clothing, or other products
Simple sale of for example clothing to the club’s members. Emphasis on simple, as there is no stock management or similar built into the system. But for selling a few items to the club’s members, the system can handle it well.
The association can set up an unlimited number of different enrollments.
Configuration options
You can configure online enrollment in many different ways so it fits a range of different situations. The following can be configured (depending on activity type):
- Enrollment opens
You can specify a date and time for when online enrollment should open. If you are for example a gymnastics association with some very popular teams, this can be used to implement a “first come, first served” principle. It can be combined with Dankort payment, so the association is sure to have received payment from the enrolled participants on the team.
- Event date
Date and time for when the activity takes place. When the time passes, the activity is automatically removed from the list of activities that can be enrolled in online.
- Payment method
You can choose that the member must pay immediately via for example Dankort or PayPal. You can also choose to send an invoice manually after the member has enrolled.
- Enrollment fee
You can choose that new members must pay an enrollment fee, which will be added on top of the price the membership/subscription is set to cost. Only new members will be charged the extra fee, and it will not appear on subsequent invoices sent to the member from the system.
- Multichoice
If you use multichoice on an activity (for example of type event), the system can create an invoice based on the choice options the member has selected. This means you can for example specify more than one line on the invoice, and in that way itemize exactly what the member has chosen and is paying for. You also have the option to make some items optional for the member, or allow the member to specify for example quantity or write a text that will subsequently appear on the invoice and be included in a combined enrollment report that the association can pull as needed. With conditional display, a line can also be shown only when the member has selected a specific value in a dropdown line above — see the section below. If members must enroll multiple identical units with tiered pricing in a single enrollment (for example several persons for the same event), you can use repeatable unit block — see the section below under Multichoice.
- User
If several users administer the association, you can configure each enrollment (i.e. activity) to notify a specific person in the association when a member completes an enrollment. This is especially suitable for multi-sport associations, or associations that have for example a youth department and a senior department managed by different people.
- Who
This configuration makes it possible to limit who may enroll. You can choose between the following:
Both new and existing members
New members only
Existing members only
- Member data
You decide yourself which member information a person must provide at enrollment. Typically a person only needs to provide member information at enrollment, while existing members simply enter for example email address or member number, so the system knows which member is enrolling. When enrolling new members, the association decides which member information the person must provide during enrollment. You can have several different enrollment forms and vary the fields the person must fill in — as well as the price.
- Maximum participants
The number of participants can be limited to a fixed number. Especially suitable for teams with a fixed size. When the maximum number of participants is reached, it will no longer be possible to make further enrollments for the activity.
- Approval required
If approval is required, a member will only be enrolled in the activity once someone from the club has approved the enrollment.
- Text template
If a text template is linked to the enrollment, an email will be sent to the member when the enrollment is completed, with the content of the text template. You can for example create a “Welcome to the association” text template for new members, and it is possible to merge member information into the text, so you can for example begin with “Hello Hans Hansen! Welcome to the association…”
- Registration type
Can for example be “Subscribe” or “Subscribe & Unsubscribe”, among others. Read more below in the section “Registration types”.
- Donation
Used to give the member the option to specify an optional amount donated to the association. This function only works with Dankort.
The configuration options above give the association ample opportunity to adapt enrollment to the association’s needs. In addition to the configuration options above, the association can attach up to ten optional texts that will be visible in connection with enrollment. These texts can be used for detailed information about the activity, the event, etc.
Registration types
There are different registration types in the system. They are as follows:
- Subscribe
Normal enrollment, where members cannot unsubscribe.
- Subscribe & Unsubscribe
Normal enrollment, but where members can also unsubscribe again. You will be able to see who has unsubscribed.
- Selection
Here the person responsible for the activity chooses who should be able to enroll.
- At disposal
Members make themselves available, and later the person responsible for the activity selects among those who have made themselves available. The responsible person can for example be an instructor, team leader, local manager, or similar.
- No enrollments
Members cannot enroll in this activity. It can be used if you want to make an activity visible in for example the calendar.
Creating an enrollment
To get enrollments on the association’s website, you must do the following:
Make the activity/activities visible for enrollment
Integrate the Member Portal on the association’s website
The following sections go through each point.
Make activity visible
By default, most types of activities created in the system are visible in the Member Portal. The exception is the activity type group.
So when you create a new activity of for example type membership, it will be available in the Member Portal afterwards.
When you create a new activity, optionally adjust enrollment regarding opening date, maximum number of participants, payment method, etc.
Integrate with the association’s website
As soon as one or more activities are made visible in the Member Portal, you can open the Member Portal via the menu item “Member Portal -> Show member portal”. A new tab/window opens, and the web address from the new tab/window can now be copied and pasted in a suitable place on the association’s website. Read more about the option to insert a link to the Member Portal here: Integration with website.
Mid-period enrollment
If the enrollment concerns enrollment of new members, the activity can be set up to automatically adjust the price, so the member for example only pays half if the member enrolls midway through a period.
- Example 1
A membership costs 500 DKK per year, and the membership is set up to renew on 1 January each year. A new member enrolls around 1 July, and therefore pays approximately 250 DKK, as the activity is set up to adjust the price continuously.
- Example 2
A membership costs 150 DKK per month, and renews on the 1st of each month. A new member enrolls for example on the 10th of the month, and only pays for the remaining days of the month, which will be 20–21 depending on the number of days in the month. The system automatically adjusts the price every day.
Setting up continuous price adjustment is done on the individual activities (which must be of type membership), under the item “Price for new members”. The item is only shown if a renewal policy has been chosen for the activity.
Variant: Fixed cut-off dates
It is also possible to have the system adjust the price on specific dates. Here you must choose the price type called “Based on cut-off dates”, and then you can for example enter the following:
01-01: 500, 01-07: 250
This means the following: From 1 January it costs 500 DKK, and from 1 July it costs 250 DKK.
The advantage of this model is that you do not have to remember to change the price yourself for example twice a year, but the system does it automatically.
The price type is changed on the activity via “Activities -> Activity list” and then go to “Choose action” on the right and choose “Edit type, price & department”.
Automatic waiting list management
If you have popular teams, you can save many hours of work by letting the system handle the entire waiting list process. The system can be set up to activate a waiting list as soon as a team is full, and when/if a place subsequently becomes available on the team, the system can automatically send an offer of a place on the team to the first person on the waiting list.
This person can then choose to accept the offer within a deadline you decide — and you can choose to require Dankort payment before the offer is accepted. If the person does not accept the offer before the deadline expires, the system automatically sends the offer on to the next person on the waiting list. This process continues until the team is full again, or the waiting list is empty.
You can of course also choose to manage allocation of available places to those on the waiting list yourself.
The system can also be set up to automatically move a person from the waiting list onto the team when there is a cancellation. The person who gets the place then automatically receives an email and/or SMS about this. This is especially suitable for team training with limited and popular places.
Setting up waiting lists
If you want to use waiting lists and the automation the system offers around this, go to “Activities -> Activity list” and choose “Edit settings” for the activity on which you want to activate the waiting list.
Here you must do the following:
Enter the number of people in “Maximum participants”.
Tick “Activate waiting list”.
Enter the number of people in “Maximum waiting list size”.
Choose what should happen when a place becomes available in “Action performed when place becomes available”.
In addition, go to “Configuration -> Member Portal -> Waiting list” and specify the number of hours a person has to accept an offer of a place. If you want to give for example 3 days to consider, enter 72, as 72 hours equals 3 days. The number of hours should of course only be set up if you use the function that sends offers that must be accepted. This is typically used at season start for popular teams.
Multichoice: Enrollment with multiple choices
If you are holding a larger event, you can advantageously use the system’s enrollment function for this purpose.
Create an activity of type event and price type “multichoice”. This gives you the option to create a very flexible enrollment, as multichoice opens up for the member to make some choices during enrollment. For example specifying how many guests the member is bringing to the event, or the size of a T-shirt (with individual price specified for each T-shirt size) ordered for the event. It can also be the number of overnight stays and who you optionally wish to stay with. The possibilities are many.
Setting up choice options
Setting up choice options for an event is done as follows:
Choose “Activities -> Create new activity”.
In type, choose event.
In price type, choose multichoice. Later you will have the option to set up choice options.
Give the event a name and click “Create activity”.
The activity details are now shown, and click “Multichoice setup”, which is shown at the top just below “Price type”.
You can now add lines (choice options) via the blue “Create new line” button:
Name: The name of the line, which the person sees at enrollment.
Type: Here the line can be changed to a dropdown (list field) or a free-text field. A dropdown gives the member the option to choose from a list that the association defines itself — for example the size of a T-shirt.
An example could be the following: XS, S, M, L, XL, XXL This will show a dropdown where the member can choose between different sizes — this could for example concern a T-shirt.
Another example could be the following: XS[75], S[100], M[125], L[125], XL[150], XXL[175] This will show a dropdown where the member can choose between different sizes, and for each choice an individual price is set in square brackets. If the member chooses S (small), the member will be charged 100 DKK.
Can change quantity: By ticking here, the member can choose quantity during enrollment. Can for example be used for enrollment in an event where the member registers x number of people.
Count as participants: By ticking here, the quantity specified on the enrollment is used in the total count of how many participants there are for an activity. So if a member for example registers 5 people for an event, this one enrollment counts as 5 participants (the member is one of the 5 participants), and this will appear in the number of available places in online enrollment. However, a minimum of one participant will always be counted — even if 0 is specified in number of participants. This is assumed to be the member themselves as participant.
Optional line: By ticking here, the member can opt out of this line during enrollment.
Show to: Can be used to give different prices to members and non-members respectively. If a line for example is only shown to members and the line is set to cost 100 DKK, and you create another line that is only shown to non-members, and the line is set to cost 150 DKK, you can in that way give different prices to members and non-members.
Choice required (dropdown only): When enabled, the member must actively choose in the dropdown. The first option is “– Please choose –”, and the member cannot continue the enrollment without making a choice.
Conditional display: Can be used on a line that comes immediately after a dropdown line. The line is only shown during enrollment when the member has selected a specific value in the dropdown line above. The dropdown line must be placed directly above the line that should be shown conditionally.
Conditional display (example)
With conditional display you can show extra lines only when the member has made a specific choice in a dropdown line above. This is useful when you only need information in some cases.
Example — food allergies:
Line 1 — Name: Do you have food allergies?, Type: dropdown, Dropdown options: No, Yes
Line 2 — Name: Describe your allergies, Type: input field, Conditional display: Show only when line 1 has the value Yes
During enrollment the member first chooses Yes or No. If the member chooses No, line 2 stays hidden. If the member chooses Yes, line 2 is shown where the member can describe their allergies.
Use Trial preview to verify that conditional lines are shown and hidden as expected.
When you are finished setting up the various lines, click “Save line”.
You can see how the complete enrollment looks by clicking the blue “Trial preview” button.
To test the enrollment “for real” you can go to the Member Portal (menu item “Member Portal -> Show member portal”) and try to enroll in the event. Then you can also test any payment and automatic email texts.
Repeatable unit block
Repeatable unit block is an extension of multichoice, used when a member must enroll multiple identical units in one enrollment — and when the price depends on how many units are enrolled (tiered pricing).
When repeatable unit block is enabled, it replaces the regular multichoice enrollment in the Member Portal. Multichoice lines on the setup page can still be used as shared add-ons (for example base fee, license, or other choices) that are shown and included together with the unit block.
Setup
Create an activity of type event with price type multichoice and link an invoice template as for regular multichoice.
Go to Multichoice setup for the activity.
Click the Repeatable unit block button.
Tick Enable repeatable unit block for this activity.
Complete the setup and click Save repeatable unit block.
Setup fields
Name (singular / plural): What one unit is called in the enrollment, for example Person / Persons.
Maximum per enrollment: How many units the member can enroll at most in one go (1–20).
Tiered pricing: Price for the first unit and additional units each. The system automatically creates invoice lines for the first unit and any extra units.
Fields per unit: Up to 6 fields that are repeated for each unit the member enrolls. Field names can be up to 20 characters. Fields can be text, dropdown (comma-separated options), or yes/no (checkbox). Fields can be marked as required.
Count as participants: If enabled, the number of enrolled units counts toward the activity’s participant total (together with any multichoice lines that also count as participants).
Account / VAT: As with multichoice lines, you can choose chart of accounts and VAT for the unit block price lines.
Member enrollment
The member first chooses the number of units. For each unit, the fields defined by the association are shown. The price is updated continuously with tiered pricing and any shared multichoice add-ons.
Information for each unit is stored on the invoice as a detail line (for example Person 1: Name: …, Difficulty: …). The combined text per line must not exceed 250 characters; the member cannot continue the enrollment if the limit is exceeded. Use short field names and keep answers reasonably concise.
Reports and export
As with regular multichoice, the Enrollment report is available from the activity’s participant list. Under More options you can among other things export Enrollment per unit to Excel, which gives one row per unit per enrollment with the member’s answers in separate columns.
Preview
On the repeatable unit block page, Trial preview lets you see the enrollment before it is activated. For full testing with payment and email texts, use the Member Portal as for regular multichoice.
Enrollment report
When all enrollments are in, you can — if an invoice template is linked — pull an enrollment report, where you can see a summary of the enrollments and choices members have made. This gives you a good overview for the further process around planning the event.
The enrollment report is found under “Activities -> Activity list”. Then choose “Show participant list” on the right for the activity in question, and then click “Enrollment report”.
Team training with enrollment
If you offer team training with enrollment and unsubscription for each training session, the system can be set up to handle this. It is used for example for the following:
Cycling teams (bike)
Fitness teams
All types of teams that require subscribe and unsubscribe
The system supports the following options:
Easy copying of teams, so you for example only create the first team and then have the system copy the team forward for the next for example 3 months, where the system then changes the dates automatically.
Overview / Team schedule of teams with enrollment is updated automatically on the Member Portal and in the app.
Option to enroll on a waiting list for full teams.
Automatic sending of offer of place on team to members on the waiting list when/if a place becomes available on a team.
Check-in screen where members register their own attendance on the day (you must set up for example a tablet or similar at the entrance yourself).
Option to set up fines, if members do not show up without having cancelled.
Members can subscribe and unsubscribe from teams themselves via the Member Portal and/or the app.
Overview / Team schedule
Below is an example of a team schedule that can be placed on your own website and/or made visible in the Member Portal. The team schedule is updated automatically as teams are created. Available places are also updated automatically as members subscribe and unsubscribe from teams.
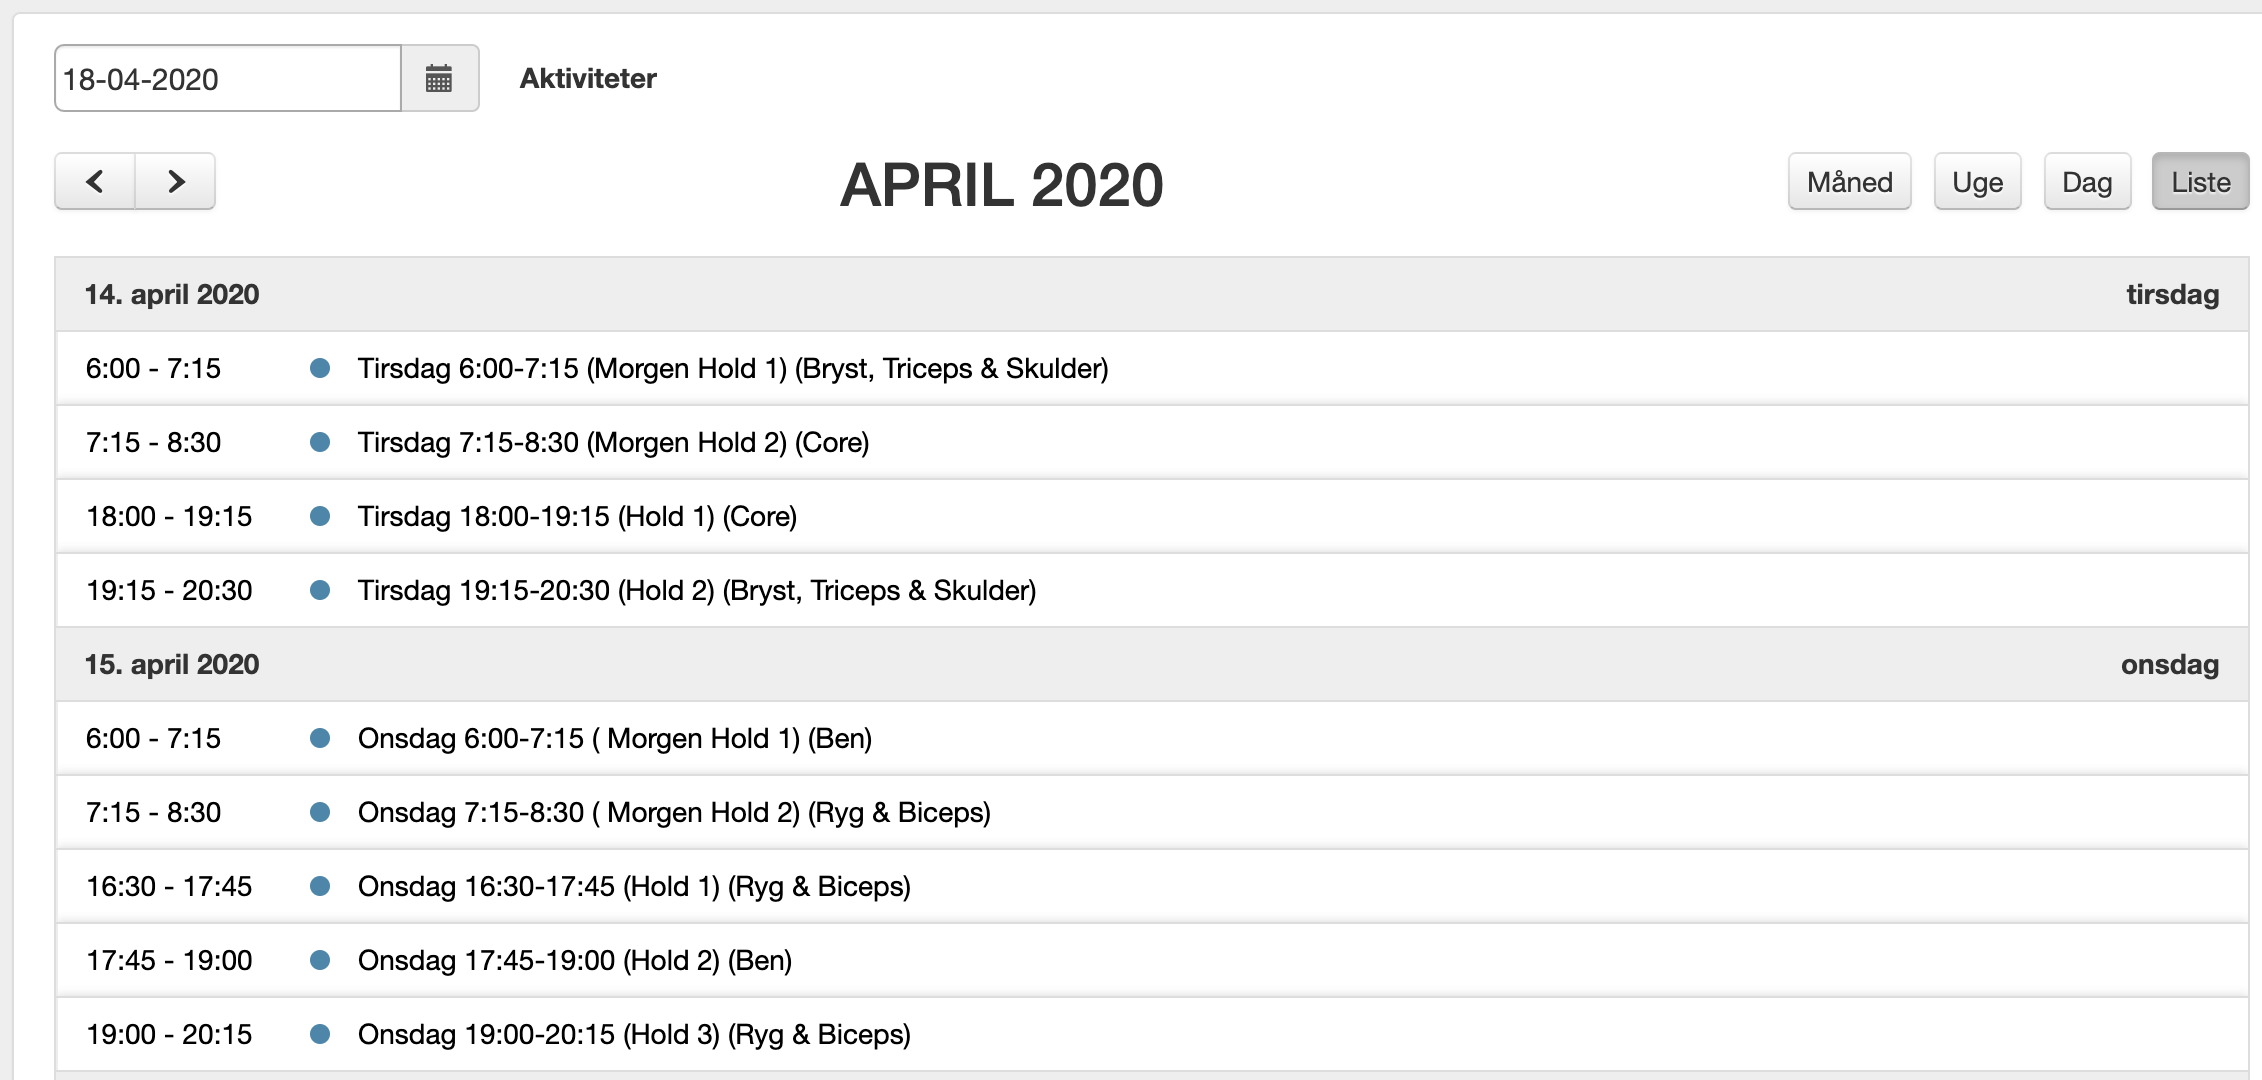
The team schedule becomes automatically visible in the Member Portal as soon as you create teams with specific event dates.
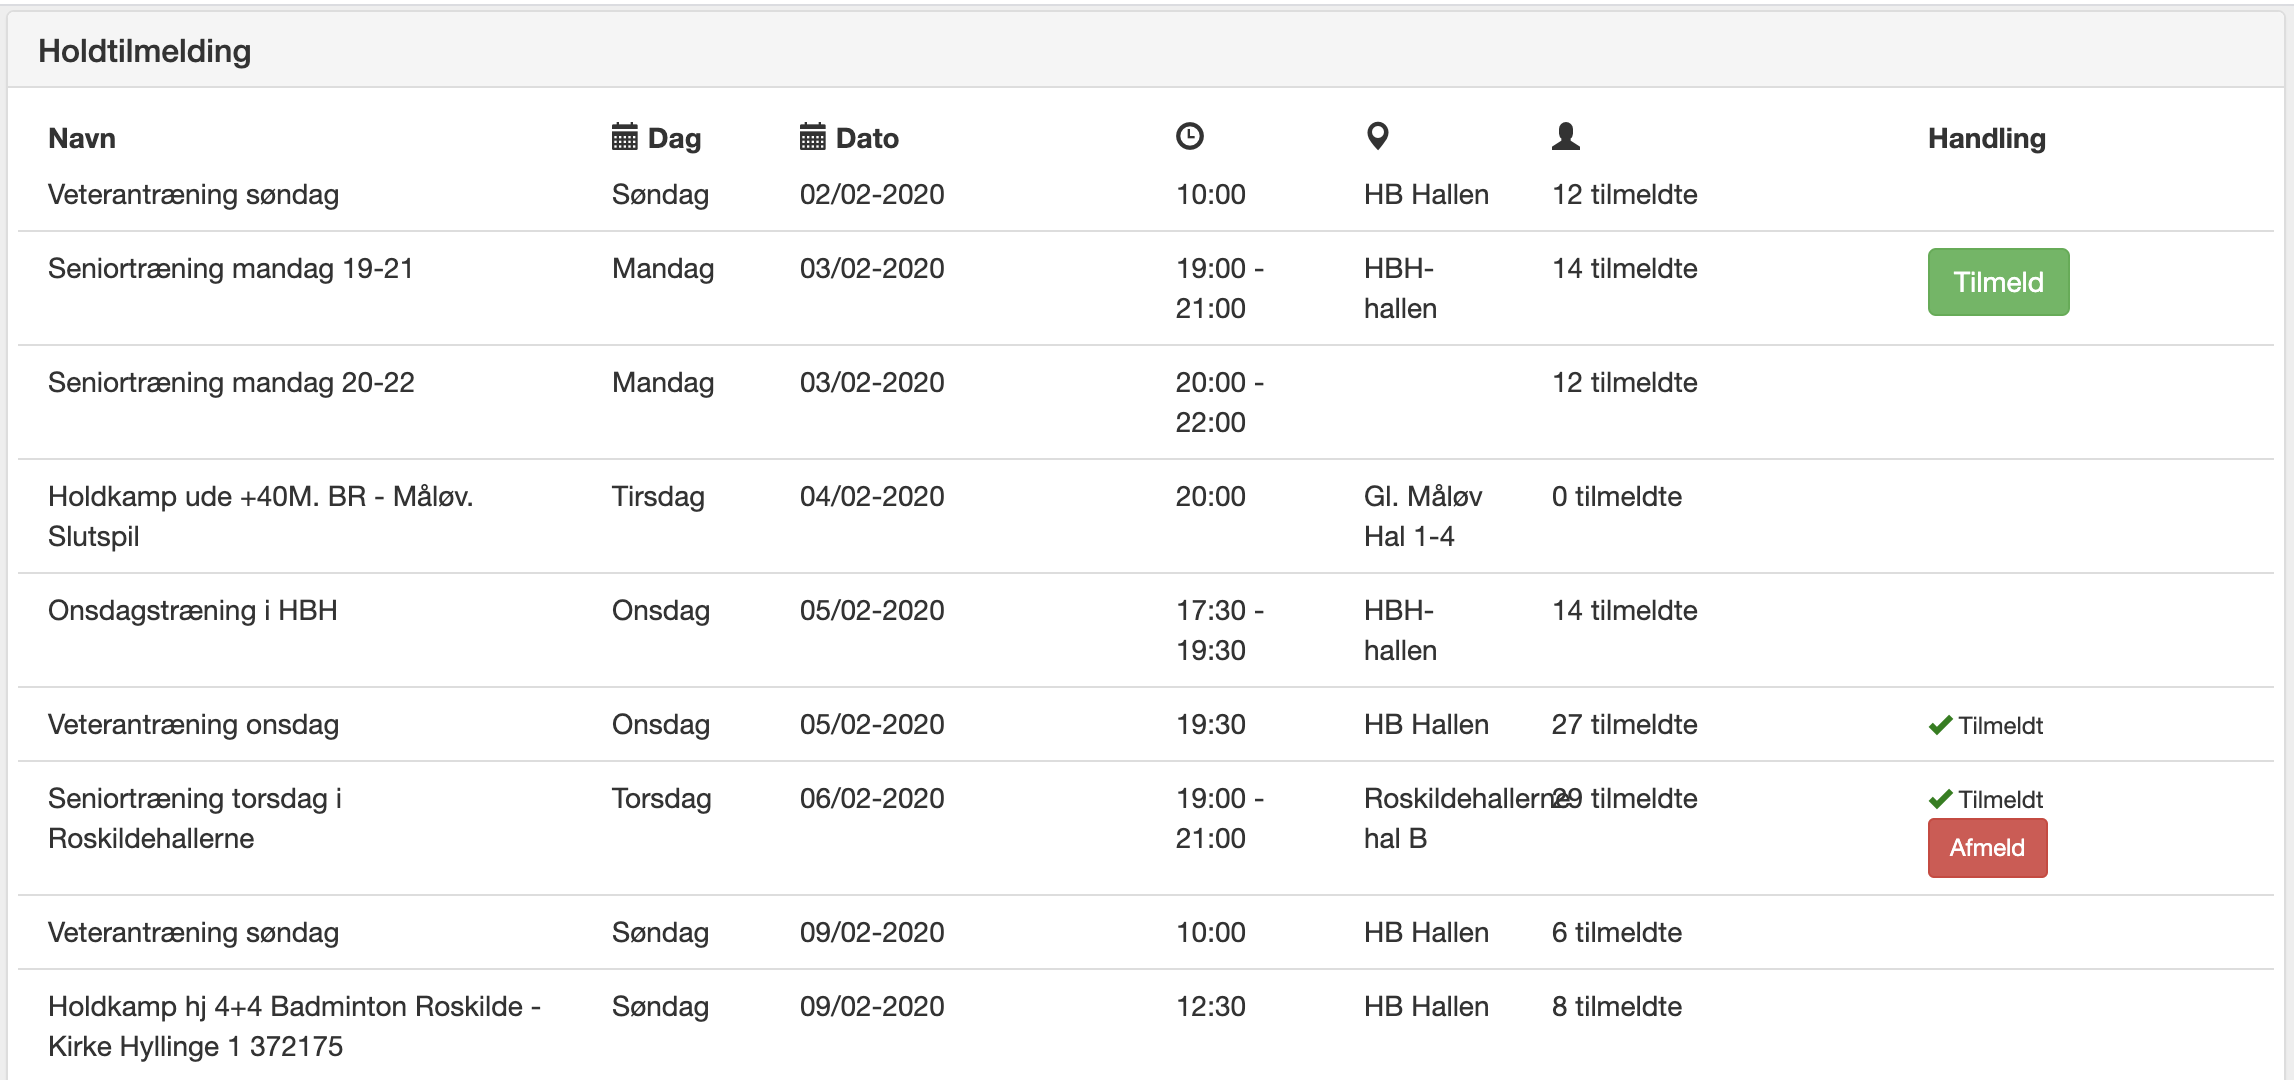
Here is another screenshot from team training, as seen by members in the Member Portal:
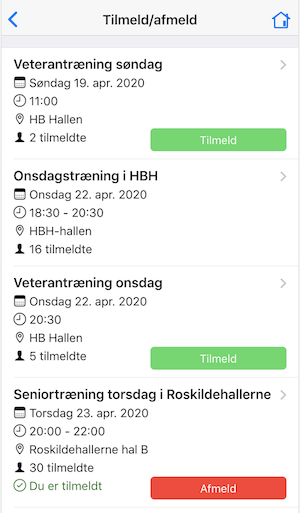
Here is a screenshot of team training as it looks in the app:
How to set it up
Enrollment and unsubscription for team training can be set up in two places in the system:
- From the administration part of the system
Typically used if one person — or very few — should manage everything.
- From the Member Portal
Typically used if there are several different instructors or departments, each of which should be able to create team training sessions that different member groups can enroll in, and where members in the different departments should not be able to see each other’s team training sessions.
Setting up team training from the administration part of the system
Use this approach if one person (or very few) creates and maintains all team training sessions.
- Add new team training
Choose “Activities -> Create new activity”.
In “Type”, choose “Team training”.
Enter the name of the team and choose department and click “Create activity”.
Activity settings are now shown and the relevant items are filled in here.
An important item in team training is “Repeat activity”. If this is ticked, the team can easily be copied forward in time, so you do not have to create all teams week by week manually.
Click “Save activity & create copies” at the bottom right.
Done. Repeat the process for any other team training sessions members should be able to enroll in.
- Extending existing team training sessions
Choose “Activities -> Activity list”. Click “Edit settings” on the right in “Choose action” next to the last team training session.
Tick “Repeat activity” and specify how far forward in time the team should be copied.
Click “Save activity & create copies” at the bottom right.
Done. Repeat the process for any other team training sessions that should be copied forward in time.
Setting up team training from the Member Portal
Use this approach if there are several different instructors or departments, each of which should be able to create teams that different member groups can enroll in. The advantage of this setup is also that you can create “clubs within the club”, so that one member group does not see what another member group sees — and vice versa.
- Give instructors access in the Member Portal
In the administration part of the system, choose “Configuration -> Member Portal -> Choose modules”.
Tick “Member list for instructors”.
Click “Save module selection”.
Click “Continue”.
Open the “Member Portal” menu on the left and click “Areas & access”.
Click “Create area”. An area corresponds to the part of the association an instructor should have access to.
Give the area a name and now choose — very importantly — which activities and/or member reports, this area should consist of. You must therefore have structured members in some activities and/or member reports before the area can be created.
Now find the instructor from the member list who should have access to this area. If the instructor is not created, create the instructor via “Members -> Create new member”.
On the instructor’s details, choose the “Actions” tab.
Then click “Show permissions”.
Click “Edit” next to the area the instructor should have access to.
- Choose which functions the instructor should be able to perform:
Access to members in area
Can create activities
Can communicate via email & SMS
Other functions in team training
- Check-in setup
Click your association’s name at the top left.
Tick the add-on module “Access control”.
Click “Save” at the bottom of the page.
Click “Configuration” at the top right.
Choose “Info screen -> Check-in setup” further down the page.
Here specify for example when check-in can be done. Here you also find the URL/address of the page you set up on tablet/screen/computer, where members can register their attendance.
- Unsubscribing from teams
Choose “Configuration” at the top right.
Choose “Member Portal -> Choose modules”.
Tick “Activities: Member can unsubscribe from activities”.
Click “Save module selection”.
Members can now log in to the Member Portal and unsubscribe from teams.
Limit on number of enrollments
It is possible to set up a limit on the number of enrollments a member can have at one time. There are two types of limits you can create:
- Limit via maximum
The number of future activities (typically events and/or team training sessions) a member may be enrolled in. As soon as an event or team training session has taken place, the activity no longer counts toward the future total.
- Limit via maximum team training sessions per week
The number of activities of type “Team training” a member may be enrolled in per week (Monday to Sunday). Example: A member was enrolled in a team training session on Monday. Now it is Tuesday, for example, and the member therefore still has 1 enrollment this week.
This is set up via “Configuration -> Member Portal -> Maximum number of enrollments”.
Limit on who can enroll
In settings for an activity — for example an event or a membership — you can set some limits on who can enroll. This can for example be on age and/or gender. These items are found directly in the activity settings.
You can also create a more advanced limit, where for example only members who already have a specific activity can enroll. Here you must start by creating a member report under “Members -> Member reports” and then “Create new member report”. In this member report you must create a criterion that the member must have a specific activity. The member report will then contain exactly the members who have this activity.
When you have saved your member report, you can go back to settings on the activity, and here you will now be able to choose the newly created member report in the box named “Limit enrollment” and then in the field “Limit enrollment to member report”.
The field “Limit enrollment to member report” is only shown if in the field “Who can enroll?” either “Both new & existing members” or “Existing members only” is chosen.
Enrollment of non-members
The system supports the option for non-members to also enroll in various offers. Typically this is an event or a course you want non-members to be able to enroll in.
It works in such a way that when a non-member enrolls in for example an event, this person is asked for some master data — you decide yourself what this master data should be. It can for example be name and email address. In addition, it can be set up so the non-member is marked in the system as a non-member, so you can easily distinguish non-members from genuine members. Non-members come into the system and appear in the member list.
You can set it up so non-members are automatically removed from the member list shortly after the event has taken place. You then do not have to remember to do this cleanup yourself.
It is set up as follows, taking an event that is for both members and non-members as the starting point:
Check that the field “Genuine member” is visible under “Configuration -> Members -> Member field configuration”. If this field is not visible, make it visible.
Create an activity of type “Event” via “Activities -> Create new activity”.
Optionally specify a price for the event — this price will be the member price.
Now create the activity, after which activity settings are shown.
Find the field “Make membership time-limited” and tick this field. If it is an event that is created, the system will now show that persons enrolled in this event are automatically cancelled 7 days after the event has taken place.
Find the field “Who can enroll?” and choose “Both new and existing members”. “New” in this context should be understood as non-members.
If the price for non-members should be different from the price for members, find the field “Alternative price” and here the price for non-members can be specified.
Find the field named “Genuine member” and make sure the tick in this field is removed. Non-members who enroll in this event will then automatically be marked as non-members, and it is always easy to see how many of the members in the member list are non-members, and thus for example “event” members.
Day tickets
Day tickets are somewhat in the same category as the section above. They are typically used by associations that also use the system’s door system. Here you can create an enrollment where a person receives a 6-digit code that only works for the rest of the day.
It is set up as follows:
Create an activity of type “Membership” via “Activities -> Create new activity”.
Specify a price for the membership — this price will be the price of the day ticket.
Now create the activity, after which activity settings are shown.
Find the field “Make membership time-limited” and tick this field.
In the “Duration” field, choose “Rest of the day”.
And tick “Generate 6-digit numeric code (email)”.
Time-slot tickets
Time-slot tickets are typically used by indoor playgrounds and similar venues where you sell access in fixed time windows (e.g. 9 a.m.–1 p.m.) with a maximum number of tickets per slot per day. The buyer chooses date and time slot during enrollment and receives a 6-digit door code valid only in that window.
Setup:
Create a “Membership” or “Event” activity with online enrollment and the desired price.
On the activity: enable “Sell tickets in time slots” under Time-slot tickets.
Add one or more time slots (weekdays, start/end time, max capacity). Optional price per slot.
Set how many days ahead booking is allowed.
Enable “Make membership time-limited”, “Generate 6-digit numeric code (email)” and upfront card/MobilePay payment as for other tickets.
The door system must have timed codes enabled (as for day tickets).
When purchasing, the person selects date, time slot and number of tickets (one shared code for the whole order). Capacity is enforced automatically per slot per day.
Automatic cancellation
The system can automatically cancel activities some time before the activity is due to take place, if there are too few enrolled. This is especially useful if you have many team training activities.
You choose yourself how long before the event time the system should cancel an activity, as well as how few participants there must be before the activity should be cancelled. You also choose whether the system should inform enrolled members (and instructors) via email and/or SMS.
The cancellation text sent to members and instructors reads as follows:
{activity name (incl. time)} has been cancelled due to too few enrolled. Person who was enrolled: {person’s name}. Regards {association name}
The text above is fixed in the system and cannot be changed. The items in curly brackets — {} — are of course replaced with the activity’s actual name, the person’s actual name, and so on.
Note: If an activity is set up to be cancelled automatically, but there are enough participants so the activity is not cancelled but goes ahead, participants will no longer be able to unsubscribe from the activity when the time for any cancellation has passed.
Setting up automatic cancellation is done on an activity of type “Team training” via “Activities -> Activity list” and then choose “Choose action -> Automatic cancellation”.
Duplicate check
The system can — in general — be set up to check for duplicates when new members enroll via the Member Portal. You can check the following:
- Do not allow same email address
Function that ensures a new member cannot sign up with an email address already used by another member in the member list
- Allow same email address if the given first name does not already exist
Function that ensures a new member cannot sign up if the combination of email and first name is already used by another member in the member list. This is suitable for associations where you want to check for duplicates, but where for example a parent enrolls two children on the same email address, namely the parent’s own email address.
- Also check among cancelled members
Function that makes the duplicate check also search among cancelled members. By default the duplicate check only searches among enrolled members.
These items are set up under “Configuration -> Member Portal -> Duplicate check”.
Merging members
If you have duplicates in the member list you should clean up, so there is only one profile per member. There is no function for this, so it is a manual process, and this is because it is difficult for the system to work out which profile you want to keep.
The easiest approach is to open the two different profiles, and then choose which of the two profiles should “survive”.
If for example there is a payment on one profile, but not a payment on the other profile, it is often a good idea to keep the profile where there is a payment, so you preserve payment history in that way.
The profile you do not want to keep must be cancelled. This is done either in the member list on the right via “Choose action -> Cancel membership” or on the member’s master data in the tab at the top right named “Actions” and then the “Cancel membership” button.
Fine for non-attendance
You can set up the system to automatically issue fines to members who do not show up for a team they have enrolled in. This can especially be used for team training with a limited number of places, so you to a greater extent ensure that members cancel a training session, so the place can go to a member on the waiting list.
There are two ways members can be assigned a fine:
Automatically by the system
Manually by instructor
The two models are described below.
Automatic issuing of fines
This model requires that either a check-in screen has been set up where members register that they have shown up themselves, or that you use the door system on the outer doors, so members use an access card or a personal code to enter the building.
- Automatic issuing of fines is set up as follows:
Click your association’s name at the top left.
Tick the add-on module “Access control”.
Click “Save” at the bottom of the page.
Click “Configuration” at the top right.
Choose “Info screen -> Check-in setup” further down the page.
Now specify some check-in time windows (minutes before and after).
And also specify one of the extra member fields in which the fine should be recorded if the member does not check in on time. Optionally rename the field under “Configuration -> Members -> Member field configuration”, so the field for example is called “Number of fines” or similar. In what follows this field is referred to as the fine field.
Click “Save” at the bottom of the page.
The system will now automatically record a fine on a member if the member does not check in on time. If a member continuously receives several fines, the system automatically increments the number in the fine field.
Manual issuing of fines
This model requires that the instructor on the team marks present participants.
- It is set up as follows:
Click your association’s name at the top left.
Tick the add-on module “Access control”.
Click “Save” at the bottom of the page.
Click “Configuration” at the top right.
Choose “Info screen -> Check-in setup” further down the page.
Tick “Count on online tick-off and marking of ‘Did not attend’”.
And also specify one of the extra member fields in which the fine should be recorded if the member does not check in on time. Optionally rename the field under “Configuration -> Members -> Member field configuration”, so the field for example is called “Number of fines” or similar. In what follows this field is referred to as the fine field.
Click “Save” at the bottom of the page.
You can advantageously designate some instructors who should have access to mark attendance on all team training sessions. This is done under “Configuration -> Attendance lists -> Setup”, where in the box named “Instructors who can do online tick-off on all team training sessions” you choose all the instructors who should be able to mark attendance.
When an instructor runs a team training session, the instructor can now find the team training session by logging in to the Member Portal or the app, and here mark attendance for participants on the team, and all participants who are marked with “Did not attend” will automatically have the fine field incremented by one.
Payment of fines
You can set up the system to automatically debit fines from the member’s account. This requires that you for example support automatic debit via card or MobilePay recurring payments or Betalingsservice/PBS.
You create a mass invoicing run that runs every month, and this mass invoicing run is set up to look at the fine field. And the mass invoicing run is set up to multiply the number of fines by a factor you decide yourself. And the mass invoicing run can be set up to reset the fine field, so the same fines are not charged again the following month.
- Setting up mass invoicing for automatic debit of fines:
Choose “Mass invoicing & reminders -> Add/edit mass invoicing”.
Choose “Add/edit recurring invoicing”.
Click “Add new mass invoicing” (unless you already enter that screen — it is called “Information about invoice line”).
In the “Name” field, enter for example “Charging of fines”.
In the “Due date” field, choose when the fines should be charged next.
In the “Frequency” field, choose for example monthly, if fines should be charged monthly.
In the “Price” box, choose “Formula” and enter for example the following in the input field: multiply:F1*25
multiply:F1*25 means the following: Take the content of extra field no. 1 (which should correspond to the fine field) and multiply this by 25. So if a member for example has received 2 fines, the member will be charged 50 DKK — if it is extra field no. 3 you have chosen as the fine field, you must write F3 instead of F1.
In the “Who” box, choose “Member field” and then choose the fine field and choose != (which means “not equal to”) and then leave the field at the far right empty. This means the system should find all members who have something in the fine field.
In the “Miscellaneous” box it is very important that you tick “Reset member field”, so the same fines are not charged again the next time the mass invoicing run executes.
Click “Save invoice line”.
The system is now set up to charge fines completely automatically.
Ticket scanning
This solution can be used to scan tickets at an entrance, for example. For example for an event or a general assembly. The people who scan use their own phone, where they must have downloaded the MemberOrganizer app from the App Store or Play Store.
A ticket can only be scanned once.
It is a QR code on the issued ticket/receipt that is scanned. The member receives the ticket/receipt at enrollment/purchase for the event.
People who should be able to scan are set up as follows:
Under “Configuration -> Member Portal -> Members who can scan” you must choose the people who should be able to scan tickets.
The people must download the MemberOrganizer app from the App Store or Play Store.
When the person is logged in to the app, there is a “Scan ticket” function.
The person can now scan tickets.
Discount / Offer
There are no discount codes in the system. You can however create some campaigns where you can buy a membership at a reduced price, and then pay the normal price later.
This is done by creating a new activity (copy an existing membership activity) that people can enroll in, which costs some reduced price.
Copying an activity is done as follows:
Go to “Activities -> Activity list”
Go to “Choose action -> Copy activity” on the right
Typically you only need to change the name and price of the activity
The campaign activity will then typically appear on the Member Portal.
When the campaign expires at some point, you must move the members who bought the campaign activity onto the normal membership activity.
There is a function to copy all enrolled members at once from one activity to another. This is done as follows:
Go to “Activities -> Activity list”
Go to “Choose action -> Add/copy/remove participants” on the right
At the bottom left of the page, click the text “Copy selected members to another activity”
You can now choose an existing activity the participants should be copied to. The participants remain on the original activity (the campaign activity).
Examples
Below are some examples you can use as a starting point.
Booking an instructor
If you are an association where members should have an instruction session — for example a fitness association — you can create an enrollment that handles this.
If the instructors themselves should be able to create the times members can book, the instructors must have access to the administration part of the system with the permission “Activities”. This also has the advantage that the instructor will be notified when a member books an instruction session.
You can invite new users to the administration part of the system via “Configuration -> Users -> Invite new users”.
When you need to create the enrollment for an instruction session, do the following:
Choose “Activities -> Create new activity”.
In “Type”, choose “Team training”.
In “Name”, enter for example “Booking of instruction session”.
Click “Create activity” at the bottom right.
A large number of settings are now shown and in the “Event date” field specify when the instruction session takes place.
In the “Location” field the place can be specified.
In the “Choose instructor” field you can choose the instructor responsible for the instruction. This requires that the instructor is created as a member in the member list.
In “Receipt on enrollment” you can create a text the member receives at enrollment. The text is created under “Communication -> Text templates”.
In the “Limit enrollment” field change the value from 0 to 1. This means only one member can enroll in this instruction session.
If “Registration type” is set to “Subscribe & Unsubscribe”, you can advantageously choose a user in the “Notification on unsubscription” field, so you are notified if a member unsubscribes again.
In the “Notification on new enrollment” field you can advantageously choose for example the instructor (requires as mentioned earlier that the instructor is created as a user in the system).
Click “Update activity” at the bottom of the page.
Enrollment for an instruction session is now created, and you can see how it looks in the Member Portal by choosing “Team enrollment”.
It can be a good idea to run a test where you try to enroll, so you can see if it works as expected.
Tip
When you have created the first instruction session, and checked that it works as intended, you can copy this activity and then only change for example the event time. Then you can easily create many time slots members can choose between.