Invoices
An important part of MemberOrganizer is invoicing. Many associations spend a lot of time making sure that all members pay their membership fees. In addition to sending out invoices, it is also about being able to follow up on members who do not pay. Reminder procedures are therefore important in this context. MemberOrganizer supports both sending invoices and the subsequent reminder procedure for members who have not paid.
And the entire process can be automated 100%, if you want that.
An important function in MemberOrganizer is bulk invoicing. With bulk invoicing you can send invoices to all, or parts of, the association’s members — with individual invoice amounts for each member based on the member groups or activities the member is subscribed to in the association. You can also pull completely individual amounts for each member, if you have figures stored in the extra member fields. This can for example be used to settle consumption that is typically very individual per member.
Automatic debits
With MemberOrganizer, members can sign up for automatic debiting if you want to use this. The system supports the following forms of automatic debit:
Automatic debit via card payment (for example Dankort and Mastercard).
Automatic debit via Betalingsservice/PBS.
Automatic debit via MobilePay.
There are advantages and disadvantages to both forms of automatic debit, so what you should choose — or possibly combine both forms — cannot be decided in advance, but depends on the association’s needs.
The big advantage of using automatic debit is that the member does not have to do anything in connection with payment, but that you can simply debit the money from the member’s account.
Read more about automatic debit with Betalingsservice/PBS here Betalingsservice.
Read more about automatic debit with card payment here Automatic card charge.
Read more about automatic debit with MobilePay subscriptions here MobilePay recurring payments.
Invoice method
One of the first things you must decide is how the association’s members should be invoiced. There are a number of different options, which are described in detail in Invoice options. You can set up MemberOrganizer to assign a specific invoice method to new members by default. This is done under “Configuration -> Invoices -> Invoice method”. From here you choose the desired invoice method. If you have already imported or created a large number of members, you can also from this page change all members’ invoice method at once. Finally, you can go into each individual member and choose the desired invoice method.
Members do not all have to use the same invoice method. If you use Betalingsservice, for example, some may be signed up for automatic debit (and thereby have the invoice method named “Betalingsservice”), while others will receive the invoice via email with a +71 code line, and thereby have the invoice method named “Email/Code line (+71)”.
Can members choose invoice method themselves?
If it concerns new members who enroll themselves via the Member Portal, the answer is yes. And this is set up in the settings for the relevant activity (of the membership type).
If it concerns existing members, the answer is as a rule no. The assumption is that when a member is created in the system, the chosen invoice method is also the invoice method the member prefers.
There is typically one exception to this situation: The first time invoices are sent to the members. In this situation you sometimes want to be able to give members a choice. As mentioned, you cannot do this in the invoice itself, but you can send an ordinary email (that is, a newsletter, and not an invoice email) to the members before you send invoices out, where you ask the members what they prefer. There are then a number of ways you can do this.
Approach 1: Send email and change manually yourself
You can send an email where you simply ask the members to reply to the email, and those who want a different invoice method can have their invoice method changed manually. This approach can create a lot of work/corrections if there are many members.
Approach 2: Send email and allow members to change it themselves
There is another option: In the email you send out you can merge login details so that members can log in to the Member Portal themselves and change the invoice method to what they want. The email is sent as described in Login to Member Portal.
Before you send out the email about login to the Member Portal and updating the invoice method, you must open up for members in the Member Portal to be able to change their invoice method. This is done as follows:
Choose “Configuration -> Member Portal -> Choose modules”.
Tick “See and optionally edit master data”.
Click “Save module selection”.
Choose “Configuration -> Member Portal -> Member login”.
If you have just — that is, immediately before — ticked “See and optionally edit master data”, you should go through the page and check that it is the information you want to show to members that is actually shown.
Next, choose the “Invoice methods” tab at the top right.
Now tick the invoice methods you want the member to be able to choose from in the Member Portal. Typically, members should not be allowed to choose “Manual”. It will typically be for example “Betalingsservice”, “Email/Dankort & international cards”, “MobilePay recurring payment” and “MobilePay integrated payment” that members should be able to choose between.
If some of the above invoice methods are missing, it is because you have not yet set up payment agreements regarding these items.
Click “Save invoice method setup” when the ticks are set.
After this you are ready to send the email (the newsletter) off to the members. And later, when the members have had a little time to react, you can send the actual invoice.
Invoice timing
The system supports a number of different invoice timings. By this is meant when members are invoiced. Overall there are 3 different strategies, shown below, and the starting point is an association that invoices members once a year:
Fixed time of year. For example 1 January or 1 August.
Invoice based on enrollment month. If the member is enrolled in March, for example, the member should be invoiced again on 1 March the following year.
Invoice based on enrollment date. If the member is enrolled on 15 April, for example, invoice again exactly one year later, namely 15 April the following year. This invoicing form is often used by fitness centres.
The following goes through things you should be aware of regarding the invoice timings above.
- Fixed time of year. For example 1 January or 1 August
Advantages:
You have one time of year when you must focus on invoicing members.
Reminders can be run collectively for all members who have not yet paid.
This invoicing form is suitable for associations that use Betalingsservice/PBS.
Disadvantages:
You cannot sell memberships that start on an irregular day in the month and then run for exactly one month forward. For example from 15 April to 15 May.
If members enroll at an irregular time of year, the system can be set up to invoice a proportional amount, which the system calculates the price of on an ongoing basis. Read more about this in the section Memberships.
- Invoice based on enrollment month
Advantages:
Members can enroll on an ongoing basis and pay the full price for the membership.
This invoicing form is suitable for associations that use Betalingsservice/PBS.
Disadvantages:
You must each month — if there are invoices in that particular month — send out a bulk invoice in the system. It is quickly done by clicking just a few buttons, but you must remember to do it. This process can however also be automated, so if you choose to automate this, it will naturally not be considered a disadvantage.
The reminder procedure will likely require a little more time in that you will typically send reminders for the individual months on an ongoing basis. That is, several times a year.
- Invoice based on enrollment date
Advantages:
Members can enroll on an ongoing basis and pay the full price for the membership, and they can enroll on for example 10 April and then be invoiced exactly on 10 May (with monthly membership) or 10 April the following year (with annual membership).
The system sends invoices to members completely automatically either on the day of membership renewal or x number of days (for example 5) before renewal.
This invoicing form is suitable for associations that use automatic debit via Dankort and possibly international cards.
Disadvantages:
This invoicing form does not work together with automatic debit via Betalingsservice/PBS.
This invoicing strategy is particularly suitable for fitness centres, for example, where members enroll on an arbitrary day in the month and should subsequently be invoiced exactly for example one or three months after enrollment.
This is set up under “Configuration -> Invoices -> Invoice members on individual dates”.
Bulk invoicing: Recurring
An important function in MemberOrganizer is recurring bulk invoicing. By recurring bulk invoicing is meant invoices that repeat at fixed times throughout the year. It can be once a year, or for example every month, or every quarter, and so on.
You can also send out bulk invoices that do not follow a particular rhythm. These are called ad hoc bulk invoices. Read more about ad hoc bulk invoices under Bulk invoicing: Ad hoc.
Once you have created a recurring bulk invoice in the system, the system knows that this bulk invoice should be repeated at specific times. And the system reminds you when it is time to invoice, and the process itself, that is sending the recurring bulk invoices to the members, can also be automated, so the system does it entirely on its own.
With recurring bulk invoicing you can send invoices to all, or parts of, the association’s members at once — with individual invoice amounts for each member based on the member groups or activities the member is subscribed to.
Flow in recurring bulk invoicing
Once the recurring bulk invoices are created, MemberOrganizer will automatically notify the association via email when it is time to send recurring invoices. This happens as follows:
On the first day of the month (for example 1 July) MemberOrganizer will send a draft to the association with the invoices that should be sent with payment deadline in the coming month (for example August).
On the 12th of the month MemberOrganizer will again remind you that invoices should be sent. Unless the invoices have already been sent. After this the association can review the invoices and optionally adjust them.
Sending of invoices:
If you use Betalingsservice: At the latest by the Betalingsservice deadline (typically around the 20th of each month) the association must at the latest send the invoices — this is a deadline that Betalingsservice sets month by month.
If you do not use Betalingsservice: At the latest on the last day of the month the association must send the invoices — otherwise the invoices will not be sent.
If you missed sending in one month, you can in many cases catch up the missed period together with the next period’s invoices — see Catch-up bulk invoicing (missed send-out).
Tip
Sending can also be automated. This is set up inside MemberOrganizer under “Configuration -> Invoices -> Automatic sending of invoices and reminders”.
Create recurring bulk invoice
Choose “Bulk invoicing & Reminders -> Add/edit bulk invoice”. Then click on “Add/edit recurring bulk invoices”. If a completely new recurring bulk invoice should be created, click the blue button “Add new bulk invoice”. A number of fields must then be filled in regarding the recurring bulk invoice.
- Name
For example “Annual membership fee”.
- Placement
If you have several invoice lines on an invoice, you can determine the order of the lines via this value.
- Frequency
“You can choose between the following frequencies:
Annually
Half-yearly
Quarterly
Monthly
Once you have created and sent invoices the first time, MemberOrganizer will itself figure out how to generate the invoices the next time (for example next year or next month depending on the chosen frequency). “
- Payment deadline
Here you choose a date for when the invoice must at the latest be paid.
- Who
Here you choose which members should be invoiced. It can be all members in the association, or only selected members. Often you will invoice members who are subscribed to specific activities. In that case tick “Activities”. When the invoice line is saved, you get the option to choose the exact activities. You can also select the members who should be invoiced based on the extra member fields. Last but not least you can make a complex selection via some criteria, where it is possible to combine several member fields at once. Criteria are described below this table.
- Price
Here you determine the price or amount members should be invoiced. If you simply invoice one fixed amount for all members, you can with advantage enter a price in the field “Enter price”. If the amount members should be invoiced varies — for example based on the activities the members are subscribed to — choose “Use price from activity”. If you for example have your members divided into two groups: Senior membership at 1000 kr. and youth membership at 500 kr., the invoices to members will vary in the invoiced amount (1000 kr. or 500 kr.) depending on which activity the member is subscribed to. If the member is subscribed to both senior membership and youth membership, the member will be invoiced 1500 kr. in total, and there will be two lines on the invoice of 1000 kr. and 500 kr. respectively
If the amount each individual member should be invoiced is completely individual per member, choose “Use price from member field”, after which the invoiced amount is taken from the chosen member field for each member. This naturally requires that the association enters the individual amounts for each member in the relevant member field.
You can also use a formula. Formulas are described below this table.”
Criteria
With criteria you can get bulk invoicing to perform a somewhat more advanced selection of members. You can for example specify the following criterion:
month(enrollmentdate)=1
This criterion will select all members who have an enrollment date in January. You can also write the following:
month(enrollmentdate)=roll(3)
This criterion is best explained via an example. If the invoice line is run in January, for example, this criterion will select the members who are enrolled in January, April, July and October. If the invoice line is run in February, all members enrolled in February, May, August and November will be selected, etc. The criterion is typically used to invoice members based on their enrollment date — and typically in combination with each individual member being invoiced for example every 3 months or every half year. You can also select members based on their age. If you write the following:
age<18
Then all members who are under 18 years old are selected.
Formulas
To calculate the price you can also use a formula. You can for example write “fordeling:1000”, which means the following: Distribute the value 1000 evenly among all members covered by the invoice line. If for example 50 members are covered by the invoice line, each of them is invoiced the value 20 (1000/50). You can also write “fordeling:1000:F1”, which means the following: Distribute the value 1000 among all members covered by the invoice line. F1 corresponds to the value of extra member field number 1. Use this value to determine how large a share of the value of the 1000 should be assigned to the individual member. If 3 members are covered by the invoice line, and they have the values 20, 30 and 50 in extra member field number 1, these members will be invoiced 200, 300 and 500 respectively.
You can also write “multiply:F1*5”, which means: Take the value of extra member field number 1 and multiply this value by 5. If 2 members are covered by the invoice line, and they each have the values 10 and 20 in member field number 1, these 2 members will be invoiced 50 and 100 respectively.
You can also write “interval:F1:0-1000=3,5:1001-2000=3:2001-10000=2,5”, which means: Take the value of extra member field number 1. If the value in this field is between 0 and 1000, multiply the value by 3.5. If the value in this field is between 1001 and 2000, multiply the value by 3, etc. An arbitrary number of intervals can be specified.
Save invoice line
Click “Save” to save the invoice line. If you have “Activities” in “Who”, you are now asked to choose the activities that should be covered by the invoice line. When this is done and you are back under “Bulk invoicing & Reminders -> Add/edit bulk invoice -> Add/edit recurring bulk invoices”, an invoice line has now been created.
If you create several invoice lines with the same payment deadline, several invoice lines will be added to each individual invoice to the member. In a badminton club you can for example imagine invoicing both membership fee and shuttlecock fees at the same time, which will result in 2 lines on the invoice.
Bulk invoicing: Ad hoc
Ad hoc bulk invoices are characterised by not having a fixed rhythm throughout the year. That is, they are invoices sent ad hoc when there is a need for it.
It can for example be invoicing for club clothing, or invoicing regarding a specific event.
Create ad hoc bulk invoice
Choose “Bulk invoicing & Reminders -> Add/edit bulk invoice”. Then click on “Add/edit ad hoc bulk invoices”. Now click “Add new ad hoc bulk invoice”. A number of fields must then be filled in regarding the ad hoc bulk invoice. The fields are identical to a recurring bulk invoice with the difference that a payment deadline does not need to be defined.
Therefore read the section Create recurring bulk invoice for a walkthrough of the fields.
When you want to send invoices regarding an ad hoc bulk invoice, choose “Bulk invoicing & Reminders -> Send bulk invoice” and then click on “Send ad hoc bulk invoice”. Now tick one or more ad hoc bulk invoices, and click the button “Go to send ad hoc bulk invoice”.
Example of ad hoc bulk invoicing
Situation: You want to invoice a subset of the association’s members a specific amount. How is this done most easily?
It is done most easily via an ad hoc bulk invoice.
Do the following:
- Create activity
Choose “Activities -> Create new activity”.
The activity type must be “Group”.
Price type must be “Fixed amount”.
Enter the price to be paid.
Click “Create activity”.
- Add members to activity
Choose “Activities -> Activity list”.
On the right under “Choose action” next to the activity you just created, choose “Add/copy/remove participants”.
Now tick the members who should be invoiced.
Click “Save members”.
- Create ad hoc bulk invoice
Choose “Bulk invoicing & Reminders -> Add/edit bulk invoice”.
Then click “Add/edit ad hoc bulk invoices”.
Now click “Add new ad hoc bulk invoice” (if this option is not shown, skip to the next step).
Give the ad hoc bulk invoice a name — typically the same name as the activity.
Tick “Use price from activity”.
Tick “Activities & member extracts”.
Click “Save invoice line”.
Tick “Choose activities”.
Now choose the activity on the right.
Click “Continue”.
Click “Save invoice line”.
- Send ad hoc bulk invoice
Choose “Bulk invoicing & Reminders -> Send bulk invoice”.
Click “Send ad hoc bulk invoice” (if this is not shown, proceed to the next step).
Tick the ad hoc bulk invoice you just created.
Optionally change the payment deadline.
Click “Go to send ad hoc bulk invoice”.
Now review everything, and if otherwise everything looks correct, the invoices can be sent at the bottom of the page on the right.
Sending bulk invoices
When you are ready to send a bulk invoice, this is done via “Bulk invoicing & Reminders -> Send bulk invoice”.
Whether it is a recurring bulk invoice or an ad hoc bulk invoice, the association must actively send the invoices (unless you have turned on automatic sending for the recurring bulk invoices). Before sending, there are a number of things you can/should decide on.
Things the bulk invoice can be configured for:
- Unpaid invoices
If there are members who have unpaid invoices from previously sent bulk invoices, the system gives the option to transfer the outstanding amounts from the unpaid invoices as arrears on the new invoices. The old, unpaid invoices remain in the system, and on the new invoices an extra line named “arrears” will be added, where the outstanding amount is shown.
You can also choose not to transfer the outstanding amount to the new invoices. And you can also choose to cancel all the old unpaid invoices, so that members only have one invoice.
- Finance integration
There is the option to integrate invoices with the finance part of the system, so that invoices are automatically posted in the accounts, and when payments come in, these are also posted automatically. The system can also distribute the invoices across different income accounts in the accounts.
- Message on the invoice
You can add a message that will appear on all invoices.
- Add reminder fee
There is the option to add a reminder fee in connection with a reminder run. In addition to a fee you can also set up different texts for reminder 1, 2 and 3 respectively.
All of the above customisation options can be made before you send a bulk invoice. And the system remembers the setup for the next bulk invoice, so things only need to be set up once.
After you click “Go to send” and reach the review page, you can browse through the individual invoices before they are sent. Under “Choose action” you will find the button “Send test invoice to myself” (only when the batch contains email invoices).
Send test invoice to myself
The button sends an email to the logged-in admin user so you can see how the text and any dynamic fields look for a random member in the batch.
Payment links and the payment window do not work in the test email. This is expected: the invoices have not yet been created and sent, so a real payment link cannot be created (card, MobilePay Online, etc.). The test email is only for checking content and layout.
Once the invoices have actually been sent, members receive a real invoice with working payment. If you want to test the payment flow itself before a large send-out, you can send a small single invoice to one person and pay it as a member.
Catch-up bulk invoicing (missed send-out)
If the association forgets to send a recurring bulk invoice for a period — for example because you did not get it done last month — you can in many cases catch up the missed period together with the next period’s invoices in one combined send-out.
This is relevant when you send invoices every month, you missed sending invoices due in August, and it is now September and time to send the September invoices as well.
Note
Catch-up bulk invoicing is only available in the new layout. In the old layout, contact MemberOrganizer support if you missed a send-out.
When can the feature be used?
MemberOrganizer offers catch-up send-out when all of the following apply:
You have not sent the recurring bulk invoice for the current month’s due period (the period you should have sent in this month).
You have not yet sent the bulk invoice for the next month’s due period.
There are invoice lines to catch up for at least one of the two periods.
If the next period’s bulk invoice has already been sent, you can no longer catch up via this feature — contact MemberOrganizer support instead if you are unsure.
The feature covers one missed period combined with one upcoming period. It is not a general solution if you missed several months in a row.
How to run the catch-up send-out
Choose “Bulk invoicing” in the menu on the left.
If the conditions are met, a yellow notice appears at the top stating that you have not sent invoices due in the missed period, and that you can catch them up together with the next period’s invoices.
Click the button “Catch up and send invoices”.
On the “Catch-up bulk invoicing” page you can review the simulation: how many members are charged, and which lines come from the missed period and the next period respectively.
Review the individual invoices as with a normal bulk invoice.
Approve and send the invoices (requires a super admin user, as with normal bulk invoicing).
What do members receive?
Each member receives one invoice with multiple lines:
Lines for the missed period (e.g. August due date).
Lines for the next period (e.g. September due date).
Amounts and members follow your existing recurring invoice lines — you do not need to change the setup. Period texts on the lines (e.g. quarter labels) are adjusted automatically so catch-up lines show the correct period for the missed month.
Tip
If you have automatic send-out enabled for recurring bulk invoices, you typically avoid forgetting a month. See the section “Automate sending of bulk invoices” below.
Automate sending of bulk invoices
Sending of recurring bulk invoices can be automated. This is set up inside MemberOrganizer under “Configuration -> Invoices -> Automatic sending of invoices and reminders”.
It can be smart to use this function if you for example send invoices every month.
It can also easily be used even if you send invoices with longer intervals between them. What you simply must remember is that the system is no better than the data the system has available. So you must still remember for example to resign members and similar.
In connection with automating the sending of invoices, you can also set up the system to automatically send reminders when the payment deadline has passed. This is set up under “Configuration -> Invoices -> Texts and dates in invoices and reminders” in the fields “Sending of 1st reminder”, “Sending of 2nd reminder” and “Sending of 3rd reminder”.
If you for example enter the number 10 in the field “Sending of 1st reminder”, the system will automatically send the 1st reminder 10 days after the payment deadline on the invoices. If the invoices for example have a payment deadline of 3 January, the 1st reminder will automatically be sent on 13 January.
When the reminder process is completed — up to 3 reminders — the system can be set up to automatically resign members who still have not paid. This is set up under “Configuration -> Invoices -> Automatic sending of invoices and reminders” in the field named “Tick here if the system should automatically cancel invoices and resign members who do not pay the invoice after the last reminder has been sent and is overdue.”
It can already be after the 1st reminder that members are resigned, if you want that. But it can also be after the 2nd reminder, or 3rd reminder. It depends on how many reminders you have set the system up to send automatically. If you have only set up the 1st reminder to be sent, members will be resigned after the 1st reminder has been sent, and the members still have not paid.
Text in bulk invoices
If you want to specify text in connection with a bulk invoice, this can be done in two ways:
In the invoice email the member receives in connection with the invoice (or a reminder).
On the invoice itself (or reminder) the member receives. Here there is a message field on the invoice where the text will appear — just as amount to pay, payment deadline and so on appear on the invoice itself.
The invoice email the member receives is simply text. It is not the invoice itself. In the email the invoice itself will be attached and/or there will be a link to the invoice itself.
Note
There are payment forms where an email is not part of the flow, so you must also be aware of this if you choose to send special text via the invoice email. For example there is no invoice email if the member is signed up for Betalingsservice/PBS, or if the member is debited automatically via card payment or MobilePay recurring payments.
The texts for invoice email and the invoice itself are set up under “Configuration -> Invoices -> Texts and dates in invoices and reminders”.
Here it is possible to specify the following texts:
Text used in the invoice email and text used on the invoice itself.
Text used when sending the 1st reminder via email and text used on the invoice itself (reminder 1).
Text used when sending the 2nd reminder via email and text used on the invoice itself (reminder 2).
Text used when sending the 3rd reminder via email and text used on the invoice itself (reminder 3).
You can thereby define these texts in advance, and the system will automatically use the texts in the different stages a bulk invoice goes through, such as first sending and any reminders.
Note
If the system should be able to use the reminder texts at the correct times, this requires that you use the built-in reminder function, where you can start reminder 1, 2 and 3 on a previously sent bulk invoice. Read more under Reminders.
Individual invoices
An individual invoice is addressed to one member. Individual invoices are created by clicking on “Individual invoices -> Create new individual invoice”. You then choose the member who should be invoiced, and can subsequently specify price, text, payment deadline and more for the invoice.
If you have in advance assigned one or more activities to the member, and these activities have a price attached, you can easily get the invoice “filled in” by basing it on an activity.
Invoice templates
If you have a particular type of invoice (with for example several invoice lines) that you send again and again via individual invoice, you can with advantage create an invoice template.
Invoice templates are created under “Individual invoices -> Invoice templates” and then the blue button “Create new invoice template”.
You then enter the details about the invoice, and save, after which the invoice template can be used as a starting point for new individual invoices.
Outstanding
Outstanding gives an overview of the members who have not yet paid their invoice. When you have sent out for example a bulk invoice, all the invoices will appear in Outstanding. As members make payments and these are reconciled in the system (either manually or automatically depending on the invoice method used), the invoices in Outstanding will disappear.
Reminders
- Remind via a specific bulk invoice
MemberOrganizer gives the option to send reminders to all members who have not paid. If you specified dates for the first and second reminder in connection with sending a bulk invoice, MemberOrganizer will automatically send an email to the association when it is time to send reminders. The association can however at any time go in and send a reminder itself. Click “Bulk invoicing & Reminders -> Send reminder / View previous send-outs”. The list is now shown of all bulk invoices that have been sent. Then choose “Choose action -> Start reminder” on the right next to the bulk invoice a reminder should be sent for.
A screen is now shown where you can review the content of the reminder, and where at the bottom of the page you must approve the reminder before it is sent off to the members.
When you do things this way, you send a reminder on all invoices that are part of the specific bulk invoice, and thereby you can follow a flow of sending reminder 1, reminder 2, etc.
- Remind all across all bulk invoices
You can also send a reminder to all unpaid invoices. That is, all unpaid invoices that there may be across all bulk invoices and any individual invoices that have been created over time. When you use this approach, the system cannot keep track of whether an invoice has reached “reminder 1”, “reminder 2” or “reminder 3”, since it may be a mix of several different bulk invoices being reminded on.
You must be aware of this if you send reminders to everyone.
You send a reminder to all unpaid invoices across all bulk invoices by choosing “Bulk invoicing & Reminders -> Send reminder / View previous send-outs” and then clicking the blue button at the top of the page named “Start reminder for all x overdue invoices”.
Exempt from reminder run
If you have one or more members whom you want to exempt from receiving a reminder in connection with a reminder run, you can exempt them as follows:
Choose “Member payments -> Outstanding”.
Tick on the left next to the invoices that should be exempt from reminder runs.
At the top of the screen choose now “Choose action -> Exempt from reminder runs”.
The system has now marked that the relevant invoices should not be reminded.
Finance integration
MemberOrganizer gives the option to integrate invoices and the accounts. This means that when an invoice is paid, MemberOrganizer will automatically create a new voucher in the daybook in the active accounts. This saves the treasurer a lot of manual work, and minimises the risk of errors. To be able to integrate with the accounts, the association must have created a set of accounts. See the chapter regarding accounts for further information about creating a new set of accounts.
When you send a bulk invoice, you get the option to choose which accounts in the accounts, the invoiced amounts should be transferred to. In the send screen you can see which accounts amounts are transferred to.
Finance integration is set up under “Configuration -> Invoices -> Finance integration”, where you must at minimum choose the following:
- Default account
Invoiced amounts are credited to this account (cancelled invoices are debited). Typically an operating account is chosen with a name such as “membership fees”. Amounts that have an account attached via an activity will use the activity’s account instead of this account.
- Account for outstanding membership fees
Invoiced amounts are debited to this account (cancelled invoices are credited). Typically a balance sheet account is used with a name such as “outstanding membership fees”.
- Reconciliation account
When the invoices are registered as paid in MemberOrganizer, the paid amounts are debited on this account. Typically it will be a balance sheet account such as “bank”.
Click “Save” to save the chosen accounts.
Credit note
You can create a credit note from an existing invoice. This is done by going into details for the invoice and then clicking “Create credit note” at the bottom of the left side. The system then creates a credit note that has the opposite sign of the invoice from which the credit note was created. Before the credit note is saved, you can make changes to it. For example delete an invoice line.
On hold
Members can be placed on hold, which means that they are not invoiced the normal price for their membership or membership fee. Instead they are invoiced an on hold fee, which is calculated from the number of days the member is on hold in the relevant invoicing period.
Creation of on hold periods is done by going into the member’s details, and then choosing the “Actions” tab at the top right. Then click “Add/remove on hold periods” and then “Create new on hold period”, and then you can enter start date and end date and save. When the system next generates invoices, and the invoicing period and the on hold period for the member overlap, the invoiced amount is adjusted in relation to the on hold fee.
The on hold fee is entered under “Configuration -> Invoices -> On hold fee”. The fee is specified per month, and the system itself figures out how to adjust the price in relation to different on hold periods — for example 1 week, 2 weeks, 2 months, etc.
Exempt from bulk invoicing
Members can be exempted from bulk invoicing. This can for example be used for board members or other members who for one reason or another should not be part of a bulk invoice, and in that way not be invoiced for example annual membership fee or similar.
You exempt members from bulk invoicing as follows:
Make the field “Exempt from bulk invoicing” visible via “Configuration -> Members -> Member field configuration”, where you click the red “No” next to the field “Exempt from bulk invoicing”. The field now switches to “Yes”, and it is thereby visible on master data for all members. It is by default set to “No” for all members.
Go into master data for the members who should be exempted, and now choose “Yes” in the field “Exempt from bulk invoicing”. Save the member, and repeat this for any other members.
Now the bulk invoice can be sent.
If a member should only be exempted once, you must remember — after the bulk invoice has been sent — to go into the member and change “Exempt from bulk invoicing” back to “No” again.
Payments
When you have sent invoices from the system, members subsequently begin to make payments.
You can always find a list of who has paid under “Payments & Debtors -> Payments / Balance movements”.
By default the list shows payments from the current month and forward. You can change start and end date if you want to search further back in time for example.
Automatic registration
If you use the following invoice methods, payments are automatically reconciled in the system — that is, they are automatically registered on the relevant invoices:
Dankort/Visa/Mastercard (generally all payment cards) — as well as MobilePay Online
MobilePay integrated payment and MobilePay recurring payment
Betalingsservice
Physical payment slips with +71 code line sent by Betalingsservice
Invoice emails sent from MemberOrganizer with +71 code line (provided you have an agreement with Betalingsservice)
Manually delivered invoices with +71 code line — that is, you print the invoices yourselves and deliver them to the members (provided you have an agreement with Betalingsservice)
Manual registration
If an invoice is paid via a bank transfer (or delivered in cash), the payment is not automatically reconciled in the system. Here you must go into the invoice yourselves and register the payment, or link the payment to an invoice via the daybook.
If the member has paid exactly the invoiced amount, do the following:
Choose “Member payments -> Outstanding”
Click the “Paid” button next to the invoice that has been paid
The system then links a payment of exactly the invoiced amount, and marks the invoice as paid as of today’s date. If the payment date is important (and it is if you use the accounts module), read below about registration of irregular amount, where you can also change the payment date.
If the member has paid an irregular amount, for example too much or too little, do the following:
Choose “Member payments -> Outstanding”
Click the ID (the invoice number) on the left in Outstanding.
Details for the invoice are now shown and down in the right corner you can specify a date and an amount.
Then click the button “Register new payment”.
If you also use the accounts module, and have set up integration between the invoicing module and the accounts module, the system will automatically place a row in the accounts module’s daybook, when you make the above manual registration of a payment.
But you can also start in the daybook and click an icon on the right next to the row in the daybook that contains the payment, and then you can choose the invoice the payment should be linked to. If the row in the daybook for example includes an invoice no. or a member name, the system will try to match this with an unpaid invoice from Outstanding, and in that way help quickly identify the invoice the payment should be linked to. The system also searches on member no. and amount.
Double payments
From time to time you may experience a double payment from a member. Depending on the payment form, a double payment can be caused by the circumstances below, which almost always are a mistake made by the member, and almost never a mistake in the system — unless there is a system error.
Double payment via +71 code line
Here the member can actually pay via the same +71 code line twice. It may be that the member pays when receiving the invoice, and then 14 days later finds the invoice again and makes a new payment. Here the solution is to contact the member and get hold of reg. no. and account no. and then refund the money via online banking via a bank transfer.
Double payment via card payment, Betalingsservice, MobilePay integrated payment and/or MobilePay recurring payment
Here the same member should actually not be able to make the payment twice.
On the other hand, it may happen that a member has created two profiles, and therefore — especially with automatic debits — pays twice. The member may think there is a system error, but in reality it is either the member themselves who has created two profiles, or perhaps you have created a member twice. The solution is to get one of the profiles resigned, and with card payment or MobilePay integrated payment or MobilePay recurring payment the money can be refunded directly to the member.
The easiest way to check whether there are two identical profiles is to use the white search field at the top left (under the name of the association). You can for example try to enter the name of the member — or the email address of the member — in the search field and press enter/return. Then perhaps two different members appear, and you can click into each of these members and check — in the “Invoices” tab — whether for example there is a payment on both members.
There can also be two members with different names, but where one member has helped the other member to pay. It can for example be two members who have a close relationship — for example are in the same family. It is harder to find this if that is the reason. You can for example ask the member about it. Typically there is a member who contacts you and says that payment was made twice.
If none of the above gives a result, you should ask the member to click into the two payments the member can see in online banking/mobile banking and send screenshots of both items. This can sometimes give some useful information.
Payouts / Refunds
Sometimes there is a need to make a payout (refund) to a member. This can be due to the following situations:
- The member has by mistake paid their invoice twice.
See “Overpayment” below
- The member has by mistake paid too large an amount.
See “Overpayment” below
- The member has paid the correct amount, but should get the money back — for example because an event has been cancelled or you have agreed to refund part of the membership fee.
See “Create credit note and create payout” below.
Overpayment
In this case you simply create a payout to the member for the overpaid amount. This is done by finding the invoice and then choosing “Create payout”. Now enter date for payout and amount.
The payout itself must be made from the association’s online banking — unless it is a card payment or a payment made via MobilePay recurring payments or MobilePay integrated payment.
If it is a card payment or a payment made via MobilePay recurring payments or MobilePay integrated payment, the amount can be refunded directly to the member from within MemberOrganizer. There are however some things you must be aware of:
The payout must be made from the original invoice. Otherwise the money will actually not be refunded to the member (even if it says inside MemberOrganizer that a payout has been made).
You can at maximum refund the amount that was originally paid on the relevant invoice.
The payment may at maximum be 1 year old.
Create credit note and create payout
If an invoice has been paid with the correct amount, but a payout (refund) should nevertheless be made, this is done via two steps:
First create a credit note for the amount to be paid out.
Then create a payout for the amount to be paid out.
If payment was made via card, the money can be refunded directly to the member’s card without you having to go into your online banking and transfer to for example the member’s account no. (which you would first have to obtain).
Therefore do the following:
Find the invoice and go into details for the invoice.
Click the red button “Create credit note” at the bottom of the page.
Specify the amount to be credited (and subsequently paid out). Remember the amount must be negative.
Click the blue button “Create credit note”.
Now choose “Create payout”.
Specify the amount to be paid out.
If the invoice was originally paid with card, the money can be refunded directly to the member’s card without involvement of online banking.
Prepayments
Some members pay their membership fee/membership in advance for various reasons. This is typically because they have the association’s reg. no. and account no. and have been used to transferring money this way for example once a year.
You can handle these prepayments in various ways. The following goes through different ways to handle it.
Exempt member from bulk invoicing
You can exempt members from being part of bulk invoicing. Read more about how this is done here: Exempt from bulk invoicing
Register the prepayment on a previously sent invoice
This can only be done if the member at some earlier point has received an invoice sent from the system.
In this case you find the last invoice sent to the member, and go into details for this invoice and register the payment down in the right corner.
Next you must ensure that members who have a credit balance — that is, the association owes the member money — are set up to be offset in bulk invoicing. This is set up under “Configuration -> Invoices -> Handling of arrears and credits” where there must be a tick in “Offset credit balances in new invoices”.
When the new bulk invoice is sent, the system will thereby offset the prepaid amount — that is, the member’s credit balance — in the new invoice, and thereby everything will balance.
Balance calculation
The system keeps track of whether a member has paid or not. When a member has paid everything that has been invoiced, the member’s balance will be 0. If a member’s balance is not 0, it is typically because the member has not paid an invoice. Below different situations regarding the member’s balance are described in detail, and what you can/should do in the different situations.
How the member’s balance is calculated
Several things affect the member’s balance:
The invoices created for the member
The payments the member makes
The credit notes created for the member
The payouts created for the member
An account statement for the member can be seen under the member’s details in the “Invoices” tab. Here you can choose “More options -> View balance movements” and then you see a list of the things that have happened with the member’s balance over time.
Standard situation
If an invoice is created for a member of for example 200 kr., the member will have an outstanding amount of 200 kr. That is, owe 200 kr. When the member pays 200 kr. (for example via online banking, +71 code line, Dankort, Betalingsservice, etc.), the member’s balance goes to zero.
This is by the book, and these members are easy to handle, as you do not have to do anything extra yourself.
Credit note/cancellation of invoice
If an invoice of 200 kr. is created for a member, and the member for one reason or another should not pay this invoice (for example if the member is resigned/should be resigned), you can cancel the invoice. In this case the system creates a cancellation voucher of 200 kr., and thereby the member’s balance goes to zero.
You can also create a credit note of 200 kr. which can subsequently be delivered to the member. This gives the same result as cancelling the invoice.
A credit note is created as follows:
Find the invoice and go into details for the invoice.
Click the red button “Create credit note” at the bottom of the page.
Specify the amount to be credited. Remember the amount must be negative. And it can optionally be a partial amount of the original amount.
Click the blue button “Create credit note”.
Member pays too little
If a member is invoiced 200 kr. but only pays 150 kr., 50 kr. is missing in the overall accounts. The member therefore still owes 50 kr.
If the member has paid 150 kr. because the invoiced amount of 200 kr. was wrong, and the member should actually only pay 150 kr., you create a credit note of 50 kr. The member’s balance will then subsequently go to zero.
Member pays too much
If a member is invoiced 200 kr., but for one reason or another pays 300 kr., the member has paid 100 kr. too much, and thereby has a credit balance of 100 kr. In this case you can create a payout to the member of 100 kr., which means the balance goes to zero. The actual physical payout of the 100 kr. can for example be done via a bank transfer to the member.
Some members by mistake pay an invoice twice. In this case you can also make a payout to the member, and then the member’s balance will go to zero.
You can also choose to do nothing, and the next time a bulk invoice is generated where this member is invoiced, the system can automatically offset the overpaid amount in the new invoice.
Read more about payouts under Payouts / Refunds
Member is invoiced and pays, but should get the money back
You can also encounter that a member is invoiced for example 200 kr. and pays this amount. Subsequently you find out that the member should get the money back (for example resigned or similar), and then you must do the following two things:
Create a credit note for the member.
Create a payout for the member.
After this the member’s balance will go to zero. If the invoice was paid with payment card, the actual refund of the money can be done directly from the system and onto the card the member used to pay. Thereby you avoid having to make a bank transfer to the member. But as mentioned this only applies to payments made with a payment card.
Read more about payouts under Payouts / Refunds
Reset balance
If a member has a balance — for example either has paid too much or has paid too little — there is a function to reset the balance. The function can reset balance for many members at once.
Note that the function is only visible if you do not use VAT on invoices.
The function is found under “Member payments -> Balance list”.
Here you can tick the members whose balance you want to reset, and when you have set the first tick, a blue button appears a little up on the screen named “Reset balance for selected members”. Click the button to reset balance for the selected members.
This operation does not affect the bank account. So there will not be registration of any payments or payouts on the selected members. An invoice will merely be created (if the association owes the member money) or a credit note (if the member owes the association money).
If a balance on a member is not 0, and it is because money should be paid back to the member, or because the member should actually pay their outstanding amount, you should not use this function, but instead read more under Balance calculation.
If VAT is used — amount owed
If VAT is used on invoices the above approach regarding resetting balance cannot be used, as the system may have difficulty calculating how much of the total balance contains VAT.
If it concerns for example one invoice, it is probably enough to see through, but in many cases there can be several invoices involved.
If you assume that it is one invoice that is the cause of the balance, and that it is a balance where the member owes money to the association (that is, an unpaid invoice), the balance should be able to be brought to 0 by creating a credit note from the unpaid invoice.
When you start creating the credit note, you will be able to see which total amount is on the credit note, and this total amount should then match the balance. After this the credit note can be created.
If VAT is used — credit balance
If the member has money to their credit — this can for example be because an invoice was cancelled, and then the member nevertheless paid the invoice afterwards — the balance can be brought to 0 by creating a new invoice for the member, which however is not sent to the member.
This is done as follows:
Choose “Individual invoices -> Create new individual invoice”.
Choose the member it concerns, and click “Continue”.
Now optionally choose the membership the member should be invoiced for, and click “Create invoice”.
Now check that the total amount (a little down on the right) matches the member’s balance. If it does not match the member’s balance, you must adjust the amount yourself in “Price per unit DKK” until it matches.
In the field “Invoice method” (up in the middle) choose “Manual”, since the member has already paid, and thereby should not receive the invoice.
Now click “Create invoice” at the bottom on the right.
The member’s balance should now be 0.
Payment problems
It can happen that a member contacts you and says they cannot get a payment to go through. This will most often be with card payment that such a contact can come.
Most often it has nothing to do with MemberOrganizer. And thereby MemberOrganizer support can most often not help with this.
It can for example be problems with 3D Secure (MitID or equivalent confirmation in the member’s bank). It can be problems at Nets. It can be the member who has entered wrong card details.
The best you can do is described below.
Check that the payment window can be shown
Start by checking that the payment window can actually be shown. You can check this yourselves as follows:
Find the member’s invoice.
Perhaps there is a link to the invoice in the email correspondence you have with the member. In that case click this link.
If the member has not forwarded a link to the invoice, find the invoice as follows (otherwise proceed to step 4):
Search for the member’s name in the search field at the top left under the association name. This is typically the fastest way to find the member.
Then click “Choose action -> View master data” on the right in the search result. Details for the member are now shown.
Click the tab at the top right named “Invoices”.
Now find the invoice in the list it concerns, and click “Choose action -> Member view” on the right. The invoice is now shown as the member sees it.
Tick “I accept the terms and conditions” (or “I accept the terms and conditions and subscription terms” if it is a subscription payment) and click the button “Continue to payment”.
Now check that the payment window opens.
If the payment window does not open, but an error is shown instead, send a screenshot of this error to MemberOrganizer support.
If the payment window — as expected — is shown, tell the member that everything looks fine, and that the member should try again, and if it still does not work for the member, ask the member to forward a screenshot to you where you can see where the member gets stuck. This can likely lead you on the trail of what happens for the member. And if you cannot see anything from the screenshot the member forwards, contact MemberOrganizer support — include the screenshot.
Unknown payers
If you use +71 code lines on invoices in connection with Betalingsservice, you can on rare occasions experience that a member enters a wrong +71 code line in their online banking, and thereby the payment cannot be matched to an invoice/member inside MemberOrganizer.
In this case you will be met with a warning on the overview/front page named “There are unknown payers”.
We — MemberOrganizer — cannot help find out who the unknown payer is, and the bank probably cannot either. The only solution is — at some point — to send a reminder to those who have failed to pay, and then a member will likely come back and say that payment was made.
VAT
The system supports VAT on invoices. By default VAT is not enabled, as most associations do not have VAT on their invoices.
If VAT should be an option on invoices, this can be activated as follows:
Choose “Configuration -> Invoices -> VAT on invoices”.
Tick “Show VAT on invoices”.
Specify VAT percentage. Typically 25.00.
We recommend that you then tick “Exclusive” next to “Are prices in the system inclusive or exclusive of VAT”.
We recommend that you then tick “Yes” next to “Should it be possible to specify invoice lines both with and without VAT”.
This is the most flexible setup.
Now you can — on invoices created after this setup has been made — specify whether VAT should be calculated on invoices. This applies both when you create an invoice individually via “Individual invoices -> Create new individual invoice”, as well as when you create bulk invoices and/or activities (that is, events and memberships) that can be purchased.
Payment plans
A payment plan is an easy way to give people the option to support on an ongoing basis with a specific amount. There is also the option to support with one-off payments.
You define 3 amounts to choose between, and the system then creates a form from this, where it is easy for a person to choose amount (the person can also specify an amount themselves) and pay via the payment forms set up in the system, which can be card payment, MobilePay and/or Betalingsservice.
Here is an example of how a payment plan will look for the person who wants to support:
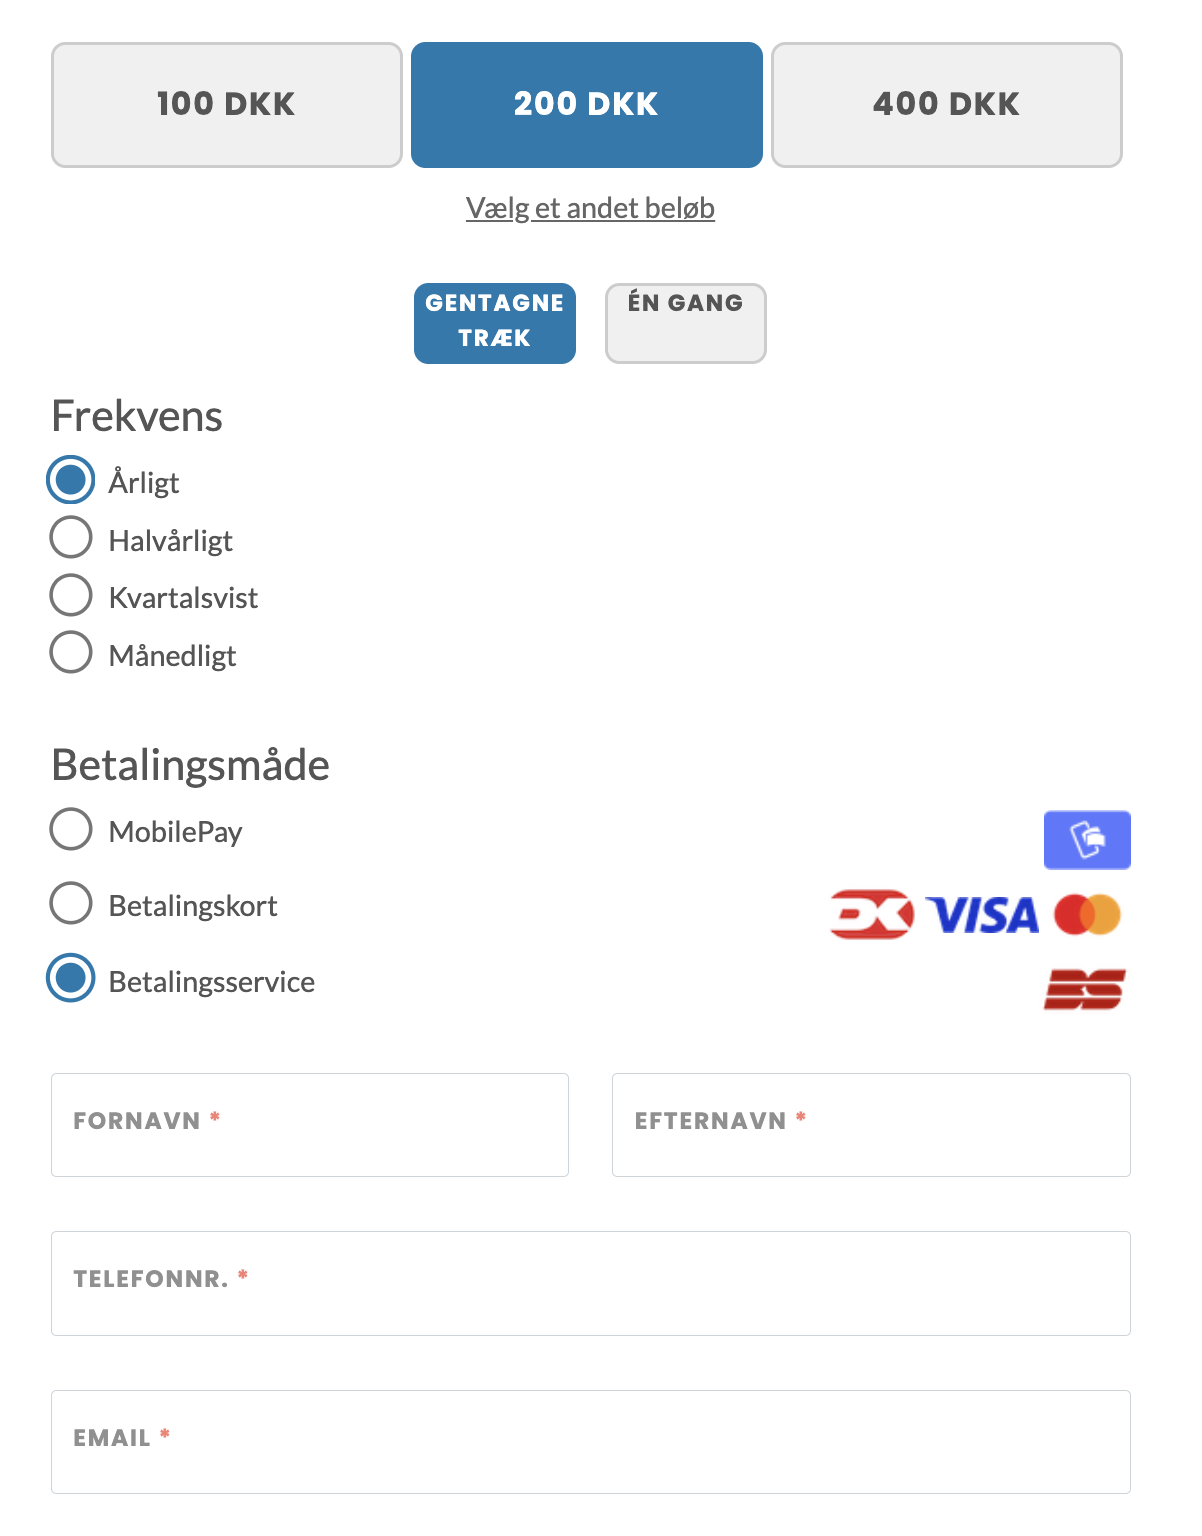
The form contains a few more fields than shown in the image above — for example the option to specify CPR no. and there is also a checkbox for terms and conditions and a link to description of privacy policy (something you must prepare yourselves as an association).
You can change the colour of the amount buttons if you want.
Payment plans can be used together with the donation module, and thereby it is easy to make the annual statement to SKAT, so people can get tax deduction for their support.
To create a payment plan, choose “Activities -> Create new activity”, and the type must be set to “Payment plan”. You then get the option to specify the 3 amounts and other settings.
Read more about the donation module under Donations
How to create a payment plan
Do the following:
Choose “Activities -> Create new activity”.
The activity type is set to Payment plan.
Enter a name — for example “Support” or similar.
Click “Create activity” at the bottom of the page.
A screen is now shown where you can configure the payment plan with the 3 amounts and other settings. Here you customise the payment plan to your wishes, and you can click the enrollment link at the top of the page to see how the payment plan looks in the Member Portal.
Donations
MemberOrganizer can help keep track of donations. The system can create a donation account, where it is calculated how much money a person has donated during a year. The system helps collect CPR numbers from the people who make donations. This happens when the person makes the donation via the Member Portal. The donation account saves many hours of work compared to having to report this information to SKAT.
Read more about donations under Donations
Sponsor account
The system can help keep track of members who have been assigned a sponsorship that for example can be used on tournament enrollments or similar offered via the Member Portal.
As an example the following can be mentioned: An association has received 5,000 kr. from a sponsor. 2,000 kr. of this is earmarked for member Søren Sørensen. These 2,000 kr. can be assigned to the member via the system, and the member can then choose to use their sponsor funds when making an enrollment for for example a tournament that costs the member for example 500 kr.
If the member chooses to use 500 kr. on a tournament — instead of paying the 500 with for example Dankort — the member’s sponsor balance after this enrollment will be 1,500 kr.
If you also use the accounts module in the system, all transactions regarding this will be posted to a special account in the accounts, so the association always has control over how much has been used, as well as who has used it and what it was used for.
You can naturally also get an overview of sponsor usage without using the system’s built-in accounts module.
Contact us to get sponsor account set up.
Deposit funds
When sponsor account is set up, you can deposit funds on a member’s account. This is done as follows:
Go into master data for the member.
Choose the “Invoices” tab at the top right/middle.
Choose “More options -> Deposit sponsor funds”.
Specify date and amount.
The chosen amount is now credited (deposited) to the member, and the member now has sponsor funds that can be spent.
Using funds
Members typically use their sponsor funds by purchasing services via the Member Portal. Here a member can choose to pay via funds on the sponsor account instead of for example making a card payment.
You can also create an invoice directly to the member that uses the sponsor funds. This is done as follows:
Choose “Individual invoices -> Create new individual invoice”
Choose the member who should be invoiced.
If the system suggests an activity that should be invoiced, you can choose to base it on this, but you can also create an empty invoice.
Details for the invoice itself are now shown, and here it is important that “Category” is set to “Sponsor account”.
It is also important that positive amounts are invoiced — otherwise the invoiced amount will be credited to the member’s sponsor account instead of being deducted from the member’s sponsor account.
Also consider whether invoice method should be set to “Manual”, as a member often should not receive an invoice that is paid via sponsor funds.
The rest of the invoice is customised/filled in, and created — but is probably not sent — to the member.
The member’s sponsor account is now reduced by the invoiced amount.
Overview of sponsor funds
When sponsor account is set up, there is an extra menu item named “Sponsor account” in the menu on the left and here you can always get an overview of which members have sponsor funds on their account as well as which members have used their sponsor funds. You can limit the search to a specific period.
Language on invoices
The invoices sent via email can be shown in different languages. The following languages are supported:
Danish
English
German
Faroese
This is set up as follows. First the field “Language on invoice” must be made visible. This is done under “Configuration -> Members -> Member field configuration”, where you switch to “Yes” next to “Language on invoice”.
Next you must go into the members where you want the invoice to be shown in a language other than Danish, and choose for example “English” or “German”.
Be aware that the texts you yourselves use on invoices — for example membership or membership fee — or similar are not translated. It is only the fixed texts on the invoice that are translated. For example payment deadline, invoice no. and so on.
OIOUBL and Peppol BIS
MemberOrganizer supports sending and receiving invoices and credit notes in the formats OIOUBL and Peppol BIS via the NemHandel/PEPPOL network.
Invoices with the invoice method “EAN” are sent to the recipient’s EAN number through NemHandel/PEPPOL — not as a regular email.
To be able to send invoices and credit notes no extra setup is required other than that you must provide your registration number and account number. Unless you have an agreement with Betalingsservice, after which invoices automatically get a +71 code line attached, and thereby the payment is also loaded and reconciled in the system completely automatically.
If you want to be able to receive invoices and credit notes on for example an EAN number, you must contact us, and we will then help you get set up to receive this.