Accounting
Note
MemberOrganizer is a so-called registered bookkeeping system. This means that the Danish Business Authority has verified that the bookkeeping system meets a number of requirements. The bookkeeping system’s registration number: fob509226.
MemberOrganizer is equipped with an accounts module that is fully integrated with the rest of the system. This means that paid invoices can automatically be posted in the accounts’ daybook, which saves the treasurer many hours of work.
The accounts module can also be used without using the other modules in MemberOrganizer — for example the member part and the invoicing part.
Creating a chart of accounts
To get started quickly with the accounts, MemberOrganizer provides some chart of accounts templates that the association can use as a starting point. Subsequently the chart of accounts can be adjusted to fit the association’s needs.
Click on “Accounting -> Create new accounts”. Then choose a chart of accounts template — for example “Simple association”. Then click “Continue”. Give the accounts a name and a start and end date, and click “Save”. The accounts are now created, and you have the option to customise the chart of accounts to the association’s needs.
Add new account
From time to time there may be a need to create one or more new accounts in the accounts. This is done via “Accounting -> Chart of accounts” and then “Create new account”.
Here you can create both operating accounts and text accounts (a form of headings) and sum accounts, which can sum amounts from a range of accounts.
Import via SAF-T
If you use an accounts system that supports export of accounts data to SAF-T, you can create your chart of accounts — as well as other things — via such a file.
When you have exported from your current accounts system to SAF-T, and saved this file on your own computer, you must — when you are logged in to MemberOrganizer — choose “Configuration -> Accounting -> Import accounts data from SAF-T (xml format)”, and then choose the SAF-T file on your computer, and then a chart of accounts and more will be created automatically from the data in the SAF-T file.
This means it does not have to be so cumbersome to switch from another accounts system over to MemberOrganizer.
Opening balances
Opening balances can be entered on balance sheet accounts in the chart of accounts, so that the accounts open with the correct balances. This is done by choosing “Accounting -> Chart of accounts”, after which you click on an account number on a balance sheet account, and here you can specify an opening balance in the field “Opening balance”. In the field “Opening balance debit/credit” choose “Debit” or “Credit”.
If assets and liabilities do not balance, you will get a warning when you click on the menu item “Overview” in the left menu.
Daybook
When all accounts are in place, you can begin entering vouchers in the daybook. Click “Daybook”. Then click “Create voucher” to create a new voucher. When you have created your vouchers, you can click “Check daybook”, which will find any imbalances in the daybook. When you are finished with your daybook, you can simply leave the daybook. The system saves the daybook continuously. However, you must always make sure there is not an orange border in the tick box to the left of the voucher you are in, as that means the voucher has not yet been saved in the database. You simply create a new voucher or go into another voucher, and then the voucher you have just left is saved in the database.
When you at some point are satisfied with your daybook, all vouchers can be posted. This is done by clicking “Post vouchers”, which will take all vouchers in the daybook and post them. After this the vouchers are deleted from the daybook, and can subsequently be searched under “Account ledger” and “Postings”.
Electronic voucher folder
You can save invoices and receipts together with the various vouchers you create in the daybook. You can also attach these invoices and receipts after you have posted the vouchers in the daybook.
In this way you can stop using a physical voucher folder. The things saved in the system are stored securely, and backup is taken automatically of these things.
The option to save invoices and receipts is an add-on module named “Document archive”. See our price list for current prices.
Import from online banking via bank connection
MemberOrganizer supports automatic loading of postings from online banking. The first time you connect to online banking you must use MitID, and after this the system can fetch postings continuously from online banking on behalf of the association.
With this solution you avoid for example having to download csv files in online banking, which subsequently must be imported into the system. This solution automatically fetches postings in online banking once a day, which you can then move into the daybook as needed.
You create a connection to online banking via “Accounting -> Daybook” and then choose “More options -> Import from online banking”, and then choose “Import via bank connection”.
When you have created the connection to online banking you can immediately load postings from online banking. And subsequently the system will fetch postings from online banking once a day, and when the system has fetched postings, an extra button will appear in the daybook named “Load postings from online banking”, and from there you can easily move the postings into the daybook.
Note
Also read Filter out payments.
Import from online banking via csv files
MemberOrganizer supports import of account movements from online banking directly into the daybook. This can save the treasurer a lot of keyboard work, and it minimises the risk of making data entry errors.
Most online banks in Denmark are supported, and if an online bank is not found in MemberOrganizer, it can very easily be added if you send a small excerpt of some account movements to MemberOrganizer.
To import from online banking to the daybook, you must first log in to the association’s online banking. Then choose in online banking the period you want to import into the daybook in MemberOrganizer. Now you can — in online banking — save the account movements as a so-called csv file on your own computer. It varies a little from online bank to online bank how this is done, so unfortunately this guide cannot help with that. However, it is usually not particularly difficult to export to csv file.
When the bank statement is saved on your own computer, open the daybook in MemberOrganizer (“Accounting -> Daybook”), and choose “More options -> Import from online banking”. Then choose the online bank the association uses, and choose the account that corresponds to the bank account in online banking, and click “Choose file” and choose the csv file from your own computer. Then click next, and all information from the csv file is loaded. This is date, text, amount, D/C and contra account.
The only information you now need to add is which account the individual account movements should be posted on.
You can also make your own file and import it. The file must be made in Excel and saved in Excel format — that is xlsx. The file is loaded in the same place as bank statements from online banking, but instead of choosing a bank, choose “From file”, and here it also states how the columns in the Excel file should be arranged.
Note
Also read Filter out payments.
Automatic account selection
Automatic account selection makes it possible to set up rules so account fields are automatically filled in when loading postings from online banking. The rules apply regardless of whether postings come automatically from online banking or come via a csv file from online banking.
You can set up the rules under “Configuration -> Accounting -> Automatic account selection”.
The typical rule checks whether the text in online banking starts with a certain word. If you for example have a text in online banking named “Electricity”, you can set up a rule where the search term is “Electricity”, and then the system can automatically place this posting on the account you have chosen for this rule.
Another example can be automatic registration of bank transfers, which however will only work if the member writes the same text each time the member makes a bank transfer, and that you also ensure that invoices are created for the member continuously — and before the member makes the bank transfer. In this case you can set up a rule that matches the text in online banking, and on the rule you specify which member number corresponds to this text, and then the amount is automatically registered on the member’s latest/newest invoice. This is especially suitable for members who on a monthly basis transfer a fixed amount.
This is how a rule regarding member payment (bank transfer) is set up:
Choose “Configuration -> Accounting -> Automatic account selection”.
Click “Create new rule”.
In the field “Search term” enter the text the member uses in online banking.
In the field “Member payment” tick the box.
In the field “Specify member no.” specify the member number the text in online banking corresponds to.
Press “Save rule”.
Filter out payments
If you have set up invoices and payments to automatically be transferred to the accounts’ daybook (see Finance integration), and you at the same time use the system’s option to import online banking postings from csv files or directly via bank connection, you must ensure that the system filters out a number of payments, as these payments would otherwise come in twice in the system, namely in the following two situations:
when the payment is made via for example card payment, MobilePay recurring payment, MobilePay integrated payment and/or Betalingsservice.
when the payment is imported via csv file or bank connection.
Some rules must therefore be set up that filter the payments from the csv file or bank connection.
The rules are created as described in Automatic account selection, where it is important that you tick “Do not import line” when you create a new rule.
The texts in online banking can vary a little from online bank to online bank, but often the payments will be named something like the following:
- Betalingsservice
Typically starts with a B followed by a series of numbers, or BS followed by a space and then a series of numbers. These are typically the automatic debits, that is the PBS agreements, as they appear in online banking. Payments from +71 code lines typically start with DK-IND or FI- or FI71 or IK71 or Indbetalingskort K.
- Card payments
Typically start DKSSL or DK3DSF or SSL or Nets.
- MobilePay recurring payment
Typically starts with 0300.
- MobilePay integrated payment
Typically starts with 0400.
The above is only indicative. Some banks may use other texts than the above, so here you must find out yourself which texts online banking may use for various income you can see going into online banking.
Multiple daybooks
It is possible to create multiple daybooks. When you are in the daybook, click “List of daybooks” and then click “Create new daybook”. Here choose a name for the daybook as well as a voucher start number. Make sure to choose a voucher start number that is large enough not to conflict with voucher numbers from other daybooks.
Standing daybook
By ticking the field “Standing daybook”, it is ensured that the rows in the daybook are not deleted after the daybook is posted. This is practical for vouchers that are posted more or less the same month after month — for example salary. However, remember to change for example date and voucher number before the daybook is posted on subsequent occasions.
Reversing postings
Note
May you delete a posted entry? According to the Bookkeeping Act and good accounting principles you may not delete a posting, as all entries must be able to be documented and traced. Below is described what can be done to reverse a posting.
If you have made a posting error, and you only discover it after you have posted your daybook, the only solution is to make new postings that reverse the error.
A classic error is that you discover the bank account no longer balances. That is, the amount that MemberOrganizer says should be on the bank account does not match the amount that actually is on the bank account in online banking.
When you have found out what the error is, one or more new postings must be made.
The following goes through a couple of different situations
- Posting must be reset/reversed
Example: You have made a posting error that you want to reset/reverse.
Solution: Here the easiest solution is to go to “Accounting -> Account ledger” and find the incorrect posting on the account ledger, and then choose “Choose action -> Reverse” on the right. After this the system creates postings in the daybook, which can subsequently be posted.
- Posted on wrong account
Example: You have paid an expense for a board meeting of 200 kr., but you have posted this expense on a different account than the one used for board meetings, and now you want to move the posting from the wrong account to the correct account.
Solution: Here the easiest solution is to go to “Accounting -> Account ledger” and find the incorrect posting on the account ledger, and then choose “Choose action -> Move to new account” on the right. Then choose the account the posting should be moved to. In this way you move the posting away from the wrong account and onto the correct account.
- Posted with wrong “sign”
Example: You have posted an expense as income (or income as an expense).
Solution: If you have posted “the wrong way round” or with wrong “sign” — that is you have chosen for example credit (C) instead of debit (D) (or the other way round), the solution is to make a posting identical to the incorrect posting, but simply with reversed “sign”. That is, if the original posting was made with credit, debit is now chosen (or the other way round).
- Posted twice
Example: You have posted the same expense twice.
Solution: If you have posted an expense twice, the solution is to make a posting identical to one of the two first postings, but simply with reversed “sign”. That is, if the original posting was made with debit, you make a new posting in the daybook identical to the original posting, but instead credit is now chosen. In this way one of the two expense postings is reversed, and the expense subsequently remains as being posted once.
Reconciliation of bank via account ledger
If you suddenly discover a bank account does not balance, you can use the account ledger to find the error.
The situation is as follows: You have posted a number of vouchers — for example the whole month of January — and now you discover the balance on the bank account inside MemberOrganizer at the end of January is not the same balance as in online banking at the end of January.
Do the following to find the error:
Choose “Accounting -> Account ledger”.
Switch account to the bank account in question.
Switch the date interval if needed, so that for example only January is shown (that is, if the bank for example does not balance at the end of January).
Now compare the balance on the account ledger inside MemberOrganizer with the balance in online banking. That is, date by date.
Start perhaps in the middle of the month — for example 15 January, if it is January you are looking at.
If the balance is wrong on 15 January, the posting error lies before 15 January.
If the balance balances on 15 January, the posting error lies after 15 January.
Reconciliation of bank in the daybook
Under “Accounting -> Daybook” there is an item at the bottom of the page named “Reconciliation accounts”. This can be used to ensure the bank balances before you post:
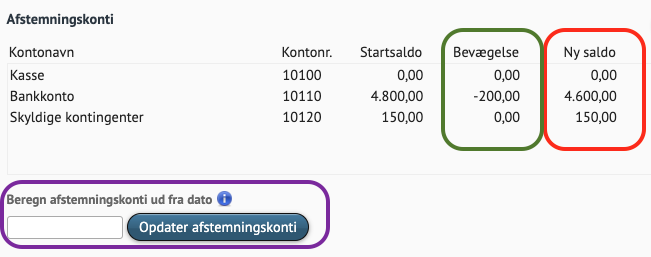
What you must ensure is that the amount in the column “New balance” (highlighted with red box) corresponds to the amount that actually stands in online banking. If it does, you are well on your way with your posting.
The column named “Movement” shows how the vouchers in the daybook affect the individual reconciliation accounts. In the example above “Bank account” is affected by 200 kr., so that it ends at 4,500 kr. if the daybook is posted. You should only post if there actually stands 4,600 kr. on the bank account in online banking.
If the amount in the column “New balance” does not match what actually stands in online banking, you must start finding the error. To ease error finding, you can use the tool marked with a purple box above.
In the purple box above you can enter a date. Here you should choose a date a little back in time and then press “Update reconciliation accounts”. Now the system will filter out the vouchers in the daybook that lie after the specified date when “New balance” is calculated, and the column “New balance” will therefore show how the reconciliation accounts look as of the date in question.
In this way you can calmly find out which date you made a posting error, and then correct the error.
Reconciliation of card payments
If you have set up automatic transfer of invoices and payments, and you at the same time have many payments via card payment, you can contact MemberOrganizer, which can help set up a couple of clearing accounts where all card payments are placed.
This makes it much easier to get your bank to balance.
The challenge with payments via card is that they are registered in MemberOrganizer as soon as the payment is completed, but in online banking the payment is often not registered until the next day or the next banking day (Monday). And this applies to payments made with Dankort.
If it is payments made with international cards (typically Mastercard and pure Visa cards), the money is not transferred to online banking until several days later, and in the total transferred amount (which often consists of many payments) transaction fees are deducted.
Therefore reconciliation of the bank account becomes much easier if you get a clearing account set up for Dankort and a clearing account set up for international cards.
You must create the two clearing accounts yourselves under “Accounting -> Chart of accounts” and then “Create new account”, and both accounts must be balance sheet accounts, placed somewhere under assets. They must be named:
Clearing card payments Dankort
Clearing card payments international cards
When the two accounts are created, send the two account numbers to MemberOrganizer, and we will set up the rest.
The last thing you can with advantage do is create some posting rules, so that when you import online banking postings (either via csv file or automatically via connection to the bank), all these card payments are automatically posted on the two clearing accounts with the bank account as contra account. Then you avoid having to choose the clearing account yourself on all card payments.
You set up these posting rules under “Configuration -> Accounting -> Automatic account selection”. Dankort payments typically start with “DKSSL” or “DK3DSF”, while payments regarding international cards typically start with “NETS “ — and note that these are transferred in batches from Nets, where several payments are combined into one large batch.
Reconciliation of MobilePay payments
This is done the same as card payment (read the section above), but you simply name the account “Clearing MobilePay integrated payment” and/or “Clearing MobilePay recurring payment”.
Reconciliation of outstanding membership fees
If you use the system’s option to automatically create vouchers in the daybook when invoices are created as well as payments are registered, you use a special account in the accounts to keep track of how much is owed in total of the invoiced amounts.
This account is typically named “Outstanding membership fees” or for example “Debtor summary account”. You set up this account as described under Finance integration.
The balance on this account should always match the balance under “Member payments -> Balance list”. Here you must remember to limit the balance list to the period in the accounts you are comparing with. If you want to compare with “Outstanding membership fees” in the accounts as of 31 December 2022 (for example), you must — under “Balance list” — first tick “Limit member balances by period” and then remove the start date (make the field empty/blank) and then enter 31-12-2022 as end date, and then press “Search in account movements”.
The figure that now appears in the balance list should match the figure you see in the accounts on the account “Outstanding membership fees”.
If the figures do not match, there can be several reasons for this:
You are comparing “Outstanding membership fees” with outstanding. You must not do that. It is the balance list you must compare with. For example outstanding will not take into account members who have a credit balance — that is, a situation where the association owes the member money. For example because the member by mistake has paid twice. The balance list takes this into account as well as other situations.
You have posted something manually yourself via the daybook on the account “Outstanding membership fees”.
The figures did not match at the opening of the accounts — that is, you have “inherited” an incorrect opening balance from a previous accounts year, where you for example have posted something manually on the account “Outstanding membership fees”.
There are vouchers in the daybook that have not yet been posted. They do not count on the account “Outstanding membership fees” until they are posted.
As the above shows, it can be difficult/time-consuming to trace a possible difference between the balance list and the account “Outstanding membership fees”.
If you give up finding the difference, you can post your way out of the difference, where you post the difference on the account “Outstanding membership fees” — typically with an income account in operations as contra account.
Account ledger
It is possible to see all postings on a given account. Choose “Account ledger” and then choose a date interval as well as the account postings should be shown for. Press “Search”. It is also possible to export postings from all or selected accounts to a PDF document.
Postings
It is possible to search for posted vouchers. You can search on voucher no., account no., date interval and/or amount. Click “Postings”.
Balance
The balance sums all the different postings at account level. You can choose to include opening balances. Click “Balance” after which the balance is shown. There is the option to export the balance to Excel and PDF. You can also limit the balance to a specific period.
Annual accounts
The annual accounts sum all the different postings at account level. There is the option to export the annual accounts to Excel.
VAT
The accounts can make VAT returns. Below follows a guide on how you can set up purchase VAT and sales VAT in the system. First create the relevant VAT accounts in the chart of accounts. Click “Chart of accounts” and then “Create new account”. Create two balance sheet accounts named “Input VAT (purchase)” and “Output VAT (sales)”. In the field “VAT” choose “Not used” for both accounts.
Click “VAT”. Then click “Create new VAT account”. In description write “Input VAT”. Specify VAT percentage — for example 25. In account choose “Input VAT (purchase)”. Repeat this for output VAT, where you simply choose “Output VAT (sales)”.
Then go to the chart of accounts and attach input VAT and output VAT to the relevant accounts. This is done by going into an account (for example an operating account) and choosing “Input VAT” or “Output VAT” in the field “VAT”.
Now new vouchers in the daybook will automatically be assigned VAT the next time vouchers are created in the daybook.
VAT return
To make a VAT return, click “VAT -> VAT return”, and then choose the period for which a return is wanted.
The system can be connected directly to SKAT, so that the VAT figures are automatically transferred to skat.dk, after which you simply log in to skat.dk and approve the figures.
You connect the system to SKAT by choosing “VAT -> VAT return” and then clicking the blue button named “Connect to SKAT”. Then simply follow the guide.
Close accounts
When the accounts are closed the system will automatically create new accounts with the same chart of accounts as the previous accounts. In addition amounts from balance sheet accounts will be transferred as opening balance in the new accounts, and the year’s result is transferred to an optional account in the new accounts.
You can also choose to run with two sets of accounts in a transition period. In this situation balance sheet accounts are transferred to the new accounts, and when the old accounts are closed, balance sheet accounts are transferred once more. In this way you can get started posting in the new accounts without having to wait to close the old accounts.
To close accounts do the following:
Click “Accounting -> Close accounts / Start new”.
Click “Continue” in the top box named “Create new accounts without closing the active accounts”.
In the field “Transfer result to account” choose the balance sheet account the year’s result should be transferred to. Typically it will be an account named “Equity” or “Year’s result”.
In the field “Name” specify the new accounts year name. It can for example be a year.
The system itself suggests start and end date for the new accounts year, so you should not need to change that.
Click “Create new accounts”.
Now you can activate the new accounts by clicking “Activate the new accounts”.
Now you can post in both the new and the old accounts year. You switch between the two sets of accounts by choosing “Accounting -> View accounts / Switch accounts” and then clicking “Activate” on the right for the accounts you want to work on.
Update temporary opening balances
If you make some after-postings in the old accounts, and you want to carry changes over to the new accounts, this is done as follows:
Make sure the old accounts are the active ones.
Click “Accounting -> Close accounts / Start new”.
Click “Continue” in the top box named “Update temporary opening balances”.
In the field “Choose account for year’s result” choose the balance sheet account the year’s result should be transferred to.
After this balance sheet accounts in the new accounts are updated.
Closing of accounts
When the accounts have been audited and the general meeting has approved them, you can close the accounts completely, so that posting in the accounts is no longer possible.
This is done as follows:
Click “Accounting -> Close accounts / Start new”.
Click “Continue” in the bottom box named “Close accounts”.
In the field “Transfer result to account” choose the balance sheet account the year’s result should be transferred to.
Click “Close accounts”.
After this the old accounts are completely closed, and can no longer be changed.
Budget
A budget can also be attached to the accounts. This is done under “Accounting -> Budget”. Subsequently you can do budget follow-up on a limited period, where actual spending is compared with the budget, and the system shows variance.
Budget figures can be entered on a monthly basis. You can also choose to enter the total annual amount in for example January, if you do not need to make monthly budgets.
Creating a budget
Choose “Accounting -> Budget” and click “Create new budget”. Give the budget a name and press “Create new budget”.
Then click the blue button a little up in the middle named “Enter budget figures”. There is the option to enter budget figures on a monthly basis, but if you do not need to make monthly budgets, simply enter the whole year’s budget figures in for example January. Remember that income must have a minus sign in front.
When you have entered the budget figures for an account, press “Save budget figures” at the bottom on the right, and then you can switch account a little up on the left, and enter budget figures for the next account. You continue with this until all operating accounts are filled in.
After this you can choose “Accounting -> Annual accounts” and then the budget figures will appear out on the right.
Adjusting budget figures in new accounts year
When a new accounts year is created based on an old accounts year, the budget figures for the old accounts year are automatically copied over to the new accounts year. You therefore only need to adjust the budget figures on the accounts where there are changes compared to the old accounts year.
This is done as follows:
Make sure the new accounts year is active.
Click “Accounting -> Budget”.
Click the blue button “Enter budget figures”.
Choose the account where the budget figures should be adjusted and now enter the new budget figures and press “Save budget figures” at the bottom of the page. Repeat this for other accounts that should be adjusted.
Department accounts
The system supports department accounts. This is especially suitable for multi-string associations, or for associations that for example have a café or clubhouse, for which a separate set of accounts should be able to be drawn.
The vast majority of associations do not need to use department accounts, so only use this if you are completely sure that this is how your accounts should be structured.
When you use department accounts, an extra column will appear in the daybook, where you choose which department a voucher should be attached to. When you draw annual accounts, there is the option to see a total set of accounts that includes all departments, but it is also possible to draw annual accounts for the individual departments.
Setting up department accounts
First the various departments must be created. This is done under “Configuration -> Association -> Departments”, where you either create a new department or click into an existing department, after which you can tick the field “Visible in department accounts”. This is done for all departments that should be included in the department accounts.
When departments are created, you can via “Accounting -> Daybook” create vouchers, where a department can now be selected for the individual vouchers.
Upload of expenses
Give the board, instructors and possibly other members the option to upload expenses, so the treasurer can easily keep track of, and process, members’ expenses.
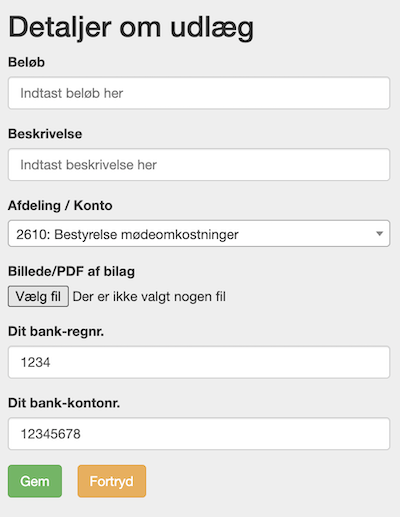
Via the Member Portal selected members, for example board members and instructors, can get access to upload expenses. The expenses are placed in the accounts module, where the treasurer can easily see the expenses and easily approve — or reject — an expense.
When a member uploads an expense, the member must attach an image of the receipt or invoice that is the basis for the expense. This receipt/invoice will automatically be included as an electronic voucher in the accounts.
This is set up as follows:
First the function must be activated, and this is done via “Configuration -> Member Portal -> Choose modules”, where you tick “Upload of expenses”.
Next go to “Accounting -> Chart of accounts” and click into the accounts that should be visible to members in the Member Portal. Here tick “Visible in ‘Upload expenses’”.
Next choose “Configuration -> Member Portal -> Setup of upload of expenses”, and here choose the members who should be able to upload expenses, which is typically a limited number of members — for example board members and instructors.
Finally inform the members in question that they now — when they log in to the Member Portal next time — can see a menu item named “Upload of expenses”. The menu item is either directly in the top menu or under the menu item “Profile”.
When members begin to upload expenses, they become visible under “Accounting -> Expenses from members”. Here you as treasurer can approve or reject expenses, and members will continuously be able to see status on the individual expenses in the Member Portal.
You can also set up the system to send an email to a specific email address when an expense is uploaded.
When an expense is approved, and the member should thereby be paid some money, this happens via the association’s online banking. There is no automation in the system that can help with the actual payout to the member. This will likely have to be handled as a bank transfer in the association’s online banking.
Reconciliation of expenses against the bank
Sometimes there can be a difference between the date when you post an expense in the daybook, and when the money is actually paid out from online banking to the person who had the expense. This date difference can make it difficult to reconcile the bank if you are not aware of this.
If you use the system’s option to automatically load postings from online banking, this date difference can especially cause challenges.
The system does however contain an option to place the expenses on a kind of clearing account. And at the moment the payout then happens from online banking, it is posted on the clearing account with the bank as contra account.
If we assume you have an account named “Various creditors” under your liabilities in the accounts, you can set up this account to be the clearing account for the expenses.
When this is set up, the only thing you must remember to do when you pay out an expense from online banking is to use the following text in online banking to start with:
Udlæg:
So if you for example have an expense regarding some shopping in a shop for a board meeting, you can for example use the following text in your online banking:
Udlæg: Shopping board meeting
When this posting from online banking is loaded, the system — because the text starts with “Udlæg:”, knows that it should be posted on the clearing account with the bank as contra account.
If you want to use this function, you must send us the account number of the clearing account. If the account is not in the chart of accounts today, you must first create the account. It is created as a balance sheet account under your liabilities.
Voucher inbox
Note
The voucher inbox module requires that you also use the document archive module, which ensures the actual storage of the vouchers. Prices on all modules are available on our website.
Voucher inbox can help with the following things:
Give overview of vouchers. That is, the invoices you receive and must pay.
Option to send vouchers into the system via a special email address.
Automatically read amounts and dates on vouchers.
Automatically match vouchers with postings in the daybook based on amounts and dates.
If you have many vouchers in your accounts, the voucher inbox will likely be able to save the treasurer a lot of work, as the voucher inbox can automate a number of the tasks a treasurer typically performs manually.
This is for example upload of vouchers from your own computer to the accounts as well as placing the voucher on the correct posting in the daybook. These work tasks can to a high degree be automated with the voucher inbox.
The voucher inbox is taken into use under “Accounting -> Voucher inbox”, where you press “Activate voucher inbox”.
After this you will be shown a special email address that vouchers can now be sent to, and then vouchers will automatically be placed in the voucher inbox, from where you can easily attach vouchers to the correct postings in the daybook.
Each time a voucher is received in the voucher inbox, the system will automatically read amounts and dates on the voucher, which are later used to easily match the voucher with a posting in the daybook.
You can do automatch, where the system will automatically take all vouchers in the voucher inbox and attempt to match them with postings in the daybook, and matching will happen based on amounts and dates.
Example of handling a voucher
Let us look at an example. We assume the association receives an invoice from a supplier, which must be paid. We assume the treasurer receives the invoice by email. The treasurer now forwards the invoice to the special email address that belongs to the association’s voucher inbox.
You could also imagine the treasurer has informed the supplier about this special email address, and then the supplier will send the invoice directly into the association’s voucher inbox.
Note
You can — via your own web hosting — create an email address for example named bilag@<domainname>, which is set up to automatically forward emails to the special email address that belongs to the association’s voucher inbox. <domainname> is replaced with the association’s website address. If you for example have an association that has a website address named badmintonklubben.dk, you must create an email address on your web hosting named bilag@badmintonklubben.dk, and then set this email address to forward all emails to the special email address that belongs to the voucher inbox. The special email address that belongs to the voucher inbox is not so easy to remember, as it consists of a series of numbers and letters that do not really make sense. Some web hosts require that a link in an email is clicked when you set up an email address to forward to another email address. If your web host does this, you must first go to “Configuration -> Accounting -> Miscellaneous settings” and tick “Email to voucher address (forwarding)”, and then get your web host to send the confirmation email. After this contact us, and we can find the confirmation email and click the link. After this you must go in and remove the tick again, so the system again analyses the emails that come in to you, and places them in the voucher inbox.
Next time the treasurer checks the voucher inbox under “Accounting -> Voucher inbox” the treasurer will see the invoice from the supplier. We further assume the treasurer now clicks into the invoice from the voucher inbox, and finds payment information and pays the invoice via the association’s online banking.
A couple of days later the treasurer returns to the accounts and now loads postings from online banking into the daybook via “Accounting -> Daybook”. Among these online banking postings is the payment to the supplier regarding the aforementioned invoice.
After this the treasurer goes back to “Accounting -> Voucher inbox” and now chooses “More options -> Voucher match”.
The system will now discover that there in the daybook lies a posting with an amount and a date that matches the invoice lying in the voucher inbox, and the system will automatically attach the invoice to the posting in the daybook.
The above example can of course be handled without use of voucher inbox — especially if you have very few vouchers. But if you have many vouchers you must match with postings in the daybook, it can quickly become unmanageable, and here the voucher inbox comes to help and creates overview.
Export data
Accounts data can be exported to SAF-T, which is an xml format, as well as to Regnskab Basis, which is a csv format.
Export to SAF-T happens via “Configuration -> Accounting -> Export accounts data to SAF-T (xml format)”.
Export to Regnskab Basis happens via “Configuration -> Accounting -> Export accounts data to Regnskab Basis (csv format)”.