Members
Note
Member field configuration is described in Members. Import and creation of members is described in Handling both individuals and companies
Members are the core of the system. Most of the other modules build on top of the member module — for example invoicing, booking, online enrollment, and more.
Active members
When the member list is shown in the system (choose “Members -> Member list”), all active or enrolled members are displayed. An active member is a member you can do something with in the system, such as:
Send an email to the member.
Send an SMS to the member.
Send an invoice to the member.
Enroll the member in an event.
Assign the member a new membership fee type.
Find member
When you want to search for a member, the easiest and fastest way is to click in the white field at the top left just below the association name. Here you can type “Hans Hansen”, for example, and the system will find all members called Hans Hansen. You can also type “Hans H” and the system will find all members whose first name is Hans and whose last name starts with H.
You can also search by email address, phone number, or member number. You can in fact search all information stored on individual members.
When you have found a member, click the member number in the “ID” column in the search result to open the member’s master data.
Cancel membership
If a member should resign, this can easily be done from the member list, where you choose “Cancel membership” under “Choose action” on the right. If the member has unpaid invoices, the system asks whether these should be cancelled.
You can also cancel a membership when you are on the member’s details page. Choose the “Actions” tab at the top right, and then click the blue “Cancel membership” button.
You can also cancel a membership in the future by setting the resignation date to a future date. When that date is reached, the system automatically cancels the membership. This requires that under “Configuration -> Members -> Member list and deletion of members” you have ticked “Resign members when resignation date is passed”.
Resign many members at once
Always be careful when resigning many members at once. There is no function to re-enroll many resigned members at once.
If you want to resign many members at once, those members must be linked to an activity or a member report. When that is done, you can choose “Resign members” under “Choose action” on the right for the activity or member report.
If it concerns members who have not paid, you can also resign many members at once via “Member payments -> Outstanding”. Here you tick the members to be resigned on the left, and then choose “Cancel invoices AND resign members” in “Choose action” (near the top of the screen).
Inactive members
Inactive members covers several things: for example resigned members or members who are temporarily resigned. You cannot do anything with these members in the system. They are still stored in the system on certain lists, so you can re-enroll a member who was resigned but now wants to be a member again, without entering all master data from scratch or the member having to enroll again via the Member Portal. You can find the resigned member and change status to enrolled.
The list of inactive members is found under “Members -> Resigned members and other lists”. Here you can click “Resigned”, for example, to see a list of all resigned members.
Non-members
You can also register non-members in the member list. It sounds slightly contradictory to have non-members in a member list, but the system is after all a membership system, which is why the list of all persons in the system is called the member list.
In member field configuration there is a field called “Member”, which can have the value “Yes” or “No”. The intention of this field is precisely to mark those persons (or companies) created in the member list who are not “real” members. For this type of member/person you choose “Member = No”. You can then easily pull a list of all non-members via Member reports.
An alternative to marking non-members this way is to create an activity called “Sponsor” or “Company” and assign non-members to this activity. You can then always easily pull a list of persons subscribed to this activity.
Re-enrollment of resigned member
If a member wants to enroll again, search for the member (for example via the white search field at the top right under the association name) and open the member’s master data. Then choose the “Actions” tab at the top right, where the member’s status can be changed to “Enrolled”. An enrolled member is an active member.
Member reports
When you click “Members -> Member list”, the system shows a list of all active, enrolled members (plus any non-members such as companies and sponsors). If you want to see a subset of members, this is possible via so-called member reports.
In a member report you can add a range of search criteria, and the system will only show members who meet those criteria exactly. Member reports are created under “Members -> Member reports”, then click the “Create new member report” button.
Member reports are given a name and saved in the system so you can use the member report again and again.
You can use both AND criteria and OR criteria when creating a member report. An AND criterion requires that a member meets all the specified criteria to be included in the member report. If you have set up two criteria, for example:
Member must have an email address.
Member must be over 18 years old.
Then the system only selects members who meet both criteria. That is what and means in an AND criterion.
The opposite applies to an OR criterion. An example could be the following two criteria:
Member must have postcode 4000.
Member must have postcode 4100.
Here the system selects members who have either postcode 4000 or postcode 4100. The member only needs to meet one of the criteria to be included in the member report.
Here are some examples of member reports you can create and save in the system:
- Find all members missing an email address.
Add a criterion where the email field must equal nothing.
- Find all members over 18 years old.
Add a criterion where the age field must be greater than 18.
- Find all members living on Funen.
Add two criteria: one saying postcode must be equal to or greater than 5000, and another saying postcode must be less than or equal to 5999.
- Find all members subscribed to Betalingsservice
Add a criterion where the Betalingsservice agreement number field must be greater than 0.
When you have saved a member report, it can be used to send an email or SMS to precisely the members included in the member report. It can also be used for invoicing, where you can send an invoice to all members in the member report.
Member statistics
There is a report on enrolled and resigned members distributed by month. This member statistics report is based on the enrollment date and resignation date for individual members.
The report is found under “Miscellaneous -> Reports & CFR -> Number of members plus enrollments and resignations”.
CFR and extracts for the municipality
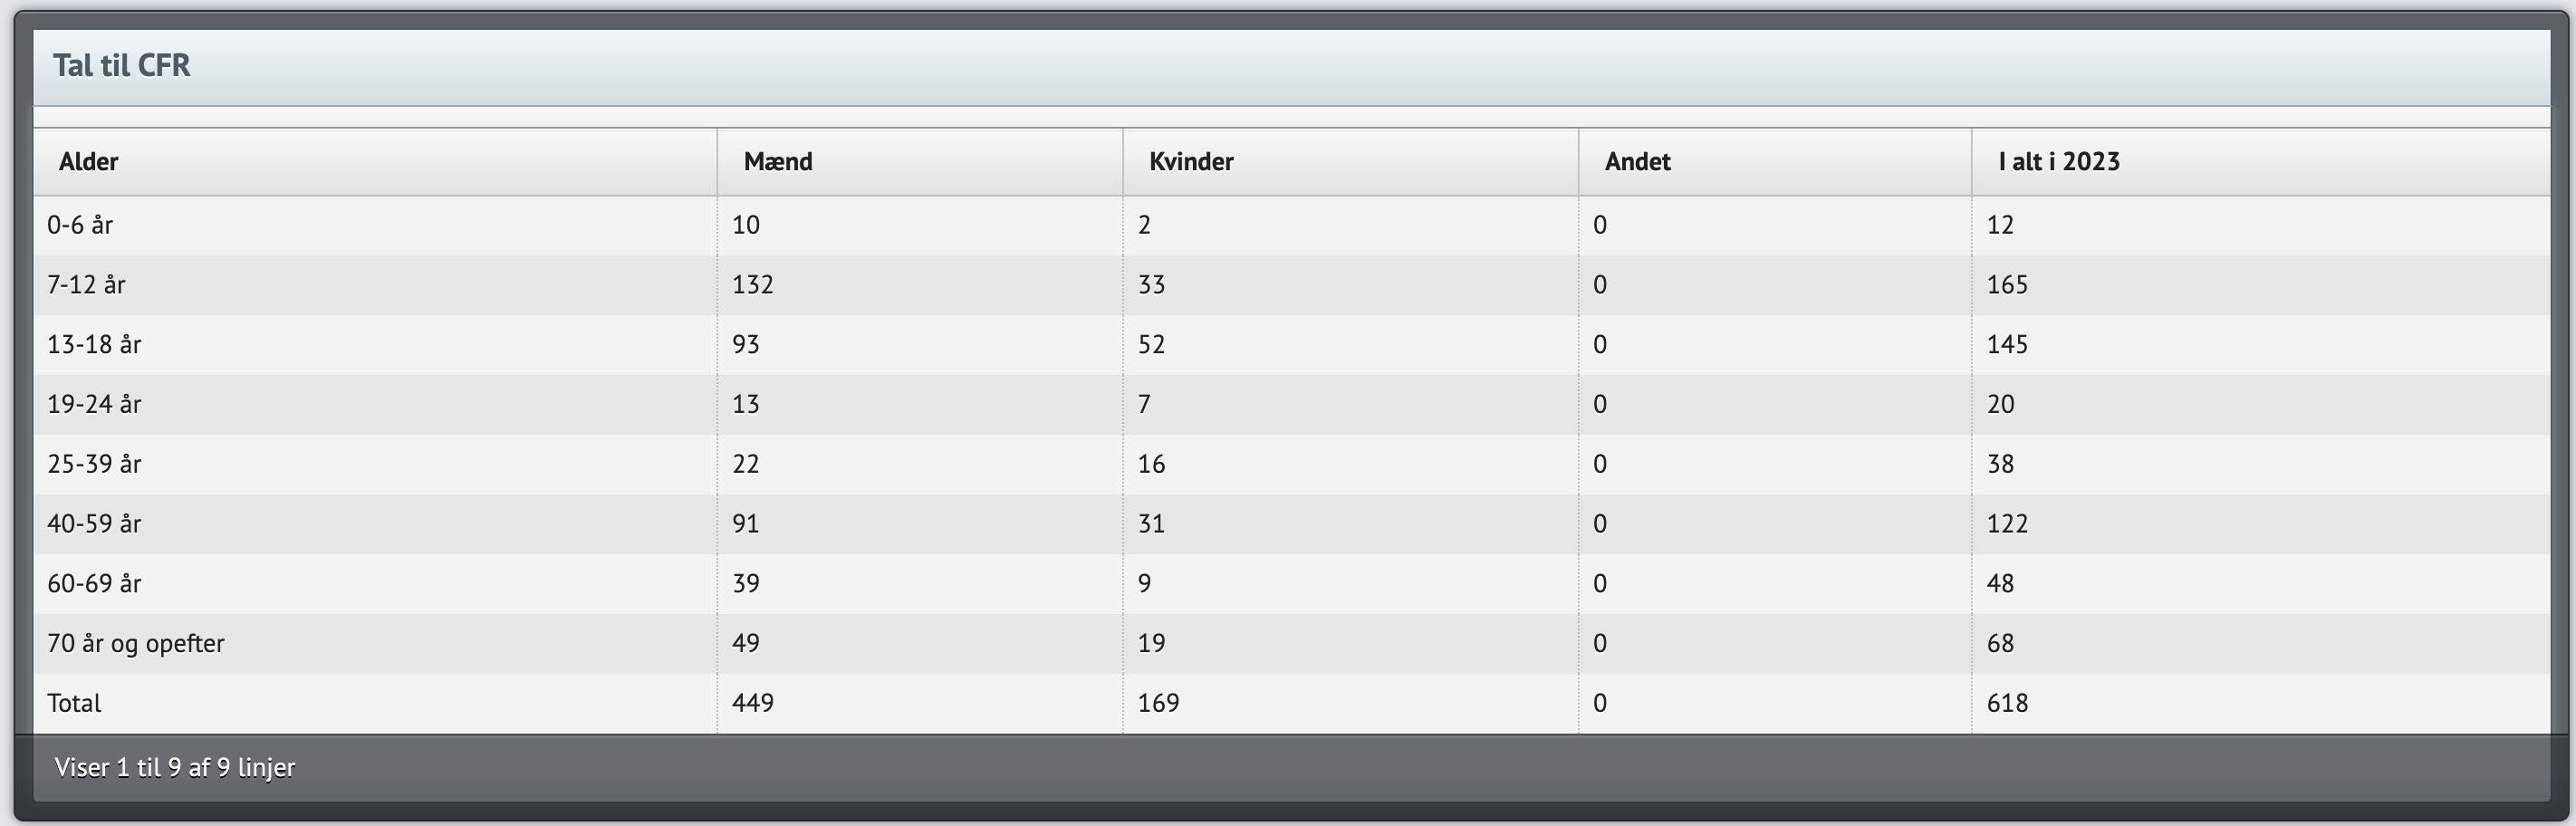
If you need to report membership figures to CFR (Central Association Register, https://medlemstal.dk), there is a built-in report in the system for this. You simply press a button and you have all the figures.
The report is found under “Miscellaneous -> Reports & CFR”, where you click “Membership figures for CFR (Central Association Register)”, and the system automatically produces the following report:
Figures for the municipality
If you need to report figures to your municipality, the system can in many cases also help. Often the municipality is interested in the same figures as CFR — perhaps just combined into larger member groups, such as members over/under 25 years old.
Some municipalities are also interested in knowing how many members live within the municipality and how many live outside it. This is also supported in the system, and this distinction can be made in the same place as you pull the CFR figures. This requires that the “Municipality” field has been made visible, which can be done under “Configuration -> Members -> Member field configuration”, and municipality must of course be set/selected for all members who should be included in the report. You can have the system select a default municipality for new members — contact us and ask to have this set up.
Family memberships
You can create relations between members. This is typically used to handle family memberships, where two or more members are linked together. When you send the annual membership fee, for example, the system creates one invoice for one member in the family, and the other family members’ invoices are added to this one member’s invoice.
Creating a relation
You create a relation by opening the member’s master data and clicking the “Relations” tab at the top right. Then click the “Assign invoicing member” button and choose the member the invoice should be sent to.
Deleting a relation
If you want to delete a relation, open the member’s master data and click the “Relations” tab at the top right. Then click “Assign invoicing member” and choose the top line in the list “No member selected”.
What are relations used for?
Relations between members are used primarily for invoicing. When two or more members are linked, the system can combine their invoices onto one invoice sent to the member designated as the invoicing member (the main member).
Relations do not automatically control who a member may enroll when signing up online for an event, for example. An activity can be set up to let members enroll others — that is independent of relations in the member database.
Enrolling family members for events
If a family member (e.g. spouse or child) already exists as a member with a relation to the main member, the main member can enroll the family members for an event — one at a time — by switching profile in the Member Portal:
Log in as the main member (the member without a parent relation, or with “Has Children” = Yes).
Go to Profile in the Member Portal and choose Show Family Members.
Click Change Profile next to the family member to be enrolled.
Enroll that family member for the event.
Repeat for each family member.
You cannot restrict the “enroll others” option on an activity so that a member may only enroll people who already have a relation in the system. If you only want existing family members enrolled, use profile switching as described above — or have an administrator enroll the members from the activity list.
Note
The Show Family Members menu appears only when the feature is enabled for the club and there are at least two members in the same family. Contact MemberOrganizer support if the menu is missing.
Relations in the member list
You can show in the member list whether a member has a relation by making the Parent and Has Children fields visible:
Go to Configuration -> Members -> Member field configuration.
Find the Parent and Has Children fields and make them visible (tick “Visible”).
Go to Members -> Member list and click Choose Columns. Add Parent and/or Has Children to the list.
The Parent field shows Yes/No depending on whether the member has a relation to an invoicing member. The Has Children field shows Yes if other members are linked to the member as invoicing member.
Family memberships and enrollment in the Member Portal
When a new member enrolls, you can set up the system so that the member — in addition to their own master data — can enter master data for one or more additional family members/household members. You can vary the information you want for the main member (“parent”) and the family members/household members (“children”).
You can set up the system to send two different welcome emails — one to the main member and another to the family members.
You can decide how many family members minimum and maximum can be added in addition to the main member. And you can control what the family members should be called — for example “household member”, “family member”, or “child”.
Enrollment in a family membership is set up as follows:
Create an activity of type “Membership” via “Activities -> Create new activity”.
When the activity is created, choose “Activities -> Activity list” and under “Choose action” on the right choose “Family membership”.
A screen is now shown where you can tick “Enable family membership”, after which all family membership settings become visible.
When you have adjusted the family membership to your requirements, you can test whether the enrollment form works as expected in the Member Portal. Go out to the Member Portal/website and pretend to enroll. You will then see the enrollment form that potential members are met by.
Member types
It is possible to create different member types, each of which only shows selected member fields. This can be used to create the following, for example:
- Newsletter recipients
Here you may only need to see member no., name, and email.
- Sponsors
Here you may only need to see member no., name, address, email, and phone, but not gender and age fields.
- Coaches
Here you may only need to see member no., name, email, phone, and age, but not gender, address, and so on.
If you have created a member type called newsletter recipient, for example, you will only see member no., name, and email when you are on master data for that person.
Creating member types
Do the following to start using member types:
- Create a department
You must create a department (unless this has already been done) and then a range of activities in this department, where each activity corresponds to a member type. Start by creating a department — for example called “Member types” — and then create a range of activities — name each activity after the member type name.
- Enable member types
Choose “Configuration -> Members -> Member types”. Tick “Use member types” and choose the department you just created.
- Choose member fields for member types
All that remains is to choose member fields for the individual member types. Go to the activity list and under “Choose action” on the right choose “Edit member fields”.
Collecting consent
If you need to collect consent from your members, there are a number of fields in the system for this. There are 5 so-called consent fields, so you can collect consent for 5 different purposes in the system.
The system keeps track of when consent was given and whether it was the member or the association who registered the consent in the system. If the member registered consent, this can happen either on enrollment (online enrollment) or because you sent an email to all members asking them to go to the Member Portal and give their consent. If the association registered consent (for example via a signed document), you must store this document in a secure place yourself. It can be stored on the member in the system, where you can upload files. This is done on the member’s master data on the “Actions” tab — choose “Member documents”. This requires that the document archive module is enabled.
Consent configuration
First make one of the consent fields visible in the system. This is done under “Configuration -> Members -> Member field configuration”.
Click into one of the fields “Consent 1 – 5”, make the field visible, and rename the field from “Consent 1” to “May use photos”, for example. In this example you want the member’s consent to use photos of the member on the association’s website, for example.
When the member field is set up, the next step is to attach a clear consent text to this field. This text will be shown together with the field so the member is in no doubt about what they are consenting to. Consent texts are configured under “Configuration -> Members -> Consent texts”.
If you want to use photos of the member in various contexts, a consent text could read as follows:
I hereby give permission to share photos on social media or the website on which I appear.
Note
Make sure your consent texts have the correct wording before they are used. If you change a consent text and you have already collected consent from a number of members, those consents will be reset because the consent — the text/purpose the member agreed to — has changed. Even the smallest change will reset consents.
If you open details for a member, the consent field from the example above will look like this:
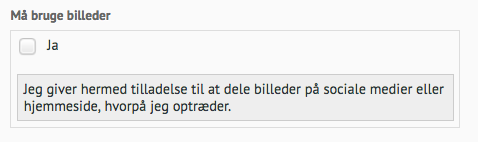
Here you as the association can tick Yes if you have collected consent via a signed document, for example. If the member gave consent themselves via online enrollment, it will look like this:
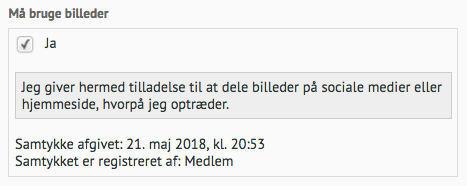
It is clearly shown when consent was given and who gave consent.
The following describes how consent can be collected from new and existing members.
New members
Note
A prerequisite for the following is that you have already configured a consent field with the associated consent text. Read more above.
Go to the activity list and find the activity or activities you use for enrollment of new members. Open online enrollment for that activity and choose the “Member master data” tab. Make sure the consent field is ticked in the “Visible” column so it is visible on enrollment. If the consent you collect is required, also tick the “Mandatory” column.
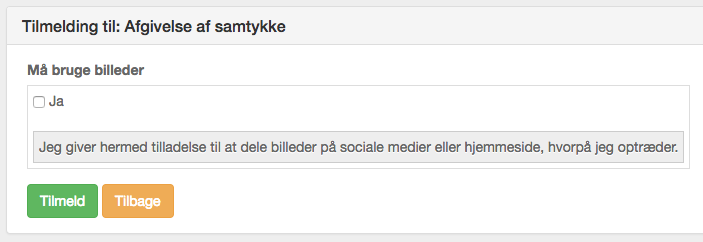
Here is an example of an enrollment screen where the member can give consent for photos to be used:
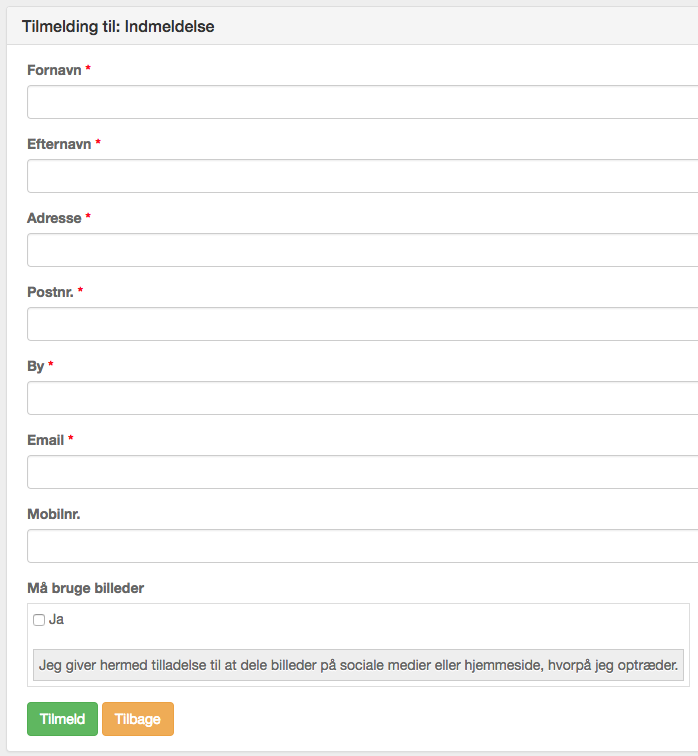
Note that the consent field is optional, as there is no red asterisk next to the field.
Existing members
Collecting consent from existing members works as follows:
Create a new activity — for example called “Giving consent”.
Open online enrollment for the new activity and tick “Publish”.
Then choose the “Member master data” tab. Here only the consent field should be ticked in the “Visible” column. If the consent you collect is required, also tick the “Mandatory” column.
On the “Member master data” tab it is very important to also tick “Also show master data to existing members” shown at the top right. Otherwise existing members will not see the consent field when they “enroll” in the activity.
On the “Basic configuration” tab, in the field “Choose who can enroll in the activity”, choose “Existing members only”.
On the “Basic configuration” tab, in the field “Member authentication”, choose “Member number and password” or “Email address and password”, so you have greater assurance that the member themselves gave consent.
You can now send an email to all members encouraging them to go in and “enroll” in the new activity, thereby collecting consent.
Here is an example screen for collecting consent from existing members: