Booking
Note
If you want to offer enrollment for e.g. memberships, events and/or team training (e.g. spinning, yoga and similar), you should use Online enrollment.
The booking module can be used e.g. to book tennis and badminton courts. You can e.g. create 6 courts (resources) and assign them to a so-called resource calendar, which members can subsequently use to book courts themselves. The resource calendar can be viewed by members via a link that you e.g. can place on the association’s website. Members can log in themselves and book.
Members will also be able to book via an app. Read more about the app here: App
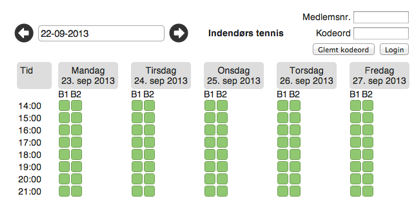
The image above shows 2 tennis courts (named B1 and B2), which can be booked from 14:00 - 21:00 in one-hour slots. Members log in via member number and password at the top right.
The booking module is connected directly to the member database in MemberOrganizer, as part of the Member Portal, which is why member number and password are retrieved from there.
You can also have the system display resources (e.g. courts) in a calendar, which e.g. looks like this:
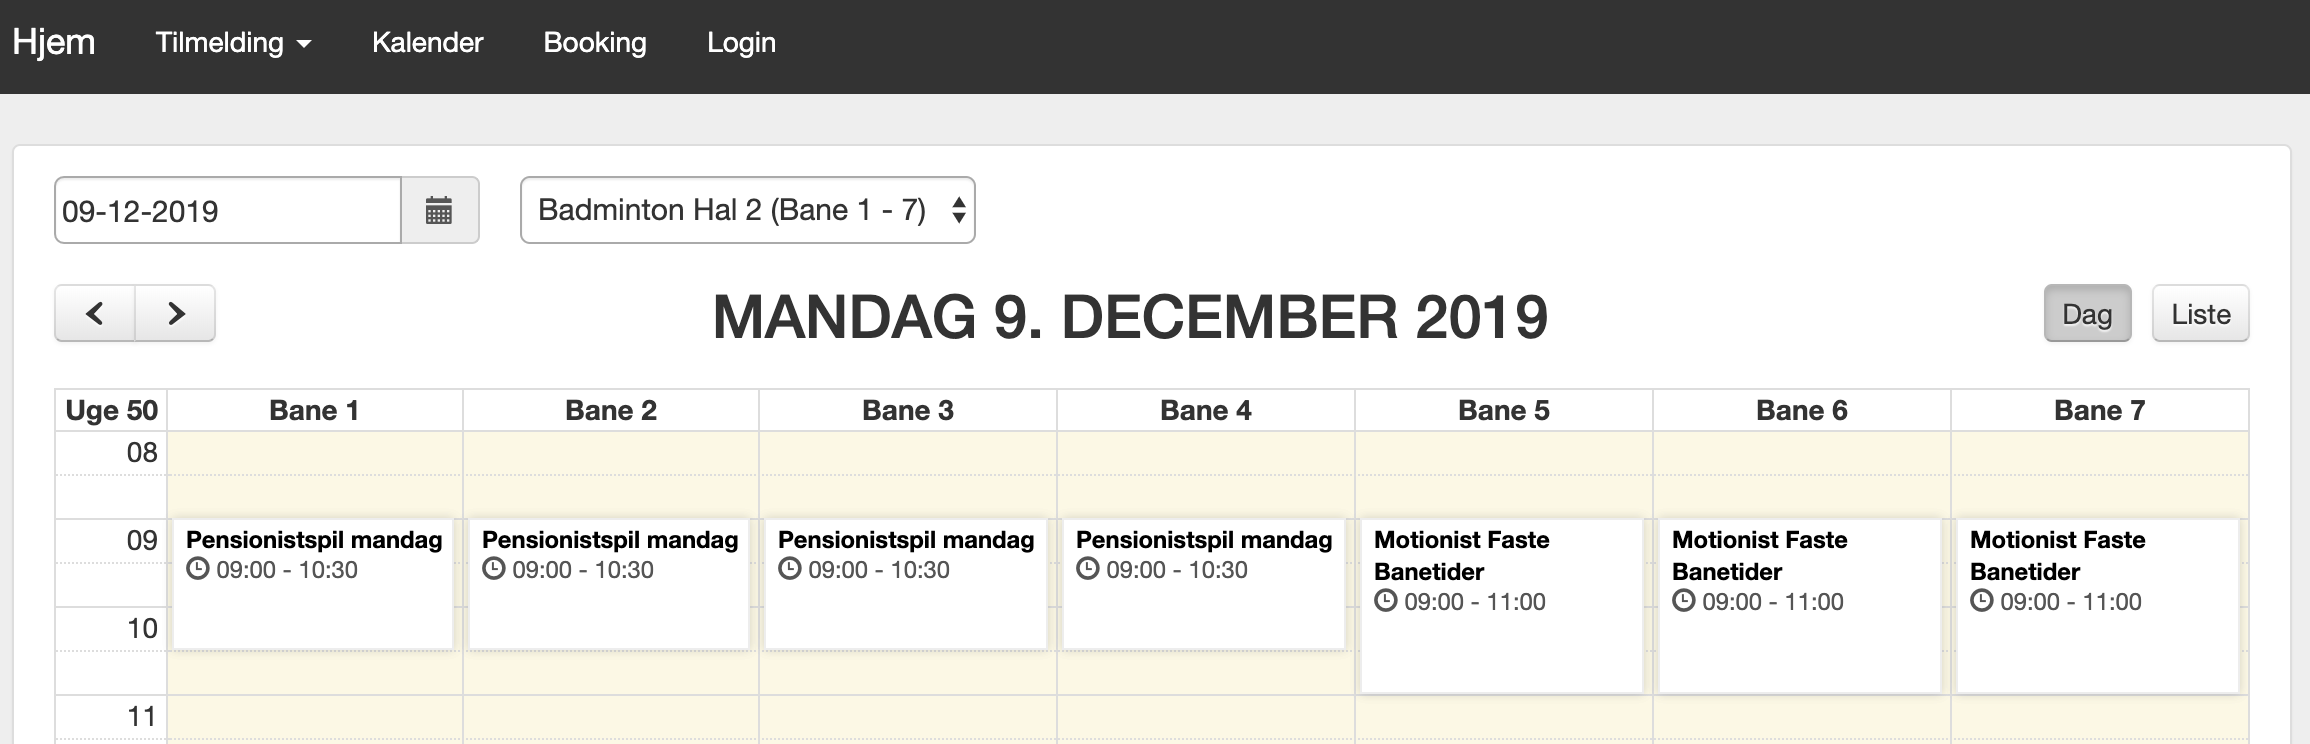
This is particularly well suited e.g. for badminton and tennis clubs, where you have a number of courts that you want to display in separate columns in a calendar. This view can be enabled under “Configuration -> Booking -> Configuration”, where you must tick “One column per resource”.
If booking options do not follow a fixed schedule, as e.g. court and room booking often does, there is also an option to set up something called special times. It is used if you e.g. offer different things at different times throughout the day, and it varies from day to day when things are offered. However, things must follow a fixed pattern week after week. Read more under Special times.
Enabling the booking module
If the “Booking” menu item is not visible, click your association’s name in the top left corner. Here you must tick “Booking module” under “Add-on modules”. Click “Save” at the bottom of the page, after which the “Booking” menu item becomes visible.
Resources
A resource is something that can be booked. It can e.g. be the following things:
Badminton court
Tennis court
Bowling lane
Room
Boat
If you e.g. have a badminton hall with 6 courts, you create 6 resources and give them e.g. the names B1, B2, B3, B4, B5 and B6.
Resources are created by clicking “Booking” and then “Resources”. Then click “Create new resource”.
Resource calendars
A resource calendar is a collection of resources. E.g. 6 badminton courts. At the same time, the resource calendar specifies the time slots in which the resources can be booked, as well as the length of a booking. If it is e.g. booking of badminton courts, a length of e.g. one hour is chosen.
If you have varying times at which the resources (e.g. badminton courts) can be booked on weekdays and weekends, you create two resource calendars, where the first has the times on weekdays, while the second has the times on weekends.
Resource calendars are created by clicking “Booking” and then “Resource calendars”. Then click “Create new resource calendar”.
Creating bookings from the administration area
When resources and resource calendars have been created, the association can go to “Booking” and choose “Booking overview”. Here e.g. the following image is shown:
Here you can see 2 resources (B1 and B2), which are two tennis courts. If you want to book a court, click one of the green boxes, after which you get the option to choose the members who should be part of the booking.
You can also assign an activity to the booking instead of members. Or you can write descriptive text regarding the booking.
When the booking has been created, the green box is changed to a red box, which marks that the court in the given time slot cannot be booked, as it is occupied.
Creating recurring bookings from the administration area
From MemberOrganizer, the association can easily create a so-called recurring booking. It can e.g. be a team that regularly trains every Wednesday from 15:00-16:00 from September to March.
When you create a booking, you can choose that the booking should repeat. E.g. repeat every day, week or month. That way it is easy to create a regular team e.g. Wednesday at 15:00-16:00. It can be done with one booking, after which the system itself inserts the subsequent bookings.
Creating bookings from the website
You can also give members access to book times in the resource calendars themselves. This is done by placing a link on the association’s website, and when members click this link, the booking page opens. The link to the booking page can be seen by choosing “Booking” and then “Booking overview”. Then click “Member portal” at the top right, after which the booking page opens in a separate tab, from which you can copy the link and e.g. place it on the association’s website.
In each resource calendar you can set some rules about how many bookings a member may have at a time. Or how far in advance members can book times.
Book time (person calendar)
In addition to booking resources such as courts and rooms via resource calendars, MemberOrganizer can handle person calendar booking — also called Book time in the Member Portal. It is well suited when members need to book time with a specific person (e.g. therapist, masseur, physiotherapist or coach), and where different services are offered with different duration and price.
Typical flow for the member:
Chooses a service (e.g. massage 30 min. or 60 min.).
Chooses add-on services if applicable.
Chooses therapist, if the service can be booked with several people.
Chooses date and available time slot.
Confirms the appointment — and pays immediately if payment has been set up.
Appointments are shown in the administration area under Booking → Person calendars - appointments, where you can filter on one person calendar or view All person calendars.
Enabling
Book time requires that the booking module is enabled (see the section Enabling the booking module above). In addition, the person calendar function must be enabled for your association. When the function is active, the menu items Person calendars, Person calendars - appointments and Services appear under Booking, and members get the menu item Book time in the Member Portal (and in the app, if it is used).
Contact MemberOrganizer if you want the function enabled.
Difference between resource calendar and person calendar
A resource calendar typically groups several identical resources (e.g. 6 badminton courts) with fixed booking slots. A person calendar links one person (as a resource) to a calendar with opening hours, services and available times.
Important differences:
Services (name, duration, price, colour) are created centrally under Booking → Services and are then assigned to the person calendars where the service can be booked.
The member chooses service first — not a calendar — and the system then finds available therapists and time slots.
A resource can only belong to either one resource calendar or one person calendar.
You can link a shared room (e.g. massage room) to the person calendar, so the room is blocked for other therapists in the same time slot.
Configuration in the administration area
The following steps are recommended when getting started:
Create resources Under Booking → Resources, create one resource per person (e.g. «Karin»). Also create resources for rooms if applicable (e.g. «Massage room 1»), if several therapists share the same physical room.
Create person calendars Choose Booking → Person calendars and click Create new person calendar. Fill in e.g.:
Name — e.g. «Karin — massage» (shown to members as the therapist’s name).
Person (resource) — the resource that represents the therapist.
Shared room / resource — optional; blocks the room when booking.
Period — start and end date for when online booking is possible.
Time interval — minimum spacing between start times members can choose (e.g. 15 min.).
Max. days in advance and Latest booking (hours before) — how far ahead members may book, and how close to the appointment booking is still allowed.
Default activity (payment) — see the section on payment below.
Save the person calendar and then configure Opening hours, Breaks and optionally Weekly exceptions via the buttons on the person calendar.
Create services and add-on services Under Booking → Services, services are created for the entire association. Specify name, duration, break after appointment, price and which person calendars the service can be booked on. Tick Available in online booking, if members should be able to choose the service.
Add-on services (e.g. «Hot stones») are created on the same page and linked to the main services they can be added to.
Services can be grouped under Service groups, so they are presented clearly in the Member Portal.
Set up payment (optional) If services cost money and an invoice should be created, the person calendar must have an activity with invoicing methods assigned — in the same way as for payment for regular booking (see Payment for booking). The price on the invoice comes from the service and any add-on services; the activity controls the payment flow (card, MobilePay, invoice later etc.).
If payment requires immediate payment (e.g. card or MobilePay), payment is completed in the Member Portal before the appointment is finally confirmed — just like payment for booking with an assigned activity on a resource calendar.
Book time in the Member Portal
When the configuration is in place, the member logs in to the Member Portal and chooses Book time in the menu. The member then goes through the steps Choose service, Add-on services (if relevant), Therapist (if several person calendars offer the service), Date and time, Confirmation and optionally Payment.
Along the way, an overview is shown in the side panel with chosen service, therapist, time slot and total price. The member can jump back to previous steps via the side panel, when possible.
A link to the booking flow can also be embedded on the association’s website (via the Member Portal’s CMS menu), so members can reach Book time directly from there.
Managing appointments
Under Booking → Person calendars - appointments, all appointments are shown in a calendar. Choose All person calendars or filter on one specific person calendar. Click an appointment to edit it, or use Create appointment to enter an appointment manually (e.g. phone booking).
When creating or editing manually, specify date, time, member, person calendar, service and any add-on services — in the same way as when the member books online.
Punch cards in the person calendar
The person calendar can be used together with MemberOrganizer’s existing punch cards (activity type Punch card, type 3). This lets members buy a punch card online and later book treatments by redeeming clips instead of paying per visit.
Typical setup:
Create an activity of type Punch card with the desired number of clips (e.g. 11 clips for a 10+1 offer) and online enrollment/payment like other activities.
Under Booking → Services, create one treatment service (e.g. Massage 30 min) with normal price and duration. Optionally link an Accepted punch card activity — members with clips can then choose Pay with punch card instead of Pay with card at checkout.
Members without a punch card book the same service and pay as usual. Members with clips choose the service and payment method on the payment step; one clip is deducted on confirmation. Appointments paid with clips show as paid in the person calendar.
The Buy punch card menu item is only shown to logged-in members — guests and visitors without login do not see it. Logged-in members can buy new punch cards via the menu item in the Member Portal when additionally these conditions are met:
The member is logged in.
The person calendar module is enabled for the association.
At least one service under Booking → Services has an Accepted punch card activity linked.
The punch card activity has open online enrollment and appears in the Member Portal enrollment list (same requirements as under Enroll).
If the menu item is not shown, members can usually still buy punch cards via the regular Enroll flow when the activity is visible and open there.
Under Members → member → Actions → Adjust punch card, you can manually adjust balance and expiration date and view clip change history. Add-on services cannot be combined with punch card redemption in the same booking.
One-time codes for door system
Note
One-time codes only work if you also use the door system from MemberOrganizer. Read more here: Access control / Door system.
If you have unmanned resources - it can e.g. be courts or rooms - and you want to sell access to these resources, this is possible via one-time codes for the door system.
Example: You want to sell access to tennis courts to guests/tourists. I.e. non-members. In practice it will work as follows:
The guest/tourist finds an available time via the Member Portal.
The guest/tourist pays for the court via payment card.
The guest/tourist automatically receives an email with a 6-digit code. This code only works in the time slot around the booking.
The entire process is controlled automatically, and therefore requires no administration.
Setting up 6-digit one-time codes is done on the resource calendar, where you can tick “Generate 6-digit numeric code for booking”. Read more about setting up resource calendar (incl. payment) in the section Payment for booking.
Payment for booking
It is possible to assign payment to a booking, which e.g. can be used in the following situations:
Prepayment for room rental.
Guest (non-member) books a tennis court, badminton court or padel court.
The following describes setting up payment for a booking in connection with renting a court on an hourly basis to guests:
- Create an activity
Do this via “Activities -> Create new activity”. It can e.g. be named “Guest booking”. It is the activity that controls the price as well as collection of master data on the guest.
- Activity configuration
The activity must be of type “Membership” and price type must be “Fixed price”, and the price per hour can now be specified. On the next screen, choose the following settings:
In the field “Who can enroll”, choose “New members only”.
Under “Member master data”, choose which master data the guest must fill in. Typically at minimum name, email address and mobile number.
In the field “Invoicing method”, choose one of the options with “Dankort”. This option will only be visible if you have an acquiring agreement regarding card payment. The advantage of card payment is that the guest can only book the court by paying immediately.
In the field “Enrollment possible in Member Portal”, remove the tick, so that this activity is not visible under the “Enrollment” menu item in the Member Portal. This activity should only be used in connection with payment for a booking.
In the field “‘Real’ member”, remove the tick, as it is not a real member, but a guest.
Tick “Make membership time-limited” and choose “Duration” — e.g. “1 day” (approx. 24 hours) or “Rest of the day” — if the guest membership should be automatically resigned shortly after the booking. (For events, the default is typically 7 days after the event — that is a different activity type.)
Now save the activity.
- Setting up booking confirmation
When the guest has booked and paid for a court, the guest should receive a receipt for this, where e.g. location and any 6-digit code for the court are shown. For this purpose, a text template must be created. Do it as follows:
Choose “Communication -> Text templates” and click “Create new text template”.
In the field “Subject”, write e.g. “Booking confirmation guest player”.
In the field “Body text”, you can write a bit about things/rules that are good for the guest to know. It is very important that you include the following in the body text: {bookinginfo}
Bookinginfo contains the date, time and any 6-digit code. Remember to put curly braces around the word bookinginfo, so it reads {bookinginfo}
Save the text template when finished.
- Creating courts
If courts have already been created, skip to the next point. If resources (courts) have not already been created, this must be done now. Resources are created by clicking “Booking” and then “Resources”. Then click “Create new resource”.
- Resource calendar configuration
Now only the linking of the newly created activity and the booking module remains. Do it as follows:
Choose “Booking -> Resource calendars” and then click “Create new resource calendar”.
In the field “Name”, write e.g. “Guest booking”.
In “Choose resources”, choose the courts that guests should be able to book.
In “Period, time & days”, fill in dates and times.
In the field “Duration”, typically choose “01:00” (one hour).
In “Rules”, set all values to 0.
In the field “Receipt email”, choose the newly created text template, which in the example above was named “Booking confirmation guest player”.
In the field “Assign activity (and optional payment)”, choose the newly created activity, which in the example above was named “Guest booking”.
In the field “Generate 6-digit numeric code for booking”, you can tick the box. However, this only makes sense if you have the door system from MemberOrganizer set up at your location.
When “Generate 6-digit numeric code for booking” is ticked, the system will generate a 6-digit code, which only works in the time slot around the booking, so that the guest can only enter the court during a specific time period.
Click “Save resource calendar” at the bottom of the page.
Now you can test guest booking by going to the Member Portal (“Member portal -> View Member Portal”) and clicking “Booking” and optionally choosing the resource calendar “Guest booking”. This resource calendar is chosen as default, if no other resource calendars have been created.
Member pays for guest
It is possible to give members the option to bring guests, and then charge the member a payment for this. It can e.g. be used for booking e.g. tennis courts and padel courts.
If the member is enrolled with a payment card, the member will be able to make the booking with guest(s) - as well as the payment - without having to find the payment card, as the guest payment will be charged from the member’s payment card immediately.
The following situations in particular are supported by the system:
Situation 1: Price per guest. A member wants to e.g. book a padel court with 4 people. The member chooses 2 other members in the padel club, and then the member will bring a guest as the fourth person, and this person is not a member. Here the system can be set up to charge e.g. 50 kr. for bringing this guest on the court. If the member has two guests, the system can be set up to charge e.g. 50 kr. for each guest, so that the member pays 100 kr. for having 2 guests.
Situation 2: Fixed price regardless of number of guests. It costs a fixed price to have one or more guests. E.g. 50 kr. This can be used for e.g. booking a badminton court or a tennis court, where a member makes the booking, and then simply chooses that there are guests, and this costs a fixed price regardless of how many guests the member has. It can - if it is e.g. badminton or tennis - be 1-3 guests the member has with them.
The configuration above is done as follows:
Create an activity under “Activities -> Create new activity”.
The activity can e.g. be named “Guest booking”.
The activity must be of type “Membership”, and the price type must be “Free”.
Under activity settings, set the following:
Who can enroll: Existing members only
Invoicing method: One of the variants related to card payment. If you want the member who books to be charged automatically, choose the variant where the member enrolls for automatic charge.
Enrollment possible in Member Portal: This must be ticked.
Visibility in Member Portal: Choose “Must know web address”.
Go to “Booking -> Resource calendars” and create a new resource calendar, or click into an already created resource calendar.
In the field “Receipt email”, choose a text template (see the section above and the point named “Setting up booking confirmation”).
In the field “Assign activity - and optional payment and guests”, now choose the activity that was created just before.
Tick “Existing members do not pay”.
Tick “Member can add guest”.
Now specify the price per guest, and also specify whether payment is per guest (tick “Charge per guest”) or whether it is a fixed price regardless of how many guests the member has (do not tick “Charge per guest”).
Members with special booking privileges
Often the same booking rules apply to all members. But there can be exceptions. It can e.g. be a sponsor who should be able to book more than regular members. Or a team manager who should be able to book more than regular members.
For this purpose you can create an extra resource calendar under “Booking -> Resource calendars” e.g. named “Sponsor booking”, and then you must set some more lenient rules on this resource calendar. E.g. the following things can be set in the box named “Rules”:
Minimum participants: Set e.g. to 1.
Maximum participants: Set e.g. to 1.
Maximum active bookings: Set e.g. to 0. I.e. unlimited number of bookings.
Choose required activities: Here you must create an activity - e.g. named “Sponsor booking” if it relates to sponsors - and then you must subsequently select the activity here. This means that only members who have the activity “Sponsor booking” can book in this resource calendar.
Status: Choose e.g. “Requires login and optional required activity” - then this resource calendar will not be visible to all the other members.
Open bookings
Open bookings are a form of partner finder, where members - who do not necessarily know each other - can find each other. It works in such a way that a member starts by creating a booking, and then other members can see this booking and enroll in the booking, and when the booking reaches its maximum number of participants, no more members can enroll.
It can e.g. be used within tennis, badminton and padel and similar, where e.g. 4 players in this way can book a court together.
Open bookings can be set up so that the booking is automatically cancelled if the required number of participants has not been reached within a certain number of hours before the booking is to take place. That way you can ensure that open bookings do not occupy courts that in the end are not used, because there were not enough participants enrolled in the booking. E.g. you can set open bookings to be automatically cancelled 24 hours before the booking start, and thereby other members can see the available time and book the court.
Open bookings give members the option to communicate with each other easily. You can write a comment on an open booking (if you are enrolled in the booking), and the other participants on the booking will then receive this comment via email and app (if they have downloaded the app).
Open bookings can automatically be announced on various notice boards. This is important, as other members are thereby quickly made aware that there is now an open booking they can enroll in. You can create several different notice boards, which e.g. correspond to different levels (e.g. “beginner”, “intermediate”, “experienced”, etc), and thereby it will be players at roughly the same level, who enroll in an open booking.
Members can enroll in different notice boards, and when they have done so, they receive direct notification via email or app, when there is a new message.
This is how open bookings are set up in the system:
If you need to be able to specify level on the open booking (e.g. “beginner”, “intermediate”, etc.), start by creating a number of activities of type “Notice boards”. They can e.g. be named “Partner finder: Beginner”, “Partner finder: Intermediate” etc. Do this under “Activities -> Create new activity”.
Then go to “Booking -> Resource calendars” and click into the resource calendar, which should allow open bookings and find the box “Open bookings” and tick “Allow open bookings”.
A new field named “Chat groups where booking can be announced” now appears, where the newly created activities of type “Notice boards” can be selected.
Specify a number of hours in the field “Automatic cancellation of booking”, so that an open booking is cancelled if there are not enough players enrolled in the open booking, so that the resource (e.g. a court) is released again.
Renewing bookings for a new season
If you have many fixed weekly bookings - e.g. 2 or 4 players who regularly play on a specific court once a week - the system can easily renew these weekly bookings for the next season. The same applies to weekly bookings regarding e.g. various training teams, which have booked all resources (e.g. badminton courts) in a specific time slot on certain days of the week.
So if you e.g. have 4 players who regularly train every Monday at 19:00-20:00 on court 4 in the period September to April, exactly the same weekly booking will be created for the September to April season/year after.
Below is a guide to how bookings are renewed.
First you must extend the period on the existing resource calendars. This is done under “Booking -> Resource calendars”, where you click into each resource calendar and change the field “End date”, so it matches the end date in the new season. Often you will simply need to add 1 year to the end date that is there. On the same screen, the resource calendar can be changed from “Active” to “Inactive”, so that members cannot book in the resource calendar while you are doing the renewal and any other adjustments to the bookings for the new season.
Now choose “Configuration -> Booking -> Renewal of recurring bookings”. Here you specify start and end date for the existing season to be renewed. This is done in the fields “Search in previous bookings”. Typically a time period covering the entire existing season is chosen. The system now finds all the weekly bookings that exist in the specified period. Single bookings are filtered out, as these are typically not wanted renewed for a new season.
You must also specify start and end date for the new bookings, and here you typically specify the start and end date of the new season.
Then click “Continue to booking selection”.
Now you must go through the bookings and check if there are any bookings that should not be created in the new season. Deselect a booking by removing the tick on the left.
Then you can click “Complete renewal of bookings” at the bottom of the page, and the system will automatically create all weekly bookings in the new season.
This function can save the booking manager many hours of work.
Room rental
You can set up the system to function as room rental. However, there are a couple of limitations you should be aware of.
If you look at the limitations first:
The system only supports single-day bookings. If you e.g. rent out a party room, it is often a whole weekend - e.g. Friday to Sunday that the room is wanted rented. Here you will have to settle for creating a resource calendar that only goes up to and including Friday, so that Saturday and Sunday cannot be booked. And then it is understood that a “Friday booking” is a booking for the whole weekend. You can e.g. write this on a page that potential renters see before they come to the booking page. On the booking page itself you can also add a text, if you wish.
Handling of deposit. If you have support for receiving card payment, the system can be set up so that persons who book must pay for the booking immediately, before the booking is entered in the calendar. Here you will then set the price to a fixed amount, which corresponds to the deposit the person must pay. When the deposit is to be refunded, you can - because it is a card payment - return the amount directly back to the person’s payment card. However, there is a pitfall here: The person’s card may in the meantime have expired, and this can happen if bookings are made well in advance. Direct refunds to a card can only be made if the payment was made within the last 365 days - i.e. the payment must at most be 1 year old.
Setting up the system for room rental: It is done primarily as described in the section Payment for booking, where the payment you set up corresponds to the deposit for the room.
If there should be a more advanced approval process in connection with the booking, you can consider creating a form (i.e. an activity) in the system, which the renter must fill in. Here e.g. name, email, mobile number, type of event, desired date and so on can be entered, and then an email will be sent to the person in the association who is responsible for entering bookings. This person then reviews the booking request, and then enters the booking in the booking system, if everything can be approved in relation to the rules/processes you have in the association.
In this model the renter cannot book directly, but there is this intermediate step, where the person responsible for the booking system ensures that the booking is entered, and does the things that otherwise need to be done in connection with a booking request.
You can also set up the form (activity) to charge a deposit, so management of deposit can also be handled in this model.
Special times
If booking options do not follow a fixed schedule, as e.g. court and room booking often does, there is also an option to set up something called special times. It is used if you e.g. offer different things at different times throughout the day, and it varies from day to day when things are offered. However, things must follow a fixed pattern week after week.
Special times is something that is enabled on a resource calendar via the field “Use special times (templates) for available times”. You can e.g. name the resource calendar “Weekly schedule”, as it is often a weekly schedule you want to create with different booking options throughout the week at different times.
It is recommended to tick “Show bookable times as chronological list”, as the times thereby appear most intuitively for those who need to book.
When you have enabled “Use special times (templates) for available times” and saved the resource calendar, a blue button named “Edit special times” appears, and that is where you enter the different things that should be bookable throughout a week.
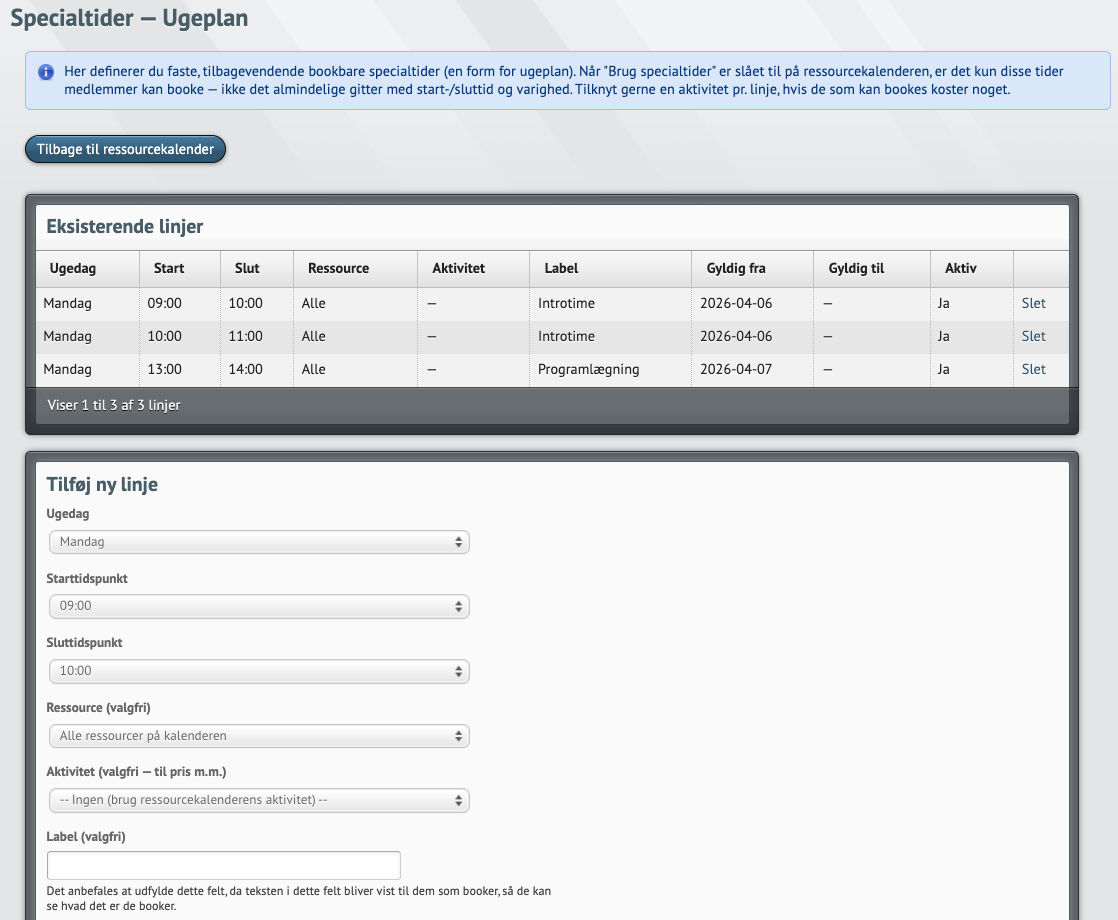
Here is an example where 3 things have been entered, which can then be booked week after week:
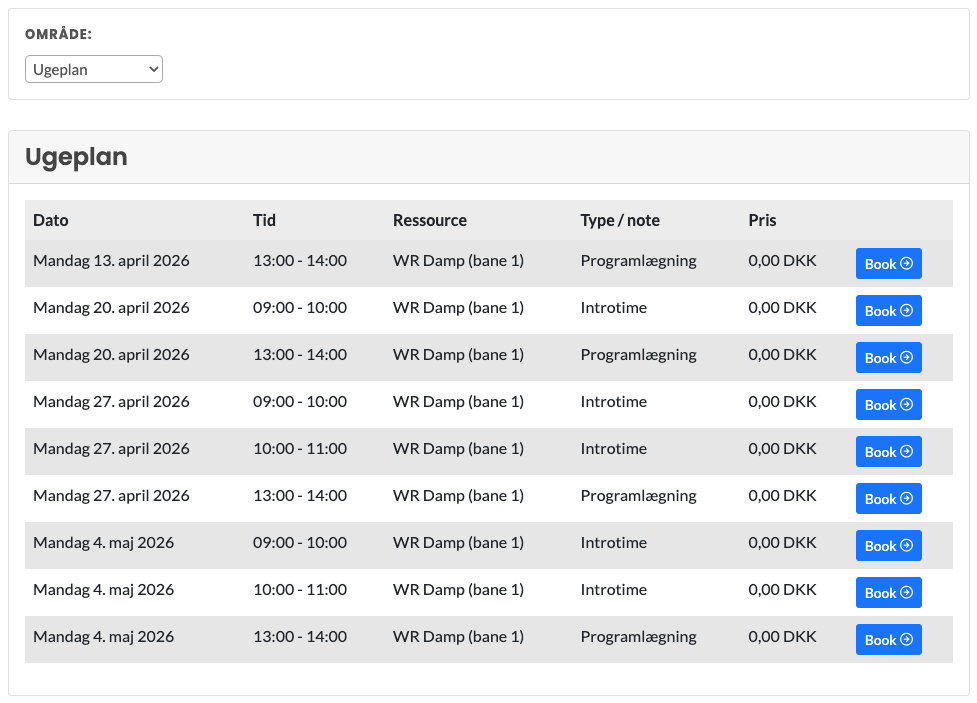
And the person who is to book - e.g. the members - will see the following: