Basic configuration
Activities
As soon as the association is created, you need to decide how it should be structured — that is, how members should be distributed across different teams, membership fee groups, training sessions, and so on.
Types
Most associations have a range of different teams or membership fee groups that members are placed in. In MemberOrganizer, all of these are grouped under one concept called an activity. When you create an activity you choose which type of activity it is. The system supports the following types, for example:
Group — used internally to group members.
Membership — can be an annual membership fee, for example.
Event — can be an annual general meeting or an end-of-season party, for example.
Team training — can be sign-up for a weekly yoga class or indoor cycling, where sign-up is required for each session.
Voucher
Donation
You can attach a price to an activity so that members can be invoiced for the activities they are subscribed to. When you create invoices in the system, you can invoice for many activities at once, which means members are charged an amount corresponding to the activities they are subscribed to — which may be individual amounts across activities.
Activities can also be opened up so members can see them. Members can then, for example at the start of a season, sign up for the teams the association offers and pay with Dankort as part of the sign-up.
Examples of activities in different types of associations:
Association type |
Example activities |
|---|---|
Sports club |
|
National assoc. |
|
Fitness centre |
|
Antenna assoc. |
|
Activity pricing
The price of an activity can be set/calculated in several different ways:
- Fixed price
For example 100 DKK for everyone subscribed to the activity.
- Standard price
If you have many activities that cost the same, you can define so-called standard prices. If this price changes, you only need to update it in one place — the standard price — and it applies to all activities that use that standard price.
- Based on age
Price can be based on the member’s age — for example 0–18 years pay 100 DKK, but 19–100 years pay 150 DKK. This means you do not need to move many members manually between different price groups, as the system can calculate the correct price from the member’s age.
- Based on cut-off dates
Price can be based on specific dates, so that you pay half price after a given date, for example. If the normal price is 500 DKK per year and you want the price halved from 1 July, you enter: 01-01: 500, 01-07: 250.
- Based on multichoice
If price is based on multichoice, the member can be given a range of options when signing up. This can be the option to specify a number of guests for an event, or a choice between different T-shirt sizes.
- Non-member
If you run courses that non-members can sign up for, you can define a price for non-members that is higher than the price for members, for example.
Creating an activity
An activity is created by choosing “Activities -> Create new activity”.
When you create the activity you can optionally set a price on the activity.
Change an activity
If you want to change an activity, do the following:
Choose “Activities -> Activity list”.
For the activity you want to change, go to “Choose action” on the right and choose “Edit settings” or “Edit type, price & department” — depending on what you want to change.
If you want to change how an activity is paid for, choose “Edit settings” (see above), find the item called “Invoicing / Billing”, and tick the options that match the payment methods set up in the system.
Copy an activity
If you want to create a new membership or a new event, and you already have another membership or event that is similar to the new one, it is often useful to copy an existing activity.
Do this by choosing “Activities -> Activity list”, finding the activity you want to copy, and then choosing “Choose action -> Copy activity” on the right.
Then enter a name for the new activity, and an activity similar to the old one will be created. You can then adjust the new activity to match what you want — for example dates and/or prices.
Departments
Departments are a kind of “parent category” that activities are linked to or “placed under”. In a sports club, activities might be divided into the following departments:
Youth department
Senior department
Veterans department
Committee
Under each department you create the activities (teams/training sessions/membership types) that members can be linked to.
In a multi-sport club you can put the name of the sport in front of the department name, as in the following example:
Badminton — youth department
Badminton — senior department
Football — youth department
Football — senior department
Gymnastics — youth department
Gymnastics — senior department
Creating a department
A department is created by choosing “Configuration -> Club -> Departments” and then clicking “Create new department”.
Areas: “Club” within the club
Areas are somewhat like departments, but with the difference that an area can be closed off so that only members in the area can see the activities — for example team training sessions and events — in that area.
This is easiest to explain with an example: If you are a badminton club and you have an event that only youth members may see and sign up for, and at the same time adult members must not be able to see — and therefore not sign up for — this event, you can achieve this by creating an area.
When the event is linked to the area, members — in both the App and the Member Portal — can only see and sign up for the event if they are in the correct area.
Areas are therefore well suited for creating “clubs within the club”.
This is how you create an area:
- Enable “Member list for instructors”
First enable the “Member list for instructors” feature. This is done under “Configuration -> Member Portal -> Choose modules”, where you tick “Member list for instructors” and save.
- Create area
Next create one or more areas via “Configuration -> Member Portal -> Areas & access”, where you click the blue “Create area” button. Then choose which activities and/or member extracts the area should consist of. This can be an activity that contains exactly the members the area should consist of. If such an activity does not already exist, you must first create one and link the relevant members to it.
If you have a youth department and a senior department in the association, create two areas called “Youth department” and “Senior department” respectively, and choose activities and/or member extracts that match the youth and senior departments respectively.
- Create an activity that belongs to the area
Choose “Activities -> Create new activity”. In the “Type” field choose “Event” or “Team training”, for example. In the “Department the activity belongs to” field, choose the area you just created. Give the activity a name. Click “Create activity”. You can then try logging in to the App or Member Portal with a member profile that belongs to that area — that member will be able to see the activity. If you log in with a member profile that is not in the area, that profile will not be able to see — and therefore not sign up for — the activity.
Another advantage of areas is that you can give instructors, team leaders, responsible persons, and similar roles access to an area. These people only have access to the areas they have been granted access to, and therefore cannot see members and activities in areas they do not have access to.
Read more about the options under Instructors, team leaders & responsible persons.
Memberships
A membership is an activity of type “Membership”.
This type is used to manage membership fee invoicing and optionally graduated pricing for members who enroll partway through the season.
When you create a new activity (“Activities -> Create new activity”) and want to use it as a membership, choose “Membership” in the “Type” field and create the activity. You will then see an option called “Renewal policy”:
- Renewal policy
Here you specify how often the membership should renew — for example monthly, quarterly, half-yearly, or annually. For quarterly, half-yearly, and annual renewal you must also decide whether the membership should renew in specific months of the year, or relative to the enrollment date.
- New enrollments
If you have chosen that the membership should renew at a fixed point in the year, you can set up the activity to graduate the price relative to that renewal date.
Example: A membership is invoiced quarterly in January, April, July, and October at 300 DKK per quarter, and a member enrolls on 15 February — midway through a quarter. The system can then automatically graduate the price so the member is invoiced for the 44 days until the next invoice on 1 April — approximately 150 DKK.
If a member enrolls close to the cut-off date — for example enrollment on 20 March and cut-off on 1 April — the system can be set up to invoice for the last 10 days of the quarter plus the entire next quarter — approximately 335 DKK. This is especially useful if you also use Betalingsservice, where there are deadlines for submitting invoices that you must meet.
Members
Members are naturally central to any association. MemberOrganizer includes a set of standard fields that can be linked to each member. They include:
First name
Last name
Address
Address 2
Postcode
City
Country code
Email address
Landline
Mobile
Gender
Date of birth
Enrollment date
Resignation date
Invoice method
EAN number
Import and creation of members
Members can be created in MemberOrganizer in three ways:
- Manual creation
With manual creation, a person with access to the association in MemberOrganizer creates the members.
Manual creation of a member is done by clicking “Members -> Create new member”.
- Import from file
If the association has all its members in a file (for example a spreadsheet), members can be imported automatically into MemberOrganizer. The association can do this itself — we also offer to do it.
Import from file is done by clicking “Members -> Import”. You then choose a file on your computer containing member data. The file must be in CSV format or Excel format to be imported into MemberOrganizer. If you prefer not to try importing members yourself, MemberOrganizer can also do it. Simply send a spreadsheet (for example Excel) by email with all the association’s members, and we will enter the data under your association. In most cases this is free. If the task is complex, a small fee may be charged by agreement.
Note
Spreadsheet import and help from MemberOrganizer with it are primarily intended for the startup phase, when members are entered for the first time. If you later send an updated spreadsheet and want to replace the entire member list, that is a different matter — see Updated member list from spreadsheet (not startup).
- Enrollment
You can set up an enrollment form via the Member Portal where members can enroll, after which they are created directly in MemberOrganizer.
Enrollment via the Member Portal is covered in a separate chapter (see the table of contents) and is not described further here.
Import from file
If you have imported members from a spreadsheet, you can afterwards spot-check whether member data looks correct.
Typically you do two checks:
- First check: Choose “Members -> Member list”
Look through the member list and click into some members to see the full master record, and check whether member data looks correct.
- Second check: Choose “Activities -> Activity list”
The activity list shows how members are distributed across different groups and/or memberships. You can click the participant count towards the middle/right for each activity to see which members have that activity. Activities are also often used as the basis for invoicing members. A price can be attached to an activity.
Bulk update from file
If at a later point — after members have been entered in the system — you need to update many members at once, this can be done via a file. The file must be an Excel spreadsheet or a CSV file.
For this to work, the member number must be in the file, as the member number is the key the system uses to identify which members should be updated.
Note
Be careful when bulk updating, as you can easily damage a lot of member data at once. You cannot undo a bulk update. It is therefore a good idea to export all member data and save it temporarily on your own computer before bulk updating from file. That way you can always bulk update again afterwards and correct any mistakes.
You can update just one field on members — for example an email address. In that case the file only needs two columns: one with member number and one with the email address. You can also update many fields at once if you wish.
When the file is ready, choose “Members -> Import members”, select your file, and consider unticking “Insert new members” so you are sure that no new members are created as part of the bulk update, and that only data on members who already exist in the system is updated.
Updated member list from spreadsheet (not startup)
When an association has already used MemberOrganizer for a long time, sending a new Excel spreadsheet is not the same as entering members for the first time during startup.
So if you contact us and say: “Here is our updated list of all valid members — will you delete the current members and import this instead?” or “Will you also fix the headings on our custom member fields?”
This cannot be solved by simply importing the file:
Import creates or updates members from the file — it does not delete members who already exist in MemberOrganizer but are not in the spreadsheet.
Bulk update (see Handling both individuals and companies and the Bulk update from file section above) requires the member number in the file and only changes fields on existing members. Members who should be removed must be resigned (individually or via member extract / bulk actions) — not replaced by import alone.
Headings on custom member fields (up to 30 extra fields) are changed under Configuration -> Members -> Member field configuration — not by sending a spreadsheet to support.
Why is this more complex than during startup?
Members in the system are often linked to other data tied to each member’s history, for example:
Invoices and balance (payments, outstanding amounts, credit notes)
Payment agreements (Betalingsservice, MobilePay, card/QuickPay, Stripe, etc.)
Bookings (resource calendar, teams, etc.)
Access control (cards/access codes and usage log)
Documents in the member archive, child certificates, enrollments via the member portal, etc.
“Deleting all members and starting over” with a new list would therefore break the link between this data — unless the association is truly still in startup (no invoices, bookings, or other links). This is not a standard support task for established associations.
What can you do instead?
Update master data on existing members: use bulk update from file with member number as the key. Untick Insert new members if no new rows should be created.
Remove members who should no longer be included: resign them (do not expect import to do this).
Add new members: import with “Insert new members”, or create individually.
Rename member field labels: Configuration -> Members -> Member field configuration.
Backup: export member data to a file before any bulk update — bulk update cannot be undone.
Note
MemberOrganizer is happy to help with import during the startup phase. For established associations we refer to the approaches above. Contact support at kontakt@foreninglet.dk if you are unsure about your specific situation.
Member field configuration
In addition to standard fields such as name, address, email, and so on, the association can freely define up to 30 extra member fields linked to each member. These 30 extra member fields can be named as the association wishes, and the association can also decide whether the fields should be text inputs, checkboxes, or drop-down lists with predefined options. The extra member fields are configured under “Configuration -> Members -> Member field configuration”.
The 30 extra member fields are primarily intended for information that varies greatly between members. This could be a member number from an old membership system, for example. If you want to group members into different teams or member types, it is better to use departments and activities.
You can also change the order in which member fields are displayed. This is also under “Configuration -> Members -> Member field configuration”, on the “Order” tab at the top right, where you can drag fields with the mouse (up or down). Remember to click “Save order” when finished.
Handling both individuals and companies
By default the system is set up to handle individuals only. However, the system can easily handle both individuals and companies at the same time.
If you want both individuals and companies registered, it is recommended to rename the “First name” field to “Name” and hide the “Last name” field.
It is also recommended to change the “Address” field to “c/o” or “Contact person”, and change the “Address 2” field to “Address”.
This way there is room to have both individuals and companies registered in the system at the same time.
Note
If you already have member data in the system and data is currently split into first name and last name, you can contact MemberOrganizer for help merging first name and last name into the first name field, which is then renamed to “Name”, for example. You can also get help moving the other member data mentioned above if needed.
The reason the above is recommended is that the same set of member fields is shown for all member types. It also relates to what appears on invoices, where the following information is included:
First name + Last name
Address
Address 2
Postcode + City
If you have renamed “First name” to “Name” and hidden “Last name”, only the content of “Name” is shown on the top line. Likewise, if you have renamed “Address” to “Contact person” and enter the contact person for companies in that field, the contact person is shown on the second line.
To make things clear for new individuals and companies who enroll themselves via an enrollment form, it is recommended to add an external help text under “Configuration -> Members -> Member field configuration” on the “Name” field, for example:
If you are an individual, enter your full name here. If you are a company, enter your company name here.
Welcome email for new members
When a new member enrolls in an activity via the Member Portal, if this has been enabled, the system can be set up to send an email to the member automatically.
Do this as follows:
Choose “Communication -> Text templates” in the menu on the left.
Click the blue “Create new text template” button.
Write the text the new member should receive on enrollment and save the text.
Now open the activity the member enrolls in via “Activities -> Activity list”.
Find the “Receipt on enrollment” field.
Choose the text template you just created.
Go to the bottom of the page and save.
Users and access
If several people administer the association, these people can be invited to the system. This is done under “Configuration -> Users -> Invite new users”. Enter the email address of the people who should have access to administering the association.
You can assign users different permissions — for example read-only access to the member database while everything else is locked. You can also give read-only access to accounting so an auditor can access the figures — without being able to change anything.
Permissions for the different users are managed under “Configuration -> Users -> User list and access”, where you can click “Change access” on the right and you will see the following:
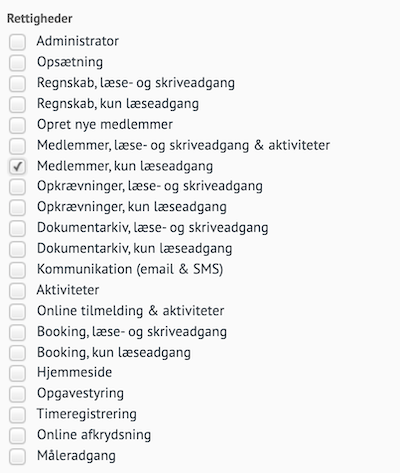
Here you can, for example, tick “Accounting, read-only access” if you want to give someone access to view accounting only (but not change anything in it).
Caution
There can only be one administrator. If you invite a new user and assign the “Administrator” permission, you lose that permission yourself, and your permissions are changed to include only “Configuration”.
There are two things only the administrator can do. The administrator can delete other users. In addition, some system emails are only sent to the administrator. If you want several people to be able to do almost everything, assign them all permissions except administrator. They can then do almost the same, with the two exceptions mentioned.
Change user email and password
If an administrative user needs to change email address, you must invite the person on the new email address via “Configuration -> Users -> Invite new users”. When the person has activated this user, the old user (the old email address) can be deleted from the system. A user is deleted under “Configuration -> Users -> User list and access”, where you click the red cross on the right next to the user to be deleted.
Only the administrator can delete users. Inviting new users requires that you are either administrator or have the “Configuration” permission.
If you want to change the password on your own user, click your own name in the top-right corner, and you can change the password.
Change administrator
If you need to change administrator — that is, transfer this permission to another person — do the following:
Log in as the current administrator.
Choose “Configuration -> Users -> Invite new users”.
Enter the email address of the person who should be the new administrator, and click “Invite new users”.
Click “Continue” and then click “Change access” next to the person you just invited.
Tick the “Administrator” permission and click “Save permissions”.
The administrator role has now been transferred.
If for some reason you cannot get the current administrator to transfer their role to another person, we can help you do it, but this requires a signed document from a board meeting or general meeting stating that the new administrator is part of the board, or that the board grants this person permission to be administrator on the system.
Two-factor login
You can set up two-factor login for your association. This is done under “Configuration -> Club -> Two-factor login”, where you simply tick “Enable two-factor login”. Only the association’s administrator can change this setting.
When two-factor login is enabled, at login — in addition to entering email address and password — you must also enter a one-time code sent to the email address you are registered with.
This means that even if someone obtains your password, they cannot log in to MemberOrganizer.
Note that when two-factor login is enabled, it applies to all administrative users who log in to the association. You cannot enable two-factor login for selected users only.
Also note that two-factor login only applies to login to the administrative part of the system. It does not apply to login to the Member Portal. There, members can log in as usual using only email address or member number and their password. The Member Portal typically does not give access to much data at once, but only to one member’s data, which is why the security level in the Member Portal is sufficient without two-factor login.
Email recipients
In some cases the system can send an email to you as a customer. This can be an email about sending the annual membership fee, for example. If you have set up the system to send invoices once a year in January, for example, the system knows this and will send an email to the person listed as administrator when it is time to send.
It is therefore recommended that the person who primarily works with the system is also listed as administrator.
Other emails can also be sent from the system to you as a customer. This can be in connection with the following:
Enrollment of a new member.
Enrollment of an existing member in an event, for example.
A member replies to an invoice email you have sent.
A member replies to a newsletter you have sent.
When payments from Betalingsservice/PBS are registered.
The following describes where in the system the various email recipients can be set up or changed.
- Enrollment of a new member
Go to “Activities -> Activity list” and find the activities new members can enroll in. Open settings for these activities, and at the bottom of each activity page find the field “Notification on new enrollment”, where you can change the email recipient.
- Enrollment of an existing member in an event, for example
This is done in the same place as described above (enrollment of a new member).
- A member replies to an invoice email you have sent
The reply goes to the email address listed under “Configuration -> Invoices -> Sender information on invoices”.
- A member replies to a newsletter you have sent
By default the reply goes to the person who sent the newsletter. This can be changed to go to a specific email address under “Configuration -> Email -> Newsletters”.
- When payments from Betalingsservice/PBS are registered
By default this information is sent to the person listed as administrator. If you want it sent to another email address, this can be changed under “Configuration -> Betalingsservice -> Email recipient for payments and payment agreements”.
Invoice options
How should you invoice members? And how should they pay? These are two central questions regarding invoicing.
The system supports the following options:
Invoice method |
|---|
MobilePay recurring payments |
Betalingsservice |
Automatic card charge |
Dankort |
Visa/Mastercard |
PayPal Checkout |
MobilePay Online |
Email invoices |
Code line (+71) |
MobilePay integrated payment |
MobilePay number |
Online banking |
EAN |
Print invoices yourself |
There are many options — and MemberOrganizer supports them all. The following sections describe the different invoice methods.
The term invoice method covers the ways the association can invoice its members. Some associations prefer to invoice via Betalingsservice, others via Dankort and MobilePay, and others again via email or by printing invoices delivered personally to each member or sent by post.
MobilePay and membership fees: Which MobilePay product do you have?
We often get the question: “How do we set up payment for membership fees — we already have an agreement with MobilePay?”
The answer depends on which MobilePay product your association has. MobilePay offers several business products, and they are set up in different ways in MemberOrganizer. The most important difference is whether payments are registered automatically in MemberOrganizer when the member pays — or whether you must reconcile and register payments manually.
Associations coming from a more manual setup typically have MobilePay number (formerly called MobilePay MyShop): a 5- or 6-digit number that members pay to via the MobilePay app. You can usually set this up right away. If you have MobilePay integrated payment and/or MobilePay recurring payments instead, that requires a separate agreement with MobilePay where MemberOrganizer is the integration partner — and setup by us once MobilePay has approved your application.
How to tell which product you have
MobilePay number: You have a 5- or 6-digit number with MobilePay (e.g. 123456) that members can pay to in the MobilePay app. In practice this works like a bank transfer to a fixed recipient number — with no automatic link to MemberOrganizer.
MobilePay integrated payment and MobilePay recurring payments: You have a business agreement with MobilePay where MemberOrganizer is listed as the integration partner. Members pay via links or automatic debiting from invoices in MemberOrganizer — not primarily by entering a 5- or 6-digit number on an invoice.
Note
Not sure which product you have? Log in to the MobilePay business portal and check your active products — or contact MobilePay support.
Overview: manual vs. automatic reconciliation
MobilePay product |
Payment in MemberOrganizer |
Typical setup |
|---|---|---|
MobilePay number |
Manual reconciliation |
Can be set up immediately |
MobilePay integrated payment |
Automatic when paid |
Requires MobilePay agreement + setup by us |
MobilePay recurring payments |
Automatic (incl. recurring debit) |
Requires MobilePay agreement + setup by us |
MobilePay number — payment like a bank transfer
If you have a 5- or 6-digit MobilePay number, membership fee payment in MemberOrganizer works like a bank transfer: Members receive an invoice (typically by email) with payment information, pay via the MobilePay app to your number, and you register the payment manually in MemberOrganizer when the money has been received.
Setup:
Go to Configuration -> Invoices -> Payment information.
Under Bank transfer and/or MobilePay MyShop, enter your MobilePay number (and optionally bank reg. no./account no.). This text appears on invoices where members must transfer the amount themselves.
Make sure members have an invoice method where payment uses this text — typically Email or Manual (printed invoice).
When members have paid, you must reconcile outstanding amounts manually. Go to Member payments -> Outstanding — see the section Manual registration in the Invoices chapter.
MobilePay integrated payment — automatic registration
With MobilePay integrated payment, invoices are sent with a payment link (by email and/or directly to the member’s MobilePay app). When the member pays, the payment is registered automatically in MemberOrganizer — you do not need to reconcile outstanding amounts manually.
Setup:
Follow the guide Miscellaneous -> Get started with MobilePay integrated payment (log in to MemberOrganizer).
Apply for the Integrated payment product in the MobilePay business portal with MemberOrganizer as integration partner — steps are in the guide.
When MobilePay has approved your application, contact us so we activate the integration in your MemberOrganizer club.
Then follow the section Adding a new invoice method below: choose MobilePay integrated payment as the invoice method and assign it to members.
Read more about the product in the section Payment via MobilePay integrated payment below.
MobilePay recurring payments — automatic debit (like Betalingsservice)
MobilePay recurring payments can be compared to Betalingsservice/PBS: The member approves the first payment via MobilePay, and subsequent invoices are debited automatically on the due date. Payments are registered automatically in MemberOrganizer.
Setup:
Follow the guide Miscellaneous -> Get started with MobilePay recurring payments.
Apply for the Recurring payments product in the MobilePay business portal with MemberOrganizer as integration partner — steps are in the guide.
When MobilePay has approved your application, contact us so we activate the integration.
Follow the section Adding a new invoice method below: choose MobilePay recurring payments and assign it to members.
Read more in the section MobilePay recurring payments.
Considering switching products?
If you currently use MobilePay number and spend many hours on manual reconciliation, you may want to consider MobilePay integrated payment (members pay individual invoices with automatic registration) and/or MobilePay recurring payments (automatic membership debiting, like Betalingsservice). This requires a new agreement with MobilePay and setup via us — but typically saves the treasurer the manual reconciliation work.
Next steps after setup
Once the relevant payment solution is set up in the system, you must also choose it as the invoice method for members and test with a small invoice. This is covered in the section Adding a new invoice method below.
MobilePay recurring payments
MobilePay recurring payments can be compared to Betalingsservice/PBS — it simply goes via MobilePay instead. For example, new members can pay the first invoice via MobilePay at enrollment, and subsequent payments are drawn automatically from the member’s MobilePay without the member having to do anything.
Betalingsservice
With Betalingsservice (also known as PBS), the association can automatically debit money from members’ bank accounts if the member agrees to this. This can save the association many hours of work compared to sending reminders.
Betalingsservice works as follows: The first time the association sends invoices from MemberOrganizer, members receive either a payment slip (FI slip sent by Betalingsservice) or an email with the amount to be invoiced. Members can then sign up the payment for Betalingsservice. The association can also set up an enrollment form on its website where the member can sign up for Betalingsservice.
Members who sign up for Betalingsservice are automatically debited the amount the association invoices. Members who do not sign up for Betalingsservice continue to receive payment slips (FI slips) by post or a new email each time the association sends invoices.
When members start paying the sent invoices (or are debited automatically), Betalingsservice sends payment information to MemberOrganizer, which automatically updates outstanding amounts in MemberOrganizer. The association therefore does not need to reconcile the bank account manually with outstanding amounts in MemberOrganizer, which can save the treasurer many hours of work.
The integration from MemberOrganizer to Betalingsservice does not require you to fetch files from Betalingsservice yourself, which is typical for competing association systems on the market. MemberOrganizer automatically fetches files every day. In other words, the integration is fully automatic.
Automatic card charge
This invoice method is similar to Betalingsservice (PBS). The member pays the first invoice with their payment card (the invoice is sent by email or paid via online enrollment). At the same time the member gives the association permission to debit their payment card automatically in future — as with Betalingsservice. Future invoices can then be debited automatically from the member’s payment card. Outstanding amounts in MemberOrganizer are reconciled automatically when amounts are debited from members’ payment cards.
When a member’s payment card is about to expire, the system automatically sends the member an email one month before expiry asking them to sign up with a new payment card so that automatic debiting can continue on the new card.
Enrollment link per member
The association can obtain a personal payment card enrollment link for each member. The link can be sent to the member (e.g. by email or SMS), and the member does not need to be logged in to the member portal to use it. Via the link the member can register their payment card for automatic debiting.
Note
Showing the link on the member’s master data and in the member list is only available in the new layout. In the old layout you can still send the link to the member via text templates (see below).
For the link to appear, the field “Subscribe link for payment card” must be made visible under “Configuration -> Members -> Member field configuration” by clicking the red “No” next to the field so it changes to “Yes”. The link is then shown on the member’s master data, where it can be copied.
The link can also be shown as a column in the member list if that column is selected in the member list setup. In text templates the link can be merged using the variable {credit_card_tilmelding} — this works whether the email is sent from the new or the old layout.
PayPal Checkout
PayPal Checkout lets members pay invoices with international payment cards (Visa, Mastercard, and American Express) via PayPal’s checkout flow. When a member pays, the payment is registered automatically in MemberOrganizer — you do not need to reconcile outstanding amounts manually.
PayPal Checkout is suitable when you want card payment without a separate acquirer agreement for Dankort/Nets, or when your members primarily pay with international cards.
Prerequisites
The Invoicing module must be enabled.
A PayPal Business account.
Access to the PayPal Developer Dashboard to create a REST API app and register a webhook.
Step 1 — Enable the PayPal Checkout module
Log in to MemberOrganizer.
Go to Configuration -> Club Details.
Under the invoicing add-on modules, tick PayPal Checkout.
Click Save.
The menu item Configuration -> PayPal Checkout -> Configuration appears once the module is enabled.
Step 2 — Create a REST API app in PayPal
Log in to the PayPal Developer Dashboard with your PayPal Business account.
Open Apps & Credentials.
Create an app under Live (production) or Sandbox (testing).
Copy the app’s Client ID and Secret — you will enter these in MemberOrganizer in the next step.
Step 3 — Register the webhook in PayPal
MemberOrganizer must receive a notification from PayPal when a payment is completed. Register a webhook in the same app:
In the PayPal Developer Dashboard, open your app and go to Webhooks.
Add a webhook with the URL shown at the top of Configuration -> PayPal Checkout -> Configuration in MemberOrganizer (copy the URL from there — do not type it manually).
Subscribe to the event Payment capture completed (
PAYMENT.CAPTURE.COMPLETED).Save the webhook.
Step 4 — Enter credentials in MemberOrganizer
Go to Configuration -> PayPal Checkout -> Configuration.
Enter Client ID and Secret from your PayPal app.
Click Save.
If a secret is already stored, you can leave the Secret field blank when saving to keep the existing value.
Step 5 — Choose PayPal Checkout as invoice method
Once configuration is complete, assign Email/PayPal Checkout as the invoice method for members who should pay this way — see the section Adding a new invoice method below (under Configuration -> Invoices -> Invoice method).
Members with this invoice method receive invoices by email with a payment link. They can also pay during online enrollment if PayPal Checkout is selected as the payment method on the activity.
When payment is completed, it appears under Member payments -> Payments. Funds are credited to your PayPal Business account; transfer them to your association’s bank account from PayPal when needed.
EAN
MemberOrganizer supports sending invoices to EAN numbers via the NemHandel/PEPPOL network. This is typically required when sending invoices to the public sector or other recipients who receive electronic invoices.
The EAN number is the recipient’s address in NemHandel/PEPPOL. When a member has the invoice method “EAN” and an EAN number on their master data, the invoice is sent as an electronic invoice (OIOUBL/Peppol BIS) via NemHandel/PEPPOL — not as a regular email.
If you have an agreement with Betalingsservice (PBS), EAN is already an invoice option in the system, as the system adds a +71 code line to the EAN invoice sent.
For EAN to work, the field called “EAN number” must be visible. This is done under “Configuration -> Members -> Member field configuration”. You can then create a new member via “Members -> Create new member”, enter master data for this member, and — very importantly — enter the EAN number the invoice should be sent to.
In the “Invoice method” field on the member’s master data you must choose “EAN”. Then the system knows the invoice should be sent electronically via NemHandel/PEPPOL to the member’s EAN number.
If you do not have an agreement with Betalingsservice, account number and bank registration number must be added, which must be set up in the system — send us this information and we will set it up, after which the invoice method called “EAN” will appear on the member’s master data.
The invoice method called “EAN” only becomes visible once you have sent us account number and bank registration number and we have confirmed that everything is ready.
Email invoices
MemberOrganizer allows you to send invoices by email to the association’s members. This naturally requires that the association knows members’ email addresses. Invoices sent by email can be paid in various ways. MemberOrganizer supports the following payment options when invoices are sent by email:
Dankort & international cards
MobilePay
Code line (+71)
Online banking
The following sections describe the different payment methods.
Dankort
This solution lets members pay the invoice immediately via Dankort. In the invoice sent by email, the member can click a link that takes them to a payment page where the invoice can be paid with Dankort (and the system can be set up so the member gives the association permission for automatic debiting in future). The invoice is updated automatically in MemberOrganizer, so the association does not need to go into outstanding amounts in MemberOrganizer and reconcile manually.
This solution requires that the association has an acquirer agreement for Dankort.
MobilePay recurring payments
This solution lets members pay the invoice immediately via MobilePay on their phone. In the email the member receives there is a link; the member enters their mobile number and a request is then sent to the member’s MobilePay app, where the member opens the MobilePay app and pays with a swipe. The invoice is updated automatically in MemberOrganizer, so the association does not need to go into outstanding amounts in MemberOrganizer and reconcile manually.
This solution requires that the association has an agreement with MobilePay for the MobilePay recurring payments product.
Only the first invoice is sent by email. Subsequent invoices can be debited automatically, as the member is now signed up for automatic debiting via MobilePay.
Payment via MobilePay Online
This solution lets members pay the invoice immediately via MobilePay on their phone. In the invoice sent by email, the member can click a link that takes them to a payment page where the invoice can be paid with MobilePay. The invoice is updated automatically in MemberOrganizer, so the association does not need to go into outstanding amounts in MemberOrganizer and reconcile manually.
This solution requires that the association has an acquirer agreement for Dankort; otherwise the solution has the same benefits as the Dankort solution. The association does not need an agreement with MobilePay.
Payment via code line (+71)
This solution enables automatic reconciliation of the bank account and outstanding amounts in MemberOrganizer. It works by the member paying the invoice via their online banking. The invoice shows an FI code line (as known from giro payment slips and FI slips) that identifies the member and invoice in MemberOrganizer, so outstanding amounts are reconciled automatically.
The solution requires an agreement with Betalingsservice (check their website for subscription prices). Betalingsservice charges 0.25 DKK per notified invoice. The solution also requires an FI number, which is created at the bank. The price of an FI number varies from bank to bank.
Payment via MobilePay integrated payment
With MobilePay integrated payment, invoices are sent with a payment link, and when the member pays, the payment is registered automatically in MemberOrganizer. The product requires a business agreement with MobilePay with MemberOrganizer as integration partner — see MobilePay and membership fees: Which MobilePay product do you have? for setup.
Also see the section MobilePay and membership fees: Which MobilePay product do you have? for setting up membership fee payment when the association already has an agreement with MobilePay.
Payment via MobilePay MyShop
The association enters a 5- or 6-digit number on the invoices (received from MobilePay) that members use when paying the invoice via their MobilePay app on their phone. The association must then monitor the bank account itself and manually reconcile outstanding amounts in MemberOrganizer with the payments. This is a relatively cheap solution, but also relatively time-consuming for the association.
The main difference between MobilePay Online and MobilePay MyShop is that payments are reconciled automatically in MobilePay Online, while they must be reconciled manually in MobilePay MyShop.
The main difference between MobilePay integrated payment and MobilePay MyShop is that payments are reconciled automatically in MobilePay integrated payment, while they must be reconciled manually in MobilePay MyShop.
Payment via online banking
The association enters a bank registration number and account number on the invoices that members use when paying the invoice via their online banking. The association must then monitor the bank account itself and manually reconcile outstanding amounts in MemberOrganizer with the payments. This solution is the cheapest, but also the most time-consuming for the association.
Print invoices yourself
If you want to print the invoices on your own printer, that is also an option. In MemberOrganizer this invoice method is called Manual.
This means the association prints the invoice on paper and delivers it to the member either in person or by sending the invoice to the member by post — for example via the postal service.
Payment of the invoice can be made in two ways:
Online banking
Code line (+71)
Payment via online banking
Same principle as described in the section “Email: Payment via online banking”. The only difference is that the invoice is delivered manually instead of by email.
Payment via code line (+71) — MemberOrganizer layout
Same principle as described in the section “Email: Payment via code line (+71)”. The only difference is that the invoice is delivered manually instead of by email.
Adding a new invoice method
If you have entered into an agreement for card payment, MobilePay, or Betalingsservice/PBS, for example, and this payment solution is set up in the system, you must also tell the system where you want to use this payment method.
This is what is called invoice method in the system.
To start with, go to “Configuration -> Invoices -> Invoice method” and choose the new payment method as the default invoice method. An exception is if you already use another payment method and do not want to change this. Example: You already support card payments and have just had MobilePay added as a payment option, but you still want card payment to be the default invoice method for members. In that case do not change the default invoice method.
When you change the default invoice method under “Configuration -> Invoices -> Invoice method”, you should also assign this invoice method to all members at the same time. This is especially important if it is the first payment method/invoice method added to the system. Do this by clicking the blue “Assign selected invoice method to all members” button.
Next you should review the activities that are open for members to enroll in. These are typically the activity or activities new members enroll in, and/or various activities — events, for example — that members can enroll in and optionally pay for when enrolling.
Review activities under “Activities -> Activity list”, open settings for the activities mentioned above, go to the bottom of the page where there is a box called “Invoicing / Billing”, and tick the ways members should pay for that activity.
If you are unsure which activities members can enroll in, click “Member Portal -> Show member portal” in the menu on the left, then “Enrollment” in the Member Portal. If you use the homepage module, go to the website and find the enrollment menu item.
When the above has been reviewed, the new payment method/invoice method is ready for members to use.
You should run a test where you send an invoice for 1 DKK to yourself. This requires that you are registered in the member list. The invoice can be created via “Single invoices -> Create new single invoice”, and it is important that the “Invoice method” field is set to the new payment method/invoice method.
When payment is completed, it should appear immediately under “Member payments -> Payments”. This applies at least to card payment or MobilePay payment (integrated payment and/or recurring payment). If payment is with a +71 code line, it takes 1–2 banking days before the payment is registered in the system.
Sender email
When email is sent from the system, these emails must have a sender email address. This email address is noreply@memberorganizer.com. This is usually not the email address members see when they receive an email from you sent from the system. For members it will look as if the email comes from your association, and if a member replies to an email, the reply is sent to an email address you choose yourself. Typically this is the email address of the person in your association who sent the email.
A little technical detail
It is becoming harder and harder to send bulk emails, because email is often used to “spam” others — that is, send emails to people who do not want to receive them.
However, there are technologies to ensure that legitimate emails reach recipients’ inboxes and are not treated as spam.
MemberOrganizer naturally uses these technologies, so as a MemberOrganizer customer you can in most cases be confident that emails reach members. When you cannot be 100% sure, it is because a spam filter may be triggered by the text the association has written in the email.
In short — without getting too technical — MemberOrganizer uses the following technologies on the email address noreply@memberorganizer.com to ensure emails reach members:
SPF — Sender Policy Framework
DKIM — DomainKeys Identified Mail
DMARC — Domain-based Message Authentication, Reporting & Conformance
Dedicated IP address emails are sent from
It sounds very technical, and it is very technical.